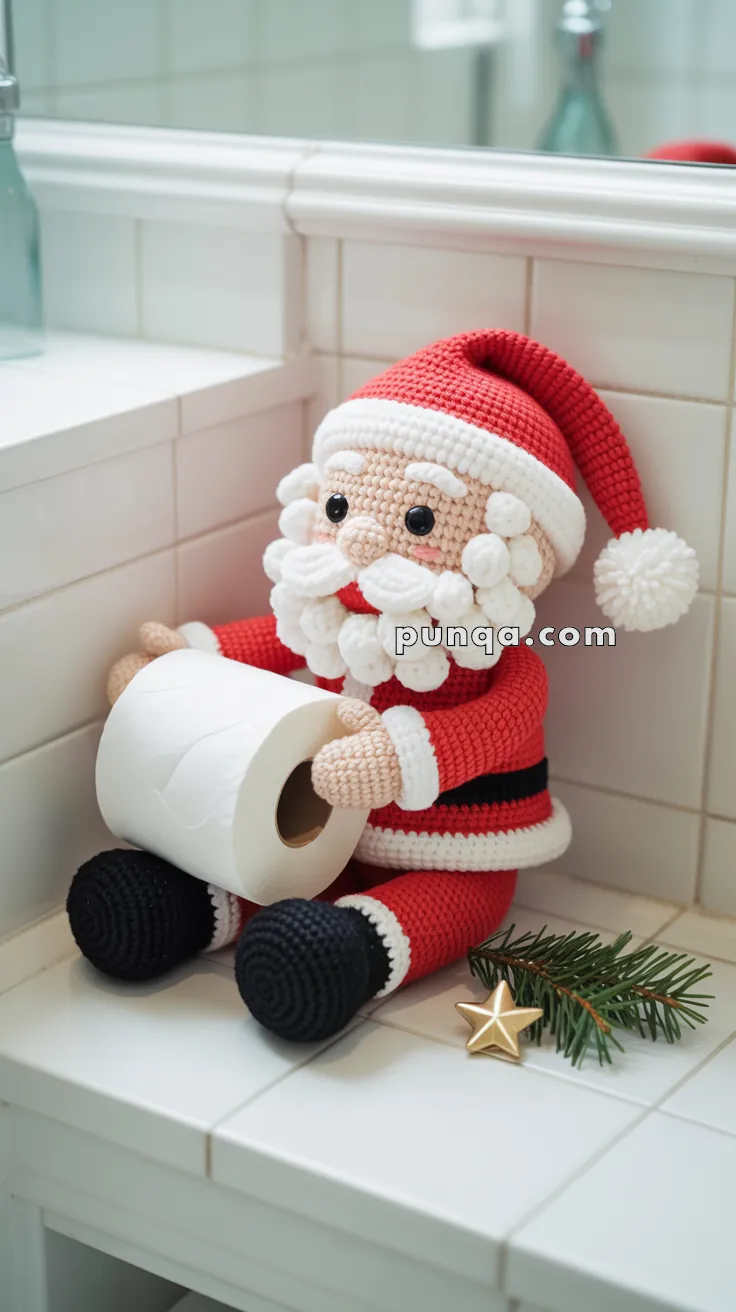
Get ready to deck the halls—and your bathroom—with the Amigurumi Santa Toilet Paper Holder, a festive crochet project that brings jolly cheer to even the most unexpected corner of your home! 🎅🧶 With his rosy cheeks, fluffy beard, and classic red suit, this Santa is more than just adorable—he’s also delightfully practical. Whether you’re prepping for holiday guests or just adding a playful touch to your seasonal décor, this merry little holder is sure to spark smiles.
Perfect for crocheters who love whimsical designs and holiday fun, this pattern invites you to explore bright colors, cozy textures, and charming details. Add a tiny gift sack, stitch on twinkling eyes, or personalize Santa’s outfit for extra flair. The Amigurumi Santa Toilet Paper Holder is a joyful way to stitch up laughter, warmth, and a sprinkle of handmade holiday magic—one loop at a time! 🧵🎄
🎅 Amigurumi Santa Toilet Paper Holder Crochet Pattern
Make your bathroom merry this holiday season with this adorable Santa Claus Toilet Paper Holder! With his bright red suit, fluffy bobble-stitch beard, and jolly smile, he’s both functional and festive. This cheerful Santa will happily hold a roll of toilet paper and spread holiday giggles to anyone who visits.
✨ Skill Level
Intermediate – You’ll need to be comfortable with color changes, bobble stitches, and assembling multiple parts.
📏 Finished Size
Approximately 28–30 cm (11–12 inches) tall when made with DK or worsted weight yarn and a 3.0–3.5 mm hook.
🧶 Materials Needed
Yarn (DK or Worsted Weight)
- Red: 150g (hat, coat, pants)
- White: 80g (beard, mustache, hat trim, cuffs, boot trim)
- Black: 50g (boots, belt)
- Peach/Skin Tone: 40g (face, hands, nose, ears)
Other Supplies
- Crochet hook: 3.0–3.5 mm
- Fiberfill stuffing
- 12–14 mm black safety eyes (or embroider)
- Red and black embroidery thread (for mouth and details)
- Tapestry needle & stitch markers
- Optional: craft wire to reinforce arms for roll support
🧵 Abbreviations (US Terms)
- MR = Magic Ring
- sc = single crochet
- inc = increase (2 sc in same stitch)
- dec = decrease (sc2tog)
- sl st = slip stitch
- ch = chain
- st = stitch
- BLO = back loop only
- Bobble = 5 dc cluster in the same stitch (yarn over, insert hook, pull up loop, yarn over, pull through 2 loops – repeat 4 more times in same stitch, then yarn over and pull through all 6 loops on hook)
🧑🎄 Pattern Instructions
Head (Peach/Skin Tone)
- MR 6 [6]
- inc ×6 [12]
- (sc, inc) ×6 [18]
- (2 sc, inc) ×6 [24]
- (3 sc, inc) ×6 [30]
- (4 sc, inc) ×6 [36]
- (5 sc, inc) ×6 [42] 8–16. sc around [42]
- (5 sc, dec) ×6 [36]
- (4 sc, dec) ×6 [30]
- (3 sc, dec) ×6 [24]
👉 Insert safety eyes between rounds 11–12, approximately 9 stitches apart.
- (2 sc, dec) ×6 [18]
Stuff head firmly.
- (sc, dec) ×6 [12]
- dec ×6 [6]
Fasten off, leaving a long tail. Weave through remaining stitches and pull tight to close.
Nose (Peach)
- MR 6 [6] 2–3. sc around [6]
Fasten off, leaving a long tail for sewing. Stuff lightly and sew centered between and slightly below the eyes.
Ears (Make 2, Peach)
- MR 6 [6]
- sc around [6]
Fasten off, leaving a tail. Flatten slightly and sew to sides of head at eye level.
Beard Bobbles (White)
Make 18–22 individual bobbles for full, cloud-like coverage:
- MR
- Work 1 bobble stitch (5 dc cluster) into the ring
- Pull ring tight, ch 1, fasten off, leaving a 15 cm tail for sewing
Arrange bobbles around the lower half of face (covering chin, jawline, and lower cheeks) in 3–4 overlapping rows to create a dimensional, puffy beard. Sew securely, allowing bobbles to stand out from the face.
Mustache (White – Make 2 Puff Pieces)
- MR
- Work 4 bobbles into the ring, sl st to first bobble to join
- Fasten off, leaving a long tail
Sew both pieces under the nose, angled slightly outward and upward in a gentle curve to create the mustache shape.
Smile (Red Embroidery)
Using red yarn or embroidery thread, embroider a small curved smile beneath the mustache, approximately 1–1.5 cm wide.
Eyebrows (White – Make 2)
- Ch 7
- sc in 2nd ch from hook and across (6 sc total)
Fasten off, leaving a tail. Sew in gentle arches above each eye.
Hat (Red with White Trim)
Start with red:
- MR 6 [6]
- inc ×6 [12]
- (sc, inc) ×6 [18]
- (2 sc, inc) ×6 [24]
- (3 sc, inc) ×6 [30]
- (4 sc, inc) ×6 [36]
- (5 sc, inc) ×6 [42]
- (6 sc, inc) ×6 [48] 9–22. sc around [48]
Switch to white:
23–25. sc around [48]
Fasten off, leaving a tail for sewing. The hat should be floppy and slouchy.
Hat Pom-Pom (White)
- MR 6 [6]
- inc ×6 [12]
- sc around [12]
Stuff lightly.
- dec ×6 [6]
Fasten off. Weave through remaining stitches and pull tight. Sew to the tip of the hat.
Body (Red with Black Belt)
Start with red:
- MR 6 [6]
- inc ×6 [12]
- (sc, inc) ×6 [18]
- (2 sc, inc) ×6 [24]
- (3 sc, inc) ×6 [30]
- (4 sc, inc) ×6 [36]
- (5 sc, inc) ×6 [42] 8–10. sc around [42]
- (6 sc, inc) ×6 [48] 12–17. sc around [48]
Switch to black (belt):
18–19. sc around [48]
Switch to red:
20–23. sc around [48]
Switch to white (bottom trim):
24–25. sc around [48]
Fasten off, leaving a tail. Stuff body firmly to create a rounded, barrel-like shape.
Legs (Make 2 – Black Boots to Red Pants)
Start with black:
- MR 6 [6]
- inc ×6 [12]
- (sc, inc) ×6 [18]
- (2 sc, inc) ×6 [24] 5–7. sc around [24]
Switch to white (boot trim):
8–9. sc around [24]
Switch to red (pants):
10–18. sc around [24]
Fasten off, leaving a long tail. Stuff legs firmly and sew to the bottom of the body, positioning them angled forward and slightly apart for stability when sitting.
Arms with Detailed Hands (Make 2 – Peach Hand to Red Sleeve)
Start with peach (hand and fingers):
- MR 6 [6]
- inc ×6 [12]
- sc around [12]
Finger/Thumb Round (creates 3 finger bumps):
- sc 2, work 1 bobble (3 dc cluster) in next st, sc 3, work 1 bobble in next st, sc 3, work 1 bobble in next st, sc 1 Note: You still have 12 stitches, but 3 of them are now bobbles that protrude outward like fingers.
5–6. sc around, working into the top of each bobble as if it were a regular stitch [12]
Switch to red (sleeve):
7–14. sc around [12]
Switch to white (cuff):
15–16. sc around [12]
Fasten off, leaving a long tail. Stuff lightly, keeping the hand area soft and pliable so the fingers remain puffy but flexible.
💡 Positioning Note: When attaching arms, position them angled forward at shoulder height with the finger bobbles facing inward toward each other, ready to grip the sides of the toilet paper roll.
Belt (Black)
- Ch 50 (or adjust length to fit snugly around the body at the black belt rounds)
- Row 1: sc in 2nd ch from hook and across [49]
- Row 2: ch 1, turn, sc across [49]
Fasten off. Wrap around the body at rounds 18–19 (black section) and sew ends together at the back.
Belt Buckle (Optional – Yellow or Gold):
- Ch 6
- Rows 1–3: sc in 2nd ch from hook and across [5], ch 1, turn
Fasten off. Sew to the center front of the belt.
🎀 Assembly Instructions
- Attach head to the top of the body using the long tail from the head. Sew securely all around the neck, ensuring head doesn’t wobble.
- Position and sew hat on the head, tilted slightly to one side for a cheerful look. Attach the pom-pom to the tip of the hat.
- Create the beard by sewing 18–22 white bobbles around the lower half of the face. Start at the jawline and work up toward the lower cheeks in overlapping layers for a fluffy, cloud-like effect. Leave the area directly under the nose clear for the mustache.
- Attach mustache pieces directly under the nose, positioning them to curve gently outward.
- Sew eyebrows above the eyes in gentle arches using the white pieces.
- Embroider the smile beneath the mustache using red yarn or embroidery thread.
- Attach legs to the bottom of the body, positioning them wide and angled forward so Santa can sit stably without tipping backward.
- Attach arms to the sides of the body at shoulder level (approximately at rounds 5–7 from the top of the body). Angle the arms forward so the hands meet in front of the body. Test the positioning with a toilet paper roll to ensure the hands can grip it properly.
- Wrap and sew the belt around the waist at the black rounds (18–19), securing the ends at the back. Add the belt buckle to the center front if desired.
🌟 Finishing Touches
- Fluff and shape the beard bobbles for maximum volume and dimension
- Adjust arm positioning to ensure they securely grip the toilet paper roll
- Optional: Add rosy cheeks with pink fabric paint, chalk, or blush
- Optional: Insert bendable craft wire through the arms before stuffing for adjustable positioning
- Optional: Use black embroidery thread to add a subtle line beneath the smile or add small stitches to define the mouth corners
🎉 Your Santa Toilet Paper Holder is Complete!
This jolly Santa is the perfect way to add Christmas cheer to your bathroom. Whether for guests or just to make the family smile, he’s guaranteed to spread festive joy throughout the holiday season!