Welcome to the rugged and majestic world of safari-inspired amigurumi! 🦏✨ Today, I’m excited to share my free crochet pattern for a charming Rhinoceros—an iconic and powerful creature, full of character and strength! 🌿 Whether you love crafting bold animal designs, enjoy making unique stuffed companions, or simply want to add a touch of the wild to your handmade collection, this pattern will guide you through stitching up a beautifully detailed rhino with its signature horn and sturdy frame! 💜
This design embraces strong shapes and textured details to capture the essence of this magnificent creature! 🧶🏞️ I’ve outlined each step to ensure your amigurumi rhinoceros turns out just right—perfect for display, gifting, or adding a touch of safari magic to your crochet collection! 🌍 So grab your hooks, choose soft earthy tones or striking grays, and let’s stitch up a lovable, adventure-ready rhino! ✨
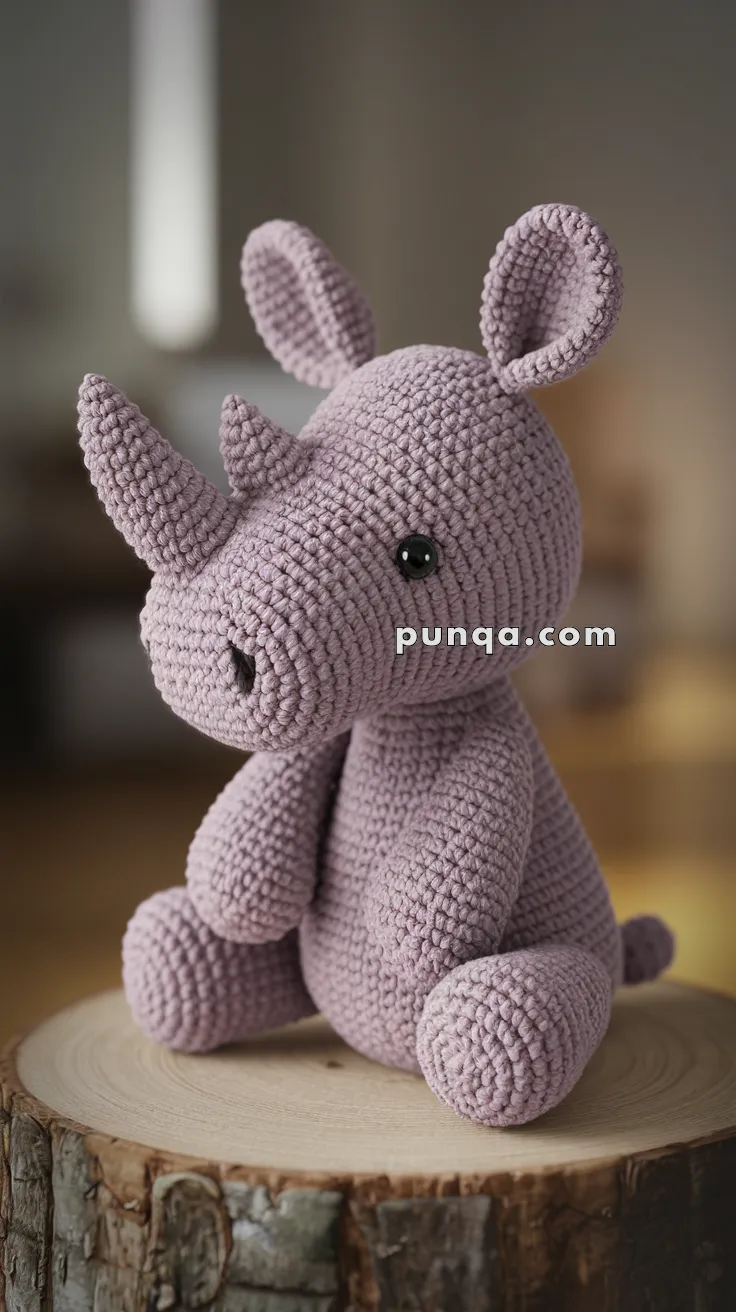
🦏 Amigurumi Rhino Crochet Pattern
Meet your new gentle safari friend! This soft, chubby little rhino sits adorably on its rounded haunches with two perfectly tapered horns, oversized cup-shaped ears, and a squishy barrel body. The smooth stitch texture and simple shaping make this project relaxing, rewarding, and irresistibly cute.
This rhino works beautifully as nursery décor, a sweet gift, or a charming handmade keepsake.
✨ Skill Level
Intermediate – Uses shaping, simple sculpting, and basic amigurumi assembly.
📏 Finished Size
Approx. 9 in (23 cm) tall when made with worsted-weight yarn and a 3.5 mm hook.
🧶 Materials
-
Worsted Weight Yarn
-
Light purple, lilac, or soft grey (main color)
-
Black or dark grey (nostrils, optional detail)
-
-
3.5 mm crochet hook
-
10–12 mm safety eyes
-
Polyester stuffing
-
Tapestry needle
-
Stitch marker
-
Scissors
🧵 Abbreviations (US Terms)
-
MR – Magic Ring
-
sc – Single Crochet
-
inc – Increase (2 sc in same stitch)
-
dec – Decrease (sc2tog)
-
ch – Chain
-
sl st – Slip Stitch
-
FO – Fasten Off
🟣 Head
The rhino’s head is large, round, and slightly pear-shaped, with a smooth transition into the snout.
Using main color:
-
MR, 6 sc (6)
-
inc ×6 (12)
-
(1 sc, inc) ×6 (18)
-
(2 sc, inc) ×6 (24)
-
(3 sc, inc) ×6 (30)
-
(4 sc, inc) ×6 (36)
7–13. sc around (36) -
(4 sc, dec) ×6 (30)
-
(3 sc, dec) ×6 (24)
-
Insert safety eyes between R10–11, leaving 8 stitches between them
-
(2 sc, dec) ×6 (18)
-
(1 sc, dec) ×6 (12)
-
dec ×6 (6)
Stuff firmly and close the opening. FO.
🦏 Large Horn
The long horn has a smooth, tall taper as seen in the reference.
Using main color:
-
MR, 4 sc (4)
-
sc around (4)
-
(1 sc, inc) ×2 (6)
4–5. sc around (6) -
(2 sc, inc) ×2 (8)
7–8. sc around (8) -
(3 sc, inc) ×2 (10)
10–11. sc around (10)
Stuff lightly — the horn should hold shape but not be overfilled. FO.
🦏 Small Horn
Shorter, rounded, and placed closely behind the large horn.
Using main color:
-
MR, 4 sc (4)
-
sc around (4)
-
(1 sc, inc) ×2 (6)
4–5. sc around (6)
FO, no stuffing needed or just a tiny bit.
🟣 Body
A wide, smooth, barrel-shaped body that sits flat.
Using main color:
-
MR, 6 sc (6)
-
inc ×6 (12)
-
(1 sc, inc) ×6 (18)
-
(2 sc, inc) ×6 (24)
-
(3 sc, inc) ×6 (30)
-
(4 sc, inc) ×6 (36)
7–24. sc around (36) -
(4 sc, dec) ×6 (30)
-
(3 sc, dec) ×6 (24)
-
(2 sc, dec) ×6 (18)
-
(1 sc, dec) ×6 (12)
-
dec ×6 (6)
Stuff firmly and FO.
🦵 Legs – Make 4
The legs are short, rounded cylinders, perfect for the sitting pose.
-
MR, 6 sc (6)
-
inc ×6 (12)
3–6. sc around (12) -
(2 sc, dec) ×3 (9)
8–9. sc around (9)
Stuff and FO.
Attach:
-
Two legs at the base of the body (front legs angled slightly forward).
-
Two legs on each side, positioned low for a natural sitting posture.
👂 Ears – Make 2
Oversized, cupped ears that tilt gently forward.
-
MR, 4 sc (4)
-
inc ×4 (8)
-
(1 sc, inc) ×4 (12)
-
(2 sc, inc) ×4 (16)
5–6. sc around (16) -
(2 sc, dec) ×4 (12)
-
(1 sc, dec) ×4 (8)
FO.
Do not pinch shut — keep the natural open cup shape.
Sew ears high and toward the back of the head, slightly angled forward.
🦶 Tail (Tiny Stub)
-
ch 3
-
sl st back through each chain
FO and sew to lower back of body.
✂️ Final Assembly
-
Sew the head to the body, keeping a slight forward tilt.
-
Attach the large horn centered on the forehead.
-
Sew the small horn directly behind it, very close.
-
Place and sew all four legs securely.
-
Sew the ears high and back on the head.
-
Using black yarn, embroider:
-
A small nose point
-
Optional tiny mouth stitch
-
-
Shape gently with your hands.
💡 Customization Ideas
-
Use grey for a realistic rhino or pastel colors for a whimsical one.
-
Stitch little toes on the feet.
-
Add a tuft of yarn fluff at the tail.
🧸 Your Rhino Is Ready!
Soft, plump, and full of personality, your handmade rhino is ready to take center stage on any shelf or snuggle corner. This project combines simple construction with irresistible cuteness — perfect for gifting or keeping!