Whip up a dash of culinary cuteness with this Amigurumi Rat with Spoon crochet pattern! Inspired by the charm of kitchen-loving critters, this adorable rat comes complete with a big personality and an even bigger spoon—ready to stir up some handmade magic. Whether you’re crafting for a foodie friend, adding to a whimsical plushie collection, or simply indulging in a playful project, this little chef is sure to bring smiles and squeaks of delight with every stitch. 🧶🐭🥄
Designed for fun and flair, this pattern invites you to explore expressive features, cozy textures, and sweet extras like a chef’s hat, apron, or even a tiny pot of yarn “soup.” Customize your rat with favorite colors or add embroidered details to reflect your own kitchen style. Whether perched on a shelf, nestled in a gift basket, or starring in a handmade culinary scene, this Rat with Spoon Amigurumi is a joyful and satisfying project—perfect for stitching up a little handmade flavor, one loop at a time! 💖✨🍲
🐭 Amigurumi Rat with Spoon Crochet Pattern
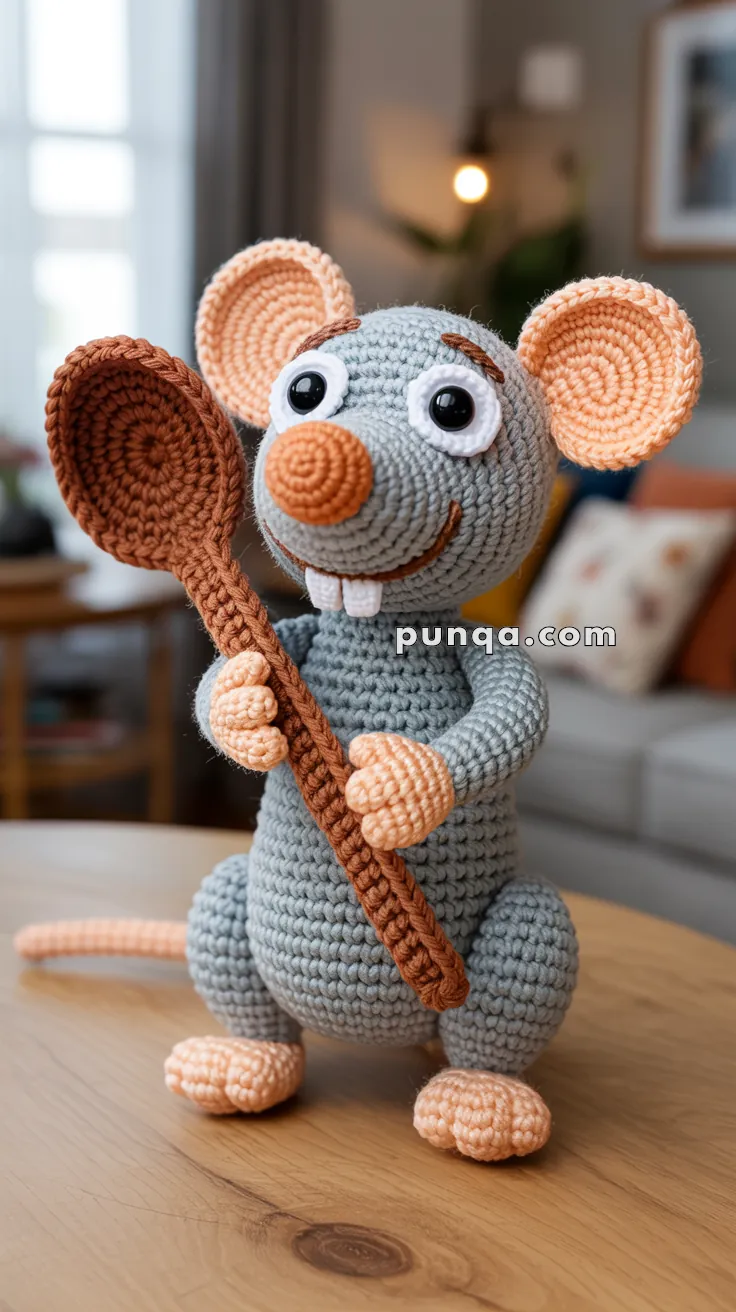
Meet your new kitchen companion — an adorable crocheted rat holding a wooden spoon! With oversized spiral ears, long limbs, expressive eyes, and a curled tail, this charming rat is perfect for display, gifting, or adding personality to any craft room or kitchen shelf. This pattern uses simple stitches with thoughtful shaping to recreate the look and personality seen in the photo.
✨ Skill Level
Intermediate
Includes spherical shaping, spiral ears, toe and finger construction, layered facial elements, and accessory building.
📏 Finished Size
Approximately 27–30 cm (10.5–12 inches) tall
Using DK yarn and a 2.5–3.0 mm hook.
🧶 Materials & Required Yarn Amount
DK weight yarn:
Light Warm Gray (head, body, arms, legs, outer ears) – 170 g
Soft Peach (inner ears, nose, hands, toes, feet soles, tail) – 110 g
Medium Brown (spoon, eyebrows, mouth) – 50 g
White (eye surrounds, teeth) – 30 g
12 mm black safety eyes
Polyester stuffing
Tapestry needle
Stitch marker
Optional thin wire for tail shaping
Work tightly for firm shaping and defined toes/fingers.
🧵 Abbreviations (US Terms)
MR – magic ring
sc – single crochet
inc – increase
dec – invisible decrease
sl st – slip stitch
ch – chain
FO – fasten off
Work in continuous rounds unless noted.
🧠 Head (Perfect Sphere)
With Light Gray:
Rnd 1: MR 6 (6)
Rnd 2: inc ×6 (12)
Rnd 3: (sc, inc) ×6 (18)
Rnd 4: (2 sc, inc) ×6 (24)
Rnd 5: (3 sc, inc) ×6 (30)
Rnd 6: (4 sc, inc) ×6 (36)
Rnd 7: (5 sc, inc) ×6 (42)
Rnd 8–14: sc 42
Insert safety eyes between R10–11, spaced 11–12 stitches apart.
Rnd 15: (5 sc, dec) ×6 (36)
Rnd 16: (4 sc, dec) ×6 (30)
Rnd 17: (3 sc, dec) ×6 (24)
Stuff firmly.
Rnd 18: (2 sc, dec) ×6 (18)
Rnd 19: (sc, dec) ×6 (12)
Rnd 20: dec ×6 (6)
FO and close.
The head must remain round and smooth.
👃 Nose
With Soft Peach:
Rnd 1: MR 6
Rnd 2: inc ×6 (12)
Rnd 3: (sc, inc) ×6 (18)
Rnd 4: sc 18
Lightly stuff and FO.
Sew centered below eye line.
👀 Eye Surrounds (Make 2)
With White:
Rnd 1: MR 6
Rnd 2: inc ×6 (12)
Rnd 3: sc 12
FO and sew behind safety eyes.
🦷 Teeth (Make 2)
With White:
Ch 3
sc in 2nd ch, sc in next
FO.
Sew side-by-side under nose.
👂 Ears (Outer Gray + Inner Peach)
Outer Ear (Make 2 – Gray)
Rnd 1: MR 6
Rnd 2: inc ×6 (12)
Rnd 3: (sc, inc) ×6 (18)
Rnd 4: (2 sc, inc) ×6 (24)
Rnd 5: (3 sc, inc) ×6 (30)
FO.
Inner Ear (Make 2 – Peach)
Rnd 1: MR 6
Rnd 2: inc ×6 (12)
Rnd 3: (sc, inc) ×6 (18)
Rnd 4: (2 sc, inc) ×6 (24)
FO.
Sew inner to outer and attach high on head.
🧍 Body (Cylindrical)
With Light Gray:
Rnd 1: MR 6
Rnd 2: inc ×6 (12)
Rnd 3: (sc, inc) ×6 (18)
Rnd 4: (2 sc, inc) ×6 (24)
Rnd 5: (3 sc, inc) ×6 (30)
Rnd 6: (4 sc, inc) ×6 (36)
Rnd 7–20: sc 36
Rnd 21: (4 sc, dec) ×6 (30)
Rnd 22–24: sc 30
Stuff firmly.
Rnd 25: (3 sc, dec) ×6 (24)
Rnd 26: (2 sc, dec) ×6 (18)
Rnd 27: (sc, dec) ×6 (12)
Rnd 28: dec ×6 (6)
FO.
🦵 Upper Legs (Make 2)
With Light Gray:
Rnd 1: MR 6
Rnd 2: (sc, inc) ×3 (9)
Rnd 3–9: sc 9
Light stuffing.
FO.
🦶 Feet with 3 Toes (Make 2)
Main Foot (Peach Sole + Gray Top)
With Soft Peach:
Ch 7.
Rnd 1: sc in 2nd ch, sc 4, 3 sc in last ch; rotate, sc 4, inc (14)
Rnd 2: inc, sc 4, inc ×3, sc 4, inc ×2 (20)
Rnd 3: sc 20
Switch to Light Gray:
Rnd 4–5: sc 20
Stuff lightly and flatten slightly.
FO.
Toes (Make 3 per foot – Peach)
Rnd 1: MR 5
Rnd 2: (sc, inc) ×2, sc (7)
Rnd 3: sc 7
Lightly stuff.
FO.
Sew three toes evenly spaced across the front of each foot.
Attach legs to feet, then sew to body.
💪 Arms with 3 Fingers (Make 2)
Hand Base (Peach)
Rnd 1: MR 6
Rnd 2: (sc, inc) ×3 (9)
Rnd 3: sc 9
Fingers (Make 3 per hand – Peach)
Rnd 1: MR 4
Rnd 2: (sc, inc) ×2 (6)
Rnd 3: sc 6
Light stuffing.
FO.
Sew three fingers to front of hand base in slight curve.
Arm (Gray)
Join gray yarn to hand base.
Rnd 1–10: sc 9
Light stuffing.
FO.
Arms should bend slightly inward to grip spoon handle.
🐀 Tail
With Soft Peach:
Rnd 1: MR 5
Rnd 2–35: sc 5
Optional wire for shaping.
FO and sew low on back.
🥄 Wooden Spoon
Bowl (Brown)
Rnd 1: MR 6
Rnd 2: inc ×6 (12)
Rnd 3: (sc, inc) ×6 (18)
Rnd 4: (2 sc, inc) ×6 (24)
Rnd 5–6: sc 24
Flatten slightly and FO.
Handle (Brown)
Rnd 1: MR 6
Rnd 2–32: sc 6
FO.
Sew handle to bowl securely.
😊 Facial Embroidery
With Brown yarn:
• Stitch thick curved eyebrows
• Add wide curved smile
Keep expression friendly and playful.
🧷 Final Assembly
- Sew head to body.
- Attach ears high and symmetrical.
- Add nose and teeth.
- Attach legs and feet securely.
- Position arms gripping spoon diagonally.
- Attach tail and curve gently.
Ensure toes and fingers are evenly spaced and slightly rounded for natural shaping.
🐭 A Charming Kitchen Companion
With its oversized spiral ears, bright eyes, defined three-fingered hands, three-toed feet, and sturdy wooden spoon, this standing rat radiates personality and warmth. The clean spherical shaping and carefully sculpted details create a lively, expressive character perfect for display.
Place it in a kitchen nook, on a craft shelf, or gift it to someone who appreciates handmade charm. Every stitch adds character, and every detail brings this playful rat to life.
Happy crocheting! 🧶✨