Whip up a dash of culinary cuteness with this Amigurumi Rat with Spoon crochet pattern! Inspired by the charm of kitchen-loving critters, this adorable rat comes complete with a big personality and an even bigger spoon—ready to stir up some handmade magic. Whether you’re crafting for a foodie friend, adding to a whimsical plushie collection, or simply indulging in a playful project, this little chef is sure to bring smiles and squeaks of delight with every stitch. 🧶🐭🥄
Designed for fun and flair, this pattern invites you to explore expressive features, cozy textures, and sweet extras like a chef’s hat, apron, or even a tiny pot of yarn “soup.” Customize your rat with favorite colors or add embroidered details to reflect your own kitchen style. Whether perched on a shelf, nestled in a gift basket, or starring in a handmade culinary scene, this Rat with Spoon Amigurumi is a joyful and satisfying project—perfect for stitching up a little handmade flavor, one loop at a time! 💖✨🍲
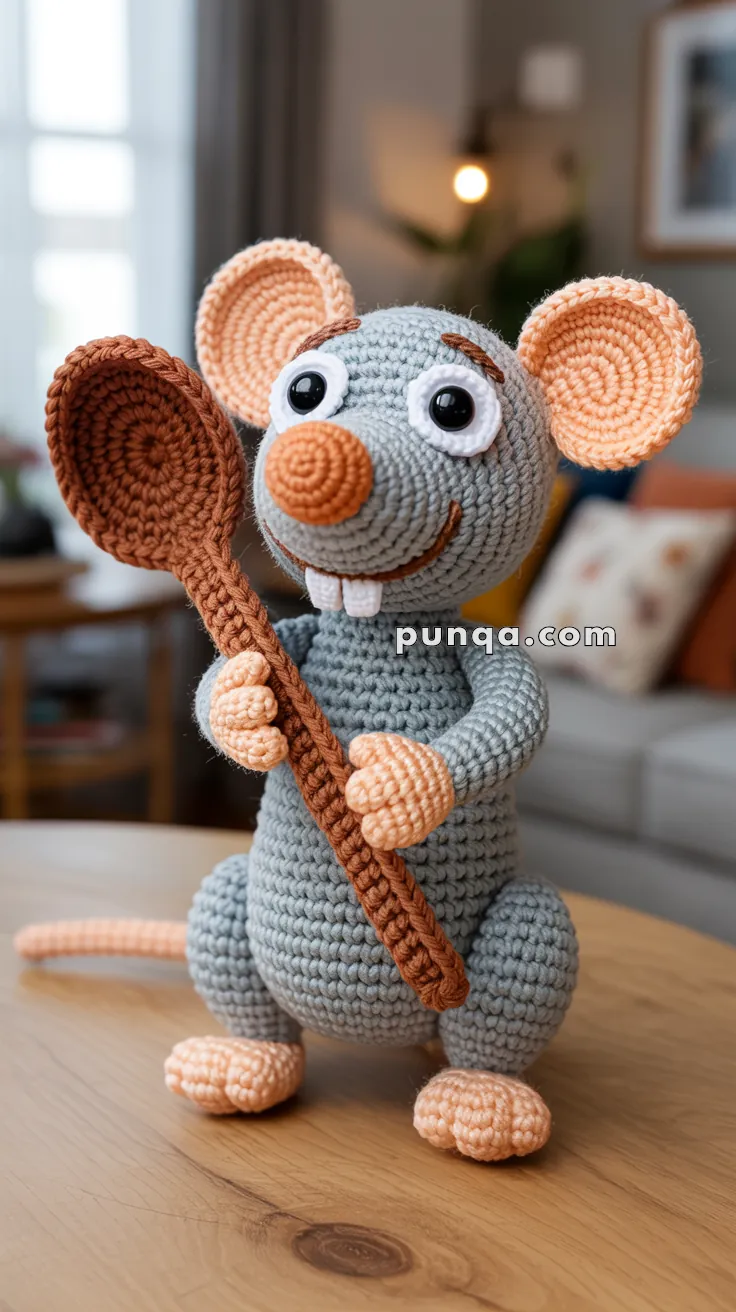
🐭 Amigurumi Rat with Spoon Crochet Pattern
Meet your new kitchen companion — an adorable crocheted rat holding a wooden spoon! With oversized spiral ears, long limbs, expressive eyes, and a curled tail, this charming rat is perfect for display, gifting, or adding personality to any craft room or kitchen shelf. This pattern uses simple stitches with thoughtful shaping to recreate the look and personality seen in the photo.
✨ Skill Level
Intermediate – includes shaping, sculpted features, fingers/toes, and accessory assembly.
📏 Finished Size
Approx. 27–30 cm (10.5–12 in) tall
🧶 Materials & Yarn Amount
DK weight yarn:
- Light warm gray: 170 g (head, snout, body, arms, legs)
- Soft peach: 110 g (nose tip, ears, hands, feet, tail)
- Medium brown: 50 g (spoon, facial embroidery)
- White: 30 g (eye surrounds, teeth)
You’ll also need:
- 10–12 mm safety eyes
- Polyester stuffing
- Yarn needle
- Stitch marker
- Optional thin wire for tail
🔤 Abbreviations
MR – magic ring
sc – single crochet
inc – increase
dec – invisible decrease
ch – chain
sl st – slip stitch
FO – fasten off
🧠 Head with Rounded Snout
With light gray yarn:
R1: MR, 6 sc (6)
R2: inc ×6 (12)
R3: (sc, inc) ×6 (18)
R4: (2 sc, inc) ×6 (24)
R5: (3 sc, inc) ×6 (30)
R6: (4 sc, inc) ×6 (36)
R7: (5 sc, inc) ×6 (42)
🐭 Snout Extension (Smooth Dome)
R8: (sc 6, inc) ×6 (48)
R9–12: sc around (48)
👉 This creates a rounded forward snout dome, not a sharp cone.
Insert eyes between R10–11, spaced 10–11 stitches apart.
Shape back of head
R13: (6 sc, dec) ×6 (42)
R14: (5 sc, dec) ×6 (36)
R15: (4 sc, dec) ×6 (30)
R16: (3 sc, dec) ×6 (24)
Stuff firmly, shaping the snout outward.
R17: (2 sc, dec) ×6 (18)
R18: (sc, dec) ×6 (12)
R19: dec ×6 (6)
FO and close.
👃 Nose Tip (Peach Spiral)
With soft peach yarn:
R1: MR, 6 sc
R2: inc ×6 (12)
R3: (sc, inc) ×6 (18)
R4–6: sc around (18)
Lightly stuff.
FO.
Spiral shaping detail
Using yarn tail, embroider a spiral from center outward across the nose surface.
Sew firmly onto front of snout.
👉 This creates the signature raised spiral nose.
👀 Eye Surrounds (Make 2)
With white yarn:
R1: MR, 6 sc
R2: inc ×6 (12)
R3: sc around (12)
FO.
Attach behind safety eyes for a bold raised look.
🦷 Teeth (Make 2)
Ch 3
sc in 2nd ch, sc next
FO.
Sew directly under nose, slightly spaced.
👂 Ears (Large & Open)
Outer (Gray – Make 2)
R1: MR, 6 sc
R2: inc ×6 (12)
R3: (sc, inc) ×6 (18)
R4: (2 sc, inc) ×6 (24)
R5: (3 sc, inc) ×6 (30)
FO.
Inner (Peach – Make 2)
R1: MR, 6 sc
R2: inc ×6 (12)
R3: (sc, inc) ×6 (18)
R4: (2 sc, inc) ×6 (24)
FO.
Sew inner pieces onto outer ears.
Attach high and slightly forward.
🧍 Body (Rounded Belly Shape)
With gray yarn:
R1: MR, 6 sc
R2: inc ×6 (12)
R3: (sc, inc) ×6 (18)
R4: (2 sc, inc) ×6 (24)
R5: (3 sc, inc) ×6 (30)
R6: (4 sc, inc) ×6 (36)
R7–16: sc around (36)
R17: (4 sc, dec) ×6 (30)
R18–20: sc around (30)
Stuff firmly to create round belly.
R21: (3 sc, dec) ×6 (24)
R22: (2 sc, dec) ×6 (18)
R23: (sc, dec) ×6 (12)
R24: dec ×6 (6)
FO.
🦵 Legs (Make 2 – Rounded Sitting Shape)
R1: MR, 6 sc
R2: inc ×6 (12)
R3: (1 sc, inc) ×6 (18)
R4–8: sc around (18)
Stuff firmly.
FO.
Attach at front-bottom for seated look.
🦶 Feet (Peach – Flattened)
Ch 7
R1: sc 5, 3 sc end, sc 4, inc (14)
R2: inc, sc 4, inc ×3, sc 4, inc ×2 (20)
R3–4: sc around (20)
Light stuffing and flatten.
👣 Toes (Make 3 per foot)
MR 5
R2: (sc, inc) ×2, sc (7)
R3: sc around
Attach evenly.
💪 Arms with Fingers
Hand Base (Peach)
MR 6
R2: (sc, inc) ×3 (9)
R3–4: sc around
Fingers (Make 3 per hand)
MR 4
R2: (sc, inc) ×2 (6)
R3: sc around
Attach in slight curve.
Arm (Gray)
Join gray yarn:
R1–11: sc around (9)
Light stuffing.
🐀 Tail
MR 5
R2–35: sc around (5)
Optional wire for shaping curve.
🥄 Spoon
Bowl
MR 6
R2: inc ×6 (12)
R3: (sc, inc) ×6 (18)
R4: (2 sc, inc) ×6 (24)
R5–6: sc around (24)
Flatten slightly.
Handle
MR 6
R2–32: sc around (6)
Attach to bowl.
🪡 Assembly
- Sew head to body
- Attach ears high and slightly angled
- Sew nose tip onto snout
- Attach eye surrounds and teeth
- Attach legs and feet
- Sew arms inward holding spoon
- Attach tail
🌟 Finishing Touches
- Embroider curved smile and brows
- Shape snout outward with fingers
- Position hands gripping spoon naturally
- Adjust ears for expression
💛 Final Thoughts
This amigurumi rat stands out with its rounded snout, spiral nose detail, oversized ears, and expressive hands. The soft shaping and carefully placed features give it a lively personality full of charm 🐭✨
Take your time with the face and hand positioning—those details bring everything to life.
Happy crocheting 🧶