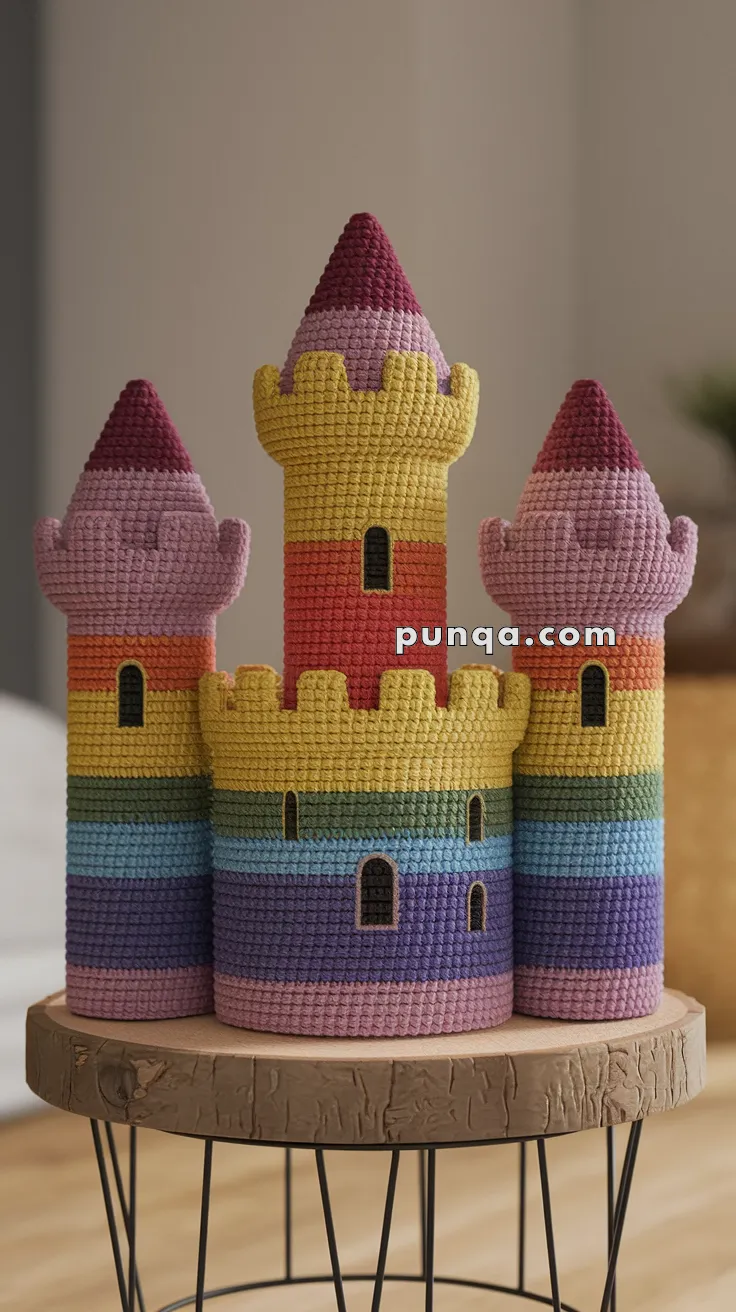
Welcome to the magical and colorful world of amigurumi! 🏰✨ Today, I’m excited to share my free crochet pattern for a Rainbow Castle—a whimsical and enchanting creation perfect for fairy-tale lovers, fantasy-themed collections, or anyone who enjoys crafting vibrant and imaginative plush designs! 🌈 Whether you love stitching up dreamy landscapes, creating detailed and textured structures, or simply want to add a dazzling castle to your handmade lineup, this pattern will guide you through crafting a beautifully sculpted plush with towering spires, flowing banners, and a touch of rainbow magic! 💖
This design embraces bold colors, intricate shaping, and playful details to bring a joyful and fantastical presence to your crochet projects! 🧶✨ I’ve carefully outlined each step to ensure your Amigurumi Rainbow Castle turns out just right—ready to brighten up your collection or become a treasured handmade gift! 🎁 So grab your hooks, pick out radiant reds, sunny yellows, deep blues, and let’s stitch up a mesmerizing rainbow castle! 🏰

🏰 Amigurumi Rainbow Castle – FREE Crochet Pattern
Add magic to your handmade toy collection or nursery decor with this vibrant and imaginative Amigurumi Rainbow Castle! Featuring three towers, rainbow layers, and playful details, this soft structure is perfect for whimsical storytelling or colorful displays.
✨ Skill Level
Intermediate – Includes color changes, tube shaping, crenellation edges, and basic structural assembly.
📏 Finished Size
Approx. 25–30 cm (10–12 in) tall when using worsted weight yarn and a 3.0 mm hook.
🧶 Materials Needed
Yarn (Worsted weight):
-
Pink, Red, Orange, Yellow, Green, Blue, Purple
-
Dark brown/black for window and door details
Tools & Notions:
-
3.0 mm crochet hook
-
Polyfill stuffing
-
Cardboard or plastic canvas (optional, for base and wall reinforcement)
-
Tapestry needle
-
Stitch marker
-
Hot glue (optional, for reinforcement)
🧵 Abbreviations (US Terms)
MR – Magic Ring
sc – Single Crochet
inc – Increase
dec – Decrease
sl st – Slip Stitch
ch – Chain
BLO – Back Loop Only
FLO – Front Loop Only
FO – Fasten Off
🧱 Castle Base (Main Cylinder)
Base Circle (work in rounds, starting with pink)
-
MR, 6 sc
-
inc x6 (12)
-
(1 sc, inc) x6 (18)
-
(2 sc, inc) x6 (24)
-
(3 sc, inc) x6 (30)
-
(4 sc, inc) x6 (36)
-
(5 sc, inc) x6 (42)
Continue increasing until desired diameter (~72–84 sts total depending on size)
Side Walls
Switch to working in BLO to form side walls.
8–30. sc around (no increases)
-
Change colors every 4–5 rounds to create rainbow layers.
-
Order: pink → purple → blue → green → yellow
🧱 Crenellated Top
Work evenly on last round of base wall:
-
(sc in next 6, ch 2, skip 2) repeat around
-
sc in each st and ch space
FO and weave in ends.
🗼 Side Towers (Make 2 – Smaller)
Repeat base pattern with smaller circle (up to 48 sts).
1–20. sc around, changing color every 3–4 rounds.
Top 5 rounds in pink for tower top base.
Turrets:
-
ch 20, join to form ring
2–4. sc around -
(sc in next 2, inc) around
6–10. sc around – fill and attach to top of tower.
🗼 Center Tower (Taller)
Same base circle as side towers.
1–28. sc around for height
Last 5–6 rounds in red and yellow.
Add crenellation like main wall.
Attach to center of main base.
🎪 Roof Cones (Make 3)
Start with maroon (point color):
-
MR, 6 sc
-
sc around
-
(1 sc, inc) x3 (9)
-
sc around
Continue increasing 3–6 sts per round evenly
Switch colors gradually from maroon → pink
Stop when diameter matches tower top
Stuff lightly and sew onto tower
🚪 Windows and Doors (Felt or Embroidered)
Option 1: Crochet
-
With black/brown yarn, ch 6, turn and sc back and forth 3 rows.
-
Shape into arches with sl sts and sew on
Option 2: Felt Cutouts
-
Cut door and windows from felt
-
Use hot glue or sew on carefully
🧷 Assembly Instructions
-
Sew all towers to the base (side towers go left and right, center tower at the back center)
-
Attach roofs to each tower
-
Add windows and doors
-
Optionally reinforce the inside with cardboard discs or plastic canvas for structure
-
Weave in all ends
💡 Tips for Structure
-
Use stiff cardboard for a hidden internal base
-
You may add small stones or beans in a sealed pouch inside the base for weight
-
Light wire can be added inside cone edges for sharper structure
This cheerful Rainbow Castle makes a great interactive playset or magical display piece – customize the colors to match a fairy tale or holiday palette and enchant your space! 🌈🏰


