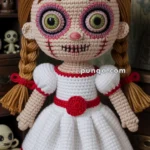
Step into a world of vintage charm with this Amigurumi Raggedy Ann Doll crochet pattern! With her iconic red yarn hair, button eyes, and sweet stitched smile, Raggedy Ann brings timeless warmth and nostalgia to your handmade collection. Whether you’re crafting a heartfelt gift, recreating a childhood memory, or simply love dolls with personality and history, this classic character is sure to tug at your heartstrings—one loop at a time. 🧶❤️👧
Designed for detail and delight, this pattern invites you to explore textured hair, layered clothing, and expressive features that make Raggedy Ann truly special. Customize her dress with your favorite colors, add embroidered accents, or pair her with a matching Raggedy Andy for double the fun. Whether perched on a shelf, nestled in a gift basket, or starring in a handmade storybook scene, this Raggedy Ann Amigurumi is a joyful and satisfying project—perfect for stitching up a little handmade nostalgia, one stitch at a time! 💖✨🪡

🎀 Amigurumi Raggedy Ann Doll Crochet Pattern
Add a classic touch to your handmade doll collection with this sweet amigurumi Raggedy Ann! With her red yarn hair, blue dress, white apron, and charming striped socks, she’s full of vintage whimsy. Perfect for gifting or as a nostalgic keepsake!
✨ Skill Level
Intermediate
Includes shaping, layered clothing, hair attachment, and assembly.
📏 Finished Size
Approximately 28–30 cm (11–12 inches) tall
Using DK weight yarn and 2.5 mm hook.
🧶 Materials and Yarn Requirements
DK weight cotton or acrylic yarn:
- Beige / Skin tone: 60 g (approx. 150 m)
- Red: 55 g (approx. 140 m)
- Light Blue: 50 g (approx. 125 m)
- White: 45 g (approx. 115 m)
- Black: 20 g (approx. 50 m)
- Pink: small amount for cheeks
Additional Supplies:
- 2.5 mm crochet hook
- 10 mm safety eyes
- Fiberfill stuffing (approx. 120 g)
- Yarn needle
- Stitch marker
- Scissors
- Pins for placement
🧵 Abbreviations (US Terms)
MR – magic ring
sc – single crochet
inc – increase
dec – invisible decrease
ch – chain
hdc – half double crochet
dc – double crochet
sl st – slip stitch
BLO – back loop only
FLO – front loop only
FO – fasten off
Work in continuous rounds unless noted.
👧 Head
With beige yarn:
Rnd 1: MR, 6 sc (6)
Rnd 2: inc x6 (12)
Rnd 3: (sc, inc) x6 (18)
Rnd 4: (2 sc, inc) x6 (24)
Rnd 5: (3 sc, inc) x6 (30)
Rnd 6: (4 sc, inc) x6 (36)
Rnd 7: (5 sc, inc) x6 (42)
Rnd 8: (6 sc, inc) x6 (48)
Rnd 9–17: sc around (48)
Rnd 18: (6 sc, dec) x6 (42)
Rnd 19: (5 sc, dec) x6 (36)
Rnd 20: (4 sc, dec) x6 (30)
Rnd 21: (3 sc, dec) x6 (24)
Insert eyes between Rnds 13–14, about 8 stitches apart.
Stuff firmly.
Rnd 22: (2 sc, dec) x6 (18)
Rnd 23: (sc, dec) x6 (12)
Rnd 24: dec x6 (6)
FO and close tightly.
Facial Features
- Embroider small curved red eyebrows above eyes.
- Add short black lashes at outer corners.
- Stitch a red triangle nose centered slightly below eye line.
- Embroider a wide upward smile in black.
- Add circular pink blush patches on both cheeks.
👂 Ears (Make 2)
With beige yarn:
Rnd 1: MR, 6 sc (6)
Rnd 2: inc x6 (12)
FO, flatten lightly. Do not stuff.
Sew at eye level, slightly behind the face center.
💇♀️ Hair Cap
With red yarn:
Rnd 1: MR, 6 sc (6)
Rnd 2: inc x6 (12)
Rnd 3: (sc, inc) x6 (18)
Rnd 4: (2 sc, inc) x6 (24)
Rnd 5: (3 sc, inc) x6 (30)
Rnd 6: (4 sc, inc) x6 (36)
Rnd 7: (5 sc, inc) x6 (42)
Rnd 8: (6 sc, inc) x6 (48)
Rnd 9–11: sc around (48)
FO leaving long tail.
Sew cap covering the top half of the head, stopping just above ear line.
❤️ Hair Strands and Pigtails
Cut 160–200 strands of red yarn, 18–20 cm long.
Attach densely around sides and back of cap using loop method.
Keep forehead edge cleaner so headband lies flat.
Divide into two even pigtails at ear level. Tie securely with red yarn and trim evenly.
💙 Narrow Headband (Photo Accurate)
The headband should be thin and snug — not wide.
With light blue yarn:
Ch 48 (measure around head above eyebrows)
Row 1: sl st in 2nd ch from hook and across (47)
Row 2: ch 1, turn, sl st across (47)
FO leaving tails.
Sew ends together to form a slim band approximately 6–8 mm wide.
Position just behind the front hairline, sitting flat between top hair and pigtails.
👗 Body and Upper Dress
With light blue yarn:
Rnd 1: MR, 6 sc (6)
Rnd 2: inc x6 (12)
Rnd 3: (sc, inc) x6 (18)
Rnd 4: (2 sc, inc) x6 (24)
Rnd 5: (3 sc, inc) x6 (30)
Rnd 6: (4 sc, inc) x6 (36)
Rnd 7–12: sc around (36)
Stuff lightly as you go.
Rnd 13: (5 sc, inc) x6 (42)
Rnd 14–16: sc around (42)
Rnd 17: (5 sc, dec) x6 (36)
Rnd 18: (4 sc, dec) x6 (30)
Rnd 19: (3 sc, dec) x6 (24)
Stuff firmly.
Rnd 20: (2 sc, dec) x6 (18)
FO leaving tail to sew head on.
Attach head securely.
💪 Arms (Make 2)
Hand
With beige yarn:
Rnd 1: MR, 6 sc (6)
Rnd 2: inc x6 (12)
Rnd 3–5: sc around (12)
Sleeve Base
Switch to light blue:
Rnd 6–8: sc around (12)
Puff Sleeve Detail
Rnd 9: (sc, inc) x6 (18)
Rnd 10: BLO sc around (18)
Switch to white:
Rnd 11: sc around (18)
FO leaving tail.
Stuff lower arm only. Sew at shoulder level.
🦵 Legs and Shoes (Make 2)
Shoe
With black yarn:
Rnd 1: MR, 6 sc (6)
Rnd 2: inc x6 (12)
Rnd 3: (sc, inc) x6 (18)
Rnd 4: (2 sc, inc) x6 (24)
Rnd 5: BLO sc around (24)
Rnd 6–7: sc around (24)
Sock
Switch to white:
Rnd 8–11: sc around (24)
Red Stripe Section
Switch to red:
Rnd 12–13: sc around (24)
Switch to white:
Rnd 14–15: sc around (24)
Switch to red:
Rnd 16: sc around (24)
Switch to white:
Rnd 17–20: sc around (24)
Rnd 21: (2 sc, dec) x6 (18)
Rnd 22: (sc, dec) x6 (12)
Stuff firmly.
FO leaving long tail to sew.
⚪ Shoe Toppers (Make 2)
With white yarn:
Rnd 1: MR, 6 sc (6)
Rnd 2: inc x6 (12)
Rnd 3: (sc, inc) x6 (18)
FO, flatten slightly.
Sew centered on top of black shoe.
👗 Skirt Flare
Join light blue yarn to waist.
Rnd 1 (FLO): (3 sc, inc) repeat around
Rnd 2–4: sc around
This creates soft flare similar to the reference shape.
🤍 Apron
Bib
Ch 14
Row 1: sc 13
Row 2: sc across
Row 3: dec, sc 9, dec
Row 4–6: sc across
FO leaving tail.
Skirt Section
Ch 34
Row 1: sc 33
Row 2: inc, sc across, inc
Row 3–6: sc across
Sew bib to skirt. Lightly curve bottom corners inward to create rounded front opening look.
Straps
Ch 36 each (make 2).
Cross in back when attaching.
🤍 Collar
Ch 40
Row 1: sc across
Row 2: (sl st, skip 1, hdc, dc, hdc in next st) repeat for scallops
Sew evenly around neckline.
🧷 Assembly Order
- Attach head to body
- Sew legs evenly and centered
- Attach arms slightly forward
- Sew hair cap
- Add hair strands and tie pigtails
- Sew narrow headband
- Add skirt flare
- Attach apron with crossed straps
- Sew collar last
💛 Final Shaping
Gently shape cheeks, smooth pigtails, and adjust apron layers so they sit symmetrically. The skirt should have gentle fullness, sleeves slightly puffed, and shoes rounded and stable.
Your finished Raggedy Ann doll is now complete — bright, cheerful, and timeless.