Oh, the delightful world of amigurumi! 🌟 There’s something irresistibly charming about creating these little crocheted characters, especially when it comes to rag doll amigurumi. It’s a joyful mix of creativity, patience, and a touch of whimsy. From the moment I pick up my crochet hook, I feel a sense of excitement at the endless possibilities. There’s a unique satisfaction that comes with transforming a simple ball of yarn into a lovable, huggable companion. Each stitch is like a step on an adventure, and I can’t help but smile as I see the personality of the doll come to life before my eyes.
Crafting a rag doll amigurumi pattern is like weaving a story. I start by imagining the character’s personality and features—will they be a mischievous little imp or a serene, wise friend? 🤔 This vision guides my choice of colors, shapes, and embellishments. The process is a delightful puzzle, where every piece fits together to create something truly special. As I work, I often find myself adding tiny details like a quirky scarf or cute little buttons, which makes each doll unique. In the end, I’m not just creating a toy; I’m crafting a little bundle of joy that, hopefully, brings a smile to anyone who meets it. 🎨🧶
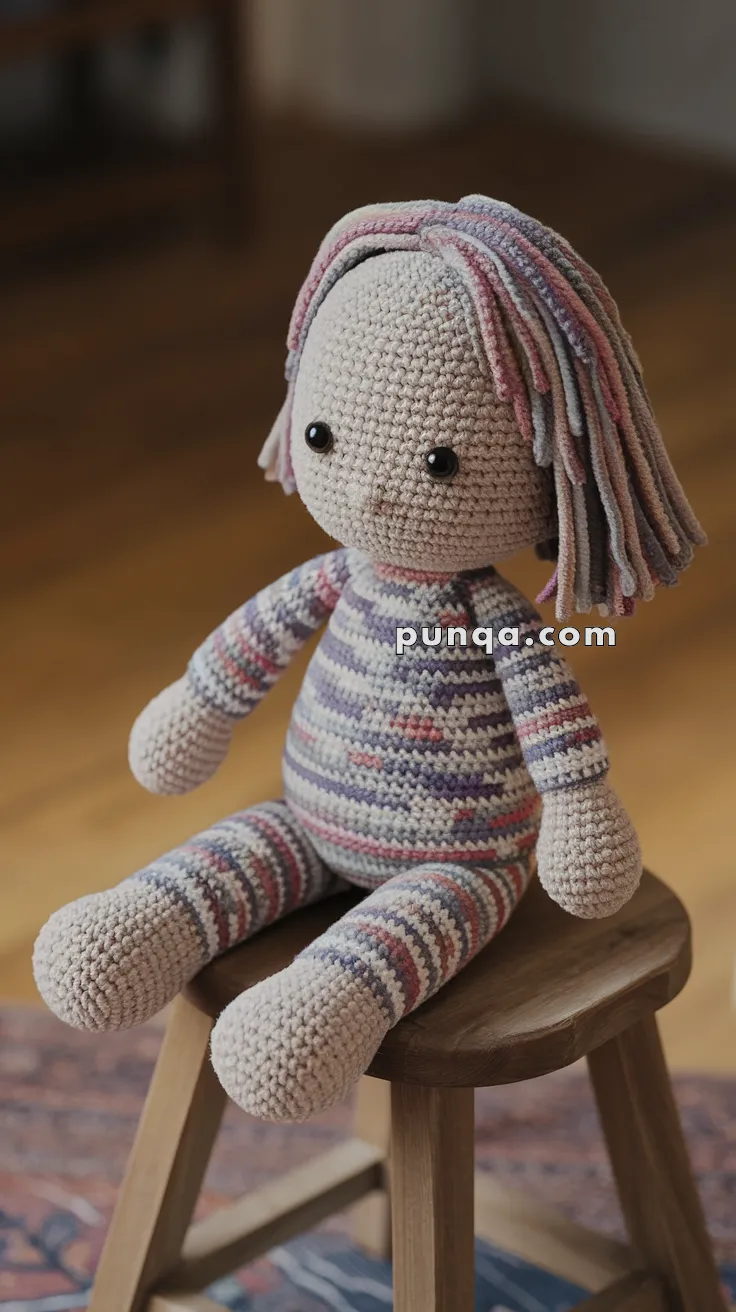
🧵 Amigurumi Rag Doll Pattern
This adorable rag doll features soft limbs, multicolor yarn body, and strands of yarn hair—giving it a truly huggable and nostalgic feel.
📏 Finished Size
Approx. 25–30 cm (10–12 inches) tall
💡 Skill Level
Intermediate – involves color changes, basic shaping, and hair attachment
🧶 Materials
-
Yarn (DK or worsted weight):
-
Skin tone (arms, legs, face)
-
Multicolor yarn (for body and sleeves)
-
Pastel shades (hair strands)
-
-
2.5–3.5 mm crochet hook
-
Safety eyes (8–10 mm)
-
Stitch markers
-
Embroidery thread for mouth and nose
-
Yarn needle
-
Polyfill stuffing
-
Scissors
🧵 Abbreviations (US Terms)
-
MR – Magic Ring
-
sc – Single Crochet
-
inc – Increase
-
dec – Decrease
-
ch – Chain
-
sl st – Slip Stitch
-
st(s) – Stitch(es)
✨ Pattern Instructions
🟤 Head (Skin Color)
-
MR, 6 sc
-
inc in each st (12)
-
(sc, inc) × 6 (18)
-
(2 sc, inc) × 6 (24)
-
(3 sc, inc) × 6 (30)
-
(4 sc, inc) × 6 (36)
-
(5 sc, inc) × 6 (42)
8–18. sc around (42) -
(5 sc, dec) × 6 (36)
-
(4 sc, dec) × 6 (30)
-
(3 sc, dec) × 6 (24)
Insert safety eyes between rounds 12–13, about 7–8 stitches apart. -
(2 sc, dec) × 6 (18)
-
(sc, dec) × 6 (12)
Stuff firmly. -
dec × 6 (6)
Fasten off, close hole, and weave in.
🧷 Body (Start with multicolor yarn)
-
MR, 6 sc
-
inc × 6 (12)
-
(sc, inc) × 6 (18)
-
(2 sc, inc) × 6 (24)
-
(3 sc, inc) × 6 (30)
-
(4 sc, inc) × 6 (36)
-
(5 sc, inc) × 6 (42)
8–18. sc around (42) -
(5 sc, dec) × 6 (36)
-
(4 sc, dec) × 6 (30)
-
(3 sc, dec) × 6 (24)
-
(2 sc, dec) × 6 (18)
Stuff firmly and fasten off.
🧤 Arms (Make 2 – Skin Tone and Multicolor)
Start with skin tone:
-
MR, 6 sc
-
inc × 6 (12)
3–5. sc around (12)
Change to multicolor yarn:
6–20. sc around (12)
Stuff lightly and fasten off, leaving tail for sewing.
🧦 Legs (Make 2 – Skin Tone and Multicolor)
Start with skin tone:
-
MR, 6 sc
-
inc × 6 (12)
3–6. sc around (12)
Change to multicolor yarn:
7–20. sc around (12)
Stuff and fasten off, leaving long tail to sew to body.
🎀 Hair
Cut multiple 20–25 cm strands of pastel yarn. Attach each strand to the head using a latch hook method (fold yarn in half, insert hook into stitch, pull loop, pull ends through).
Style by trimming or tying as desired. For this version, leave loose for a ragdoll look.
😊 Face Details
-
Use safety eyes or embroider eyes
-
Stitch a small curved mouth and optional nose
-
Add blush using pink yarn or soft blush powder
🧵 Assembly
-
Sew head to body securely.
-
Attach arms and legs evenly spaced.
-
Add hair securely and style.
-
Double-check stuffing and seams for firmness.
✅ Final Tips
-
Use a weighted insert for balance if desired
-
Customize clothing using fabric or crochet overalls, skirts, or hats
-
Experiment with yarn textures for a unique finish