Hey there! 🌿 I’m absolutely thrilled to chat about one of my favorite pastimes: creating adorable amigurumi plant hangers! If you’re like me and love both crochet and plants, this is the perfect blend of two passions. Amigurumi, the Japanese art of crocheting small, stuffed yarn creatures, has taken the crafting world by storm, and I’m here to say it’s not just for making cute animals. Crafting a plant hanger adds a touch of whimsy and charm to your green space, making it unique and personal. Plus, there’s something incredibly rewarding about seeing your handiwork hanging proudly with a beautiful plant nestled inside. 🪴
Now, let’s talk about the actual process. Starting with a simple ball or cylindrical shape, I select vibrant yarns that complement the foliage of my plant. The joy of watching each loop transform into a tangible creation is unparalleled. The best part? Amigurumi patterns are typically straightforward, perfect for both beginners and seasoned pros. As I stitch each row with anticipation, the project slowly comes to life. Adding details like tassels or tiny embellishments is my favorite part, giving each hanger its own personality. By the end, I have a delightful home for my plants and a sense of personal accomplishment that fills me with joy. 🌈
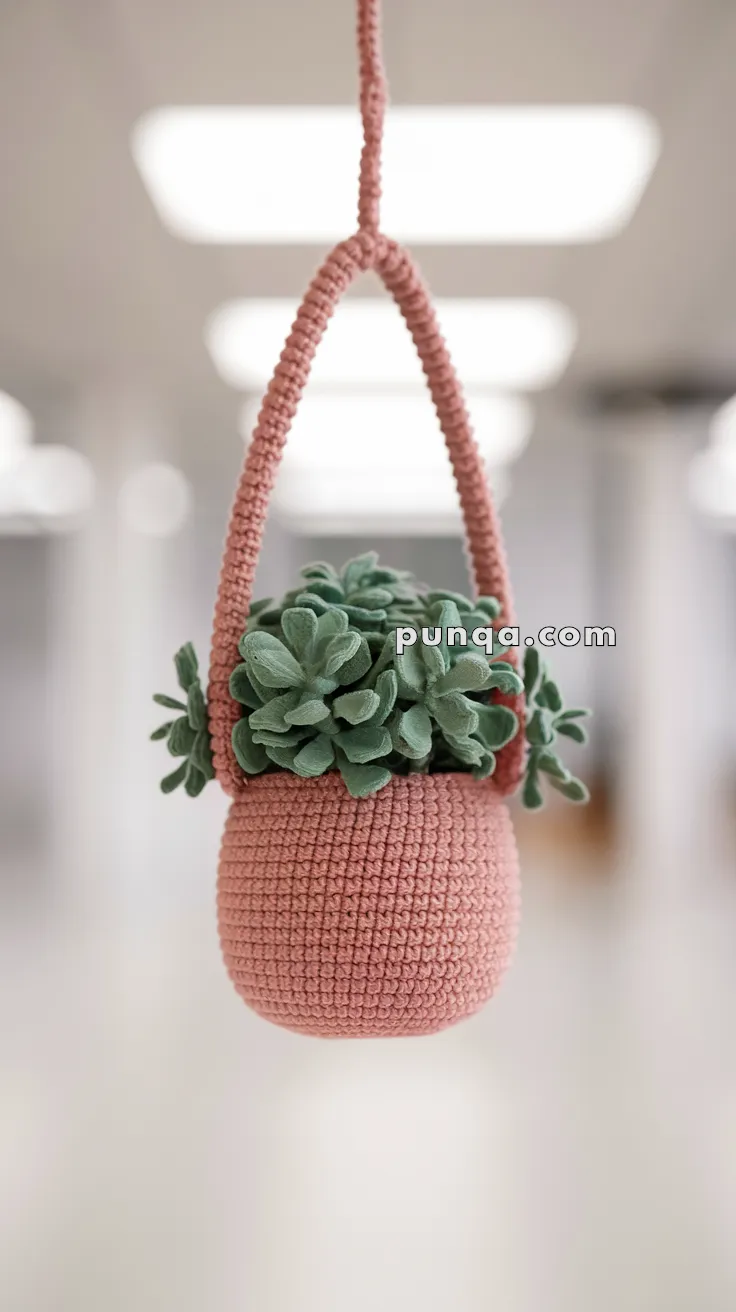
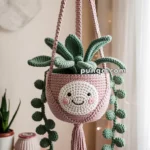
🧶 Amigurumi Plant Hanger Pattern
Add a touch of greenery to your space with this beginner-friendly crochet plant hanger! You can hang it in your kitchen, office, or near a window to brighten your day. 🌿✨
📏 Finished Size
Approximately 5–6 inches tall (excluding hanging loop), depending on yarn and tension.
🧵 Skill Level
Beginner to Easy
🧰 Materials
-
Yarn: Worsted weight cotton yarn in terracotta pink (for pot)
-
Crochet hook: 2.5 mm or size suitable for yarn
-
Stitch marker
-
Tapestry needle
-
Polyester stuffing
-
Faux succulent or small faux plant
-
Optional: magnet or keychain ring (for alternate uses)
🧩 Abbreviations (US Terms)
-
MR: Magic Ring
-
ch: chain
-
sc: single crochet
-
inc: increase (2 sc in one stitch)
-
dec: decrease (sc 2 together)
-
sl st: slip stitch
-
BLO: back loop only
🧶 Pattern Instructions
🪴 Pot Base
-
Round 1: MR, 6 sc (6)
-
Round 2: inc around (12)
-
Round 3: (sc, inc) × 6 (18)
-
Round 4: (2 sc, inc) × 6 (24)
-
Round 5: (3 sc, inc) × 6 (30)
-
Round 6: BLO sc around (30)
7–15. Rounds 7–15: sc around (30) -
Round 16: (3 sc, dec) × 6 (24)
-
Round 17: (2 sc, dec) × 6 (18)
Stuff lightly. -
Round 18: (sc, dec) × 6 (12)
-
Round 19: dec × 6 (6)
Finish off and sew hole closed.
🪢 Hanging Strap
-
Ch 70–90 (depending on desired hanging length).
-
Sl st into opposite edge of pot rim to form a loop.
-
Sc evenly across the chain (or use slip stitches for a thinner cord).
-
Fasten off and weave in ends.
🌿 Finishing Touches
-
Insert a small faux succulent or air plant into the pot.
-
Optional: Attach a magnet to the back or a keyring to the strap.
-
Hang from a shelf, hook, or peg!
💡 Tips
-
Use a stiffer yarn or add a cardboard circle inside the base to help it stand.
-
Mix colors to mimic ceramic glaze effects.
-
For a larger pot, add more increase rounds to the base.