Welcome to the elegant world of nature-inspired amigurumi! 🦚✨ Today, I’m excited to share my free crochet pattern for a stunning Peacock—a delicate and vibrant creation perfect for adding a touch of beauty to your handmade collection! 💙 Whether you love crafting intricate designs, enjoy incorporating nature’s elegance into your projects, or simply want a quick and decorative crochet piece, this pattern will guide you through stitching up a graceful feather with dazzling details! 🌿
This pattern is easy to follow, using simple stitches and colorwork to create the signature eye-catching design of a peacock feather! 🧶🎨 I’ve included clear instructions to ensure your creation turns out just right—ideal for keychains, appliqués, or decorative accents! 🏡 So grab your hooks, choose bold blues, greens, and golds, and let’s stitch up a mesmerizing symbol of beauty and luck! ✨💫
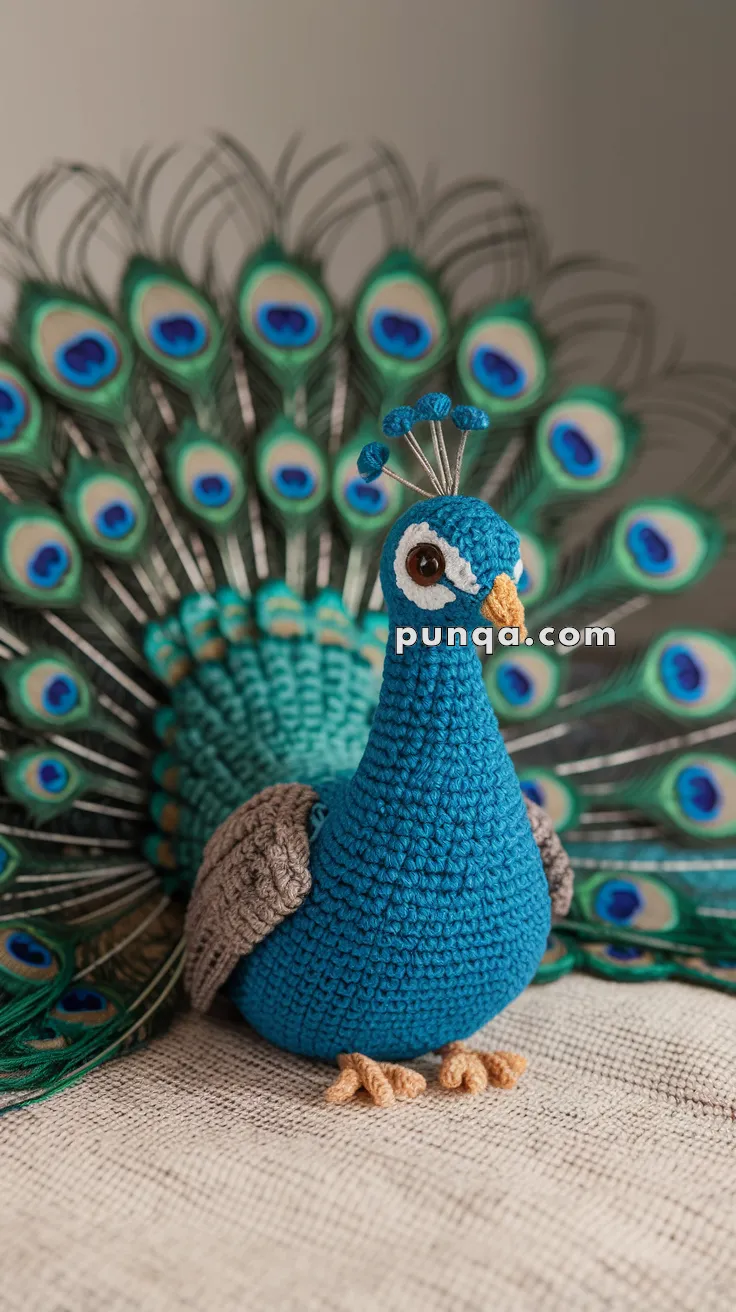
🦚 Amigurumi Peacock Crochet Pattern
Bring the majestic beauty of a peacock to life with this detailed amigurumi pattern. With a proud body, delicate wings, dazzling fan tail, and upright crown feathers, this project makes a stunning showpiece.
✨ Skill Level
Intermediate – Includes color changes, shaping, embroidery, and assembly with optional wire support.
📏 Finished Size
Approx. 25 cm (10 in) tall using worsted weight yarn and a 3.5 mm hook.
🧶 Materials
-
Worsted weight yarn in:
-
Peacock blue (body & head)
-
Teal (tail base)
-
Green (feather base)
-
Blue (feather oval)
-
Black (feather center, eye embroidery)
-
Yellow (beak, feather highlights)
-
Beige/cream (wings, feet)
-
-
Crochet hook: 3.5 mm
-
10 mm safety eyes
-
Polyester fiberfill stuffing
-
Floral wire (22–24 gauge for crown, 18–20 gauge for tail support)
-
Felt (green backing for tail, optional)
-
Yarn/tapestry needle
-
Scissors
-
Hot glue or fabric glue (optional for assembly)
🧵 Abbreviations (US Terms)
-
MR – Magic Ring
-
sc – single crochet
-
inc – increase (2 sc in same st)
-
dec – decrease (sc2tog)
-
ch – chain
-
sl st – slip stitch
-
hdc – half double crochet
-
dc – double crochet
-
tr – treble crochet
-
FO – fasten off
🧍 Body & Head (Worked Separately)
Head (Peacock Blue)
-
MR, 6 sc [6]
-
inc x6 [12]
-
(sc, inc) x6 [18]
-
(2 sc, inc) x6 [24]
-
(3 sc, inc) x6 [30]
6–12. sc around [30] -
(3 sc, dec) x6 [24]
-
(2 sc, dec) x6 [18]
-
(sc, dec) x6 [12]
-
dec x6 [6]
FO, leave tail for sewing. Stuff firmly.
📌 Place safety eyes between R9–10, about 6 stitches apart.
Body (Peacock Blue)
-
MR, 6 sc [6]
-
inc x6 [12]
-
(sc, inc) x6 [18]
-
(2 sc, inc) x6 [24]
-
(3 sc, inc) x6 [30]
6–10. sc around [30] -
(3 sc, dec) x6 [24]
-
(2 sc, dec) x6 [18]
13–14. sc around [18]
FO, stuff, and sew to bottom of head.
🪽 Wings (Make 2 – Beige/Cream)
-
Ch 7
-
Starting in 2nd ch: sc 5, 3 sc in last, rotate, sc 4, inc in last [14]
-
sc around [14]
-
(5 sc, dec) x2 [12]
-
(4 sc, dec) x2 [10]
-
sc around [10]
FO, flatten, leave long tail. Sew to sides of body.
👣 Feet (Make 2 – Beige/Cream)
-
MR, 6 sc [6]
-
sc around [6]
-
(sc, inc) x3 [9]
4–5. sc around [9]
📌 Toes: Ch 4, sc back 3, join to base. Repeat x3 for each foot.
FO, sew under body.
👃 Beak (Yellow/Beige)
-
MR, 4 sc [4]
-
(sc, inc) x2 [6]
-
sc around [6]
FO, stuff lightly, sew to face.
👑 Crown (Blue with Wire)
-
Make 3–5 mini balls:
-
MR, 4 sc, sc around, FO. Lightly stuff.
-
-
Cut wire stems (2–3 in). Insert through each ball and secure.
-
Gather wires, wrap with yarn, and sew to head center. Fan outward.
🪶 Tail Base (Teal Circle)
-
MR, 6 sc [6]
-
inc x6 [12]
-
(sc, inc) x6 [18]
-
(2 sc, inc) x6 [24]
-
(3 sc, inc) x6 [30]
6–8. sc around [30]
FO, flatten, sew to back of body.
🦚 Feathers (Make 12–16 with Eyespots)
Green Base
-
Ch 10
-
Row 1: sc, hdc, dc x3, tr, dc, hdc, sc.
-
Rotate and mirror back down chain. FO.
Blue Oval Layer
-
Ch 6, work sc, hdc, dc, tr, dc, hdc, sc around. FO.
Black Center
-
MR, 6 sc, sl st closed. FO.
Assembly of Eyespot
-
Layer black circle on blue oval, then sew onto green base.
-
Embroider yellow stitches near black circle for highlight.
Feather Stem
-
Cut wire 8–10 in.
-
Crochet stem: Ch 30, sl st back along chain.
-
Attach eyespot to stem tip.
Fan Assembly
-
Arrange feathers (longest in center, shorter at sides).
-
Sew/glue stems to felt semi-circle OR twist wire bases together.
-
Attach securely to teal tail base.
✅ Final Assembly
-
Sew head to body.
-
Attach wings and feet.
-
Sew beak and embroider eye details if desired.
-
Attach crown wires to head.
-
Secure tail fan to back of body, spread feathers evenly.
✨ Finishing Touch
Your peacock is now complete! The wired feathers allow you to pose and spread the tail just like a real peacock. With its proud stance, layered wings, and crown detail, this amigurumi makes a dazzling centerpiece or display item.