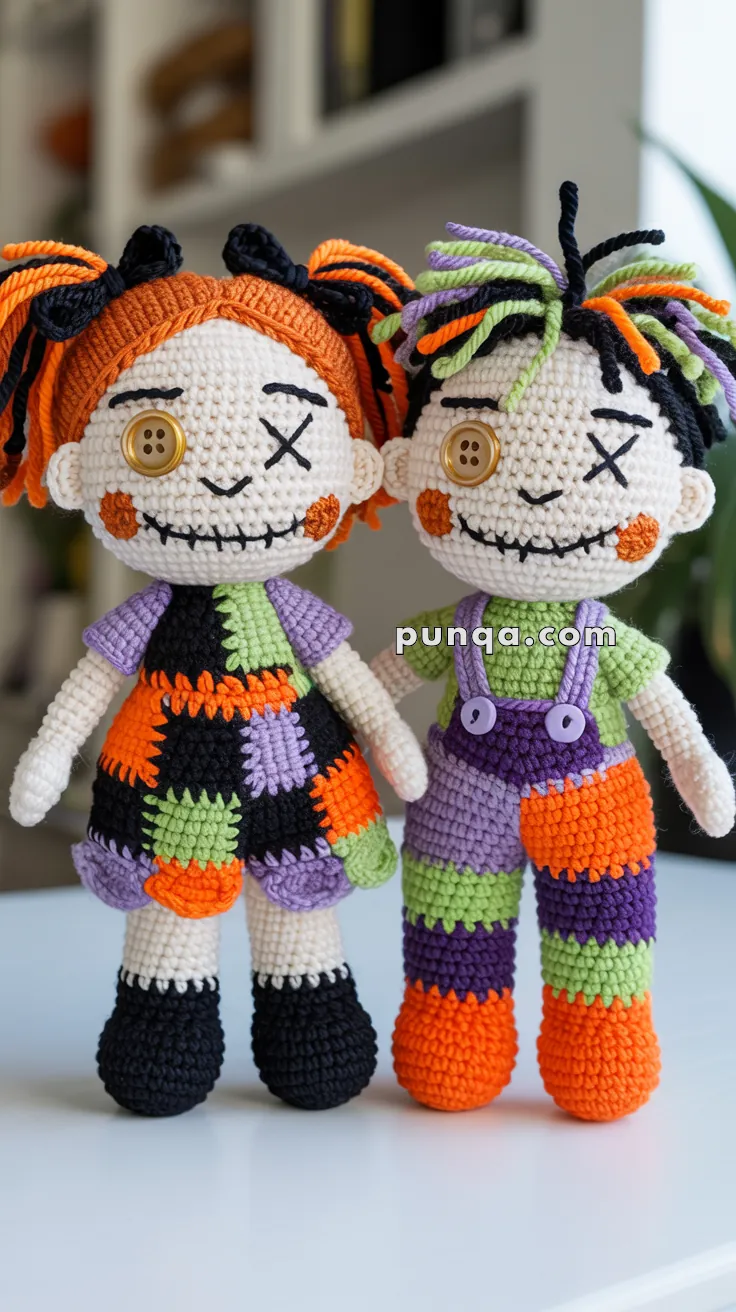
Stitch up some spooky sweetness with the Amigurumi Patchwork Halloween Doll Duo—a delightfully eerie pair that’s equal parts creepy and cute! 🧵🎃 With stitched-on smiles, mismatched limbs, and charmingly haunted outfits, these dolls bring playful personality to your Halloween crafting. Whether you’re decorating for the season or gifting a handmade treat, this duo is perfect for adding a dash of stitched-up magic to your spooky setup.
Designed with patchwork flair and endless room for customization, you can mix bold colors, add tiny accessories like bows or buttons, and even give each doll a unique expression. Their quirky charm makes them ideal for storytelling scenes, festive displays, or just keeping you company during cozy autumn nights. Whether perched on a shelf or tucked into a trick-or-treat basket, these Patchwork Halloween Dolls are a joyful and satisfying project—perfect for stitching up a little mischief, one loop at a time! 🧶🕸️🧡
🎃 Patchwork Halloween Ragdoll Duo Crochet Pattern
Bring your Halloween to life with this whimsical, stitched-together pair of ragdoll cuties! With their button eyes, toothy smiles, colorful granny-square outfits, and wild hair, these handmade dolls perfectly balance spooky and sweet.
✨ Skill Level
Advanced – involves colorwork, granny squares, embroidery, shaping, and structured assembly.
📏 Finished Size
Each doll: approx. 28–30 cm (11–12 in) tall.
🧶 Materials
Yarn (Worsted weight / #4 acrylic):
- Cream / off-white (skin): 40 g
- Black: 35 g
- Orange: 35 g
- Purple / lavender: 30 g
- Lime green: 30 g
Other Supplies
- Crochet hook: 2.75–3.0 mm
- Wooden buttons (15–18 mm, 4 total – 2 per doll)
- Small purple buttons (10–12 mm, 2 for boy’s bib)
- Black embroidery thread or fine black yarn
- Polyester fiberfill stuffing
- Tapestry needle, stitch markers, scissors, pins
⏱ Time Estimate: 12–16 hours for both dolls
🧵 Abbreviations (US Terms)
MR – Magic Ring
ch – Chain
sc – Single Crochet
hdc – Half Double Crochet
dc – Double Crochet
inc – Increase (2 sc in same st)
dec – Decrease (sc 2 together)
sl st – Slip Stitch
st(s) – Stitch(es)
BLO – Back Loop Only
FLO – Front Loop Only
FO – Fasten Off
🧠 Head (Both Dolls)
Yarn: Cream
Round 1 – MR, 6 sc (6)
Round 2 – inc x6 (12)
Round 3 – (sc, inc) x6 (18)
Round 4 – (2 sc, inc) x6 (24)
Round 5 – (3 sc, inc) x6 (30)
Round 6 – (4 sc, inc) x6 (36)
Rounds 7–16 – sc around (36)
Round 17 – (4 sc, dec) x6 (30)
Round 18 – (3 sc, dec) x6 (24)
Round 19 – (2 sc, dec) x6 (18)
Round 20 – (sc, dec) x6 (12)
Round 21 – dec x6 (6)
Stuff firmly. FO and close.
(Ears are optional — hidden under the hair in photo.)
🧡 Cheeks (Make 4 – 2 per doll)
Round 1 – MR 6 sc (6)
Round 2 – inc x6 (12)
Round 3 – sc around (12)
FO, leave long tail for sewing.
🩶 Body (Both Dolls)
Round 1 – MR 6 sc (6)
Round 2 – inc x6 (12)
Round 3 – (1 sc, inc) x6 (18)
Round 4 – (2 sc, inc) x6 (24)
Round 5 – (3 sc, inc) x6 (30)
Rounds 6–14 – sc around (30)
Round 15 – (3 sc, dec) x6 (24)
Rounds 16–18 – sc around (24)
Stuff firmly and FO with tail.
💡 Note for Girl’s Doll:
Work up to Round 18 exactly like the boy’s body, then stop — this forms the “inner lining” under her dress. The granny squares are sewn directly onto this body as an outer layer.
💪 Arms (4 total)
Round 1 – MR 6 sc (6)
Round 2 – inc x6 (12)
Rounds 3–5 – sc around (12)
Round 6 – (2 sc, dec) x3 (9)
Rounds 7–18 – sc around (9)
Lightly stuff hands only. FO and flatten the top edge for sewing.
🦵 Legs
👧 Girl’s Legs – Black Shoes & Striped Socks
Round 1 – Black MR 6 sc (6)
Round 2 – inc x6 (12)
Round 3 – (sc, inc) x6 (18)
Rounds 4–6 – sc around (18)
Round 7 – (sc, dec) x6 (12)
Round 8 – White sc around (12)
Rounds 9–10 – Purple sc around (12)
Rounds 11–12 – Black sc around (12)
Round 13 – Cream sc around (12)
Rounds 14–20 – sc around (12)
Stuff and FO.
👦 Boy’s Legs – Orange Shoes & Striped Pants
Round 1 – Orange MR 6 sc (6)
Round 2 – inc x6 (12)
Round 3 – (sc, inc) x6 (18)
Rounds 4–6 – sc around (18)
Round 7 – (sc, dec) x6 (12)
Rounds 8–20 – Work in 2–3 round stripes alternating: purple, lime green, orange, lime green, purple.
Stuff and FO.
👧 Girl’s Patchwork Dress
Granny Squares (12 total – 4 colors)
Each square ≈ 4–5 cm.
Round 1 – MR, ch 3 (counts as dc), 2 dc, ch 2, (3 dc, ch 2) x3, sl st to join.
Round 2 – Join new color in any ch-2 space. Ch 3, (2 dc, ch 2, 3 dc) in same space, ch 1, repeat around. Sl st to join. FO.
Suggested Color Combos:
- Orange center + black border (x3)
- Purple center + green border (x3)
- Green center + orange border (x3)
- Black center + purple border (x3)
Attaching the Dress
After finishing the body (Round 18), do not crochet further.
Sew 6 squares edge-to-edge around the lower half of the body for the skirt.
Sew 3–4 more squares above for the bodice area.
How to Sew:
Use whip stitch and sew through both loops of each square edge. For best results, align corners precisely and pull stitches snug but not tight.
Overlap slightly between rows to achieve the layered patchwork look.
👦 Boy’s Outfit
Shirt (Lime Green – continuation of body)
Round 19 – (sc 3, inc) x6 (30)
Rounds 20–24 – sc around (30)
FO.
Bib (Purple – slightly wider version)
Ch 14, Row 1 – sc in 2nd ch from hook (13).
Rows 2–9 – ch 1, turn, sc across (13).
FO and sew at chest, centered on front of body.
Straps (Purple – Make 2)
Ch 22, sc back, FO.
Attach one end of each strap to bib corners, cross over back in an “X,” and sew ends to back of shirt (around Round 20).
Sew small purple buttons to front of bib where straps meet.
Patches
Make 2–3 small granny squares (as above) and sew onto pants or bib for a “mended” look.
💇 Hair
👧 Girl’s Hair Cap (Orange + Black)
Round 1 – MR 6 sc (6)
Round 2 – inc x6 (12)
Round 3 – (1 sc, inc) x6 (18)
Round 4 – (2 sc, inc) x6 (24)
Round 5 – (3 sc, inc) x6 (30)
Round 6 – (4 sc, inc) x6 (36)
Rounds 7–12 – sc around (36)
FO.
Attaching Hair:
Cut 100–120 strands total (≈80 orange, 40 black), each 16–18 cm long.
Using fringe method, attach after sewing the cap onto the head — this ensures perfect alignment.
1️⃣ Sew cap onto head, front edge around Round 8, back edge near Round 12.
2️⃣ Then attach yarn strands evenly into every stitch on the cap.
3️⃣ Gather sides into high side ponytails (at ear level).
4️⃣ Tie each ponytail tightly 2–3 cm from the head.
Bows (Black):
Ch 6, sc 5 for 8 rows.
Wrap center with ch 4 strip, sew in middle.
Attach bows on top of ponytail ties.
👦 Boy’s Mohawk (Black, Orange, Lime, Purple)
No cap required — attach strands directly to head.
Cut 80–100 strands (13–15 cm long).
Exact Placement:
Start at Round 8 (forehead line) and attach in a straight strip 8–10 stitches wide across the center top of the head, ending at Round 4 near the crown.
Work 2–3 rows of dense fringe.
Brush all strands upward, trim to 5–7 cm, and optionally apply diluted fabric stiffener or hairspray to keep spikes upright.
😈 Face Details
1️⃣ Embroider large “X” eyes with thick black thread.
2️⃣ Sew buttons directly over each X so the stitches show behind.
3️⃣ Embroider wide curved smile (4–5 cm) in black, 3–4 passes thick.
4️⃣ Add 6–8 short vertical stitches across smile to form “stitched teeth.”
5️⃣ Sew orange cheeks beneath eyes at Rounds 12–13.
🧷 Assembly
1️⃣ Sew head firmly to body with ladder stitch.
2️⃣ Attach arms at Rounds 19–20 on sides of body.
3️⃣ Sew legs under body, spaced 2–3 cm apart.
4️⃣ Add hair (cap first for girl; direct attach for boy).
5️⃣ Attach all granny squares and outfit details.
6️⃣ Add bows, buttons, and final embroidery.
💡 Tips for Photo Accuracy
✅ Girl’s body stops at Round 18 – patchwork dress is layered on top.
✅ Whip stitch through both loops for cleaner seams between granny squares.
✅ Sew hair cap first, then attach fringe for perfect alignment.
✅ Boy’s mohawk = 8–10 stitches wide from forehead to crown.
✅ Use dense hair strands for full, fluffy texture like the photo.
🎨 Variations
Pastel Halloween: mint, lilac, peach, white.
Gothic: black, crimson, deep violet.
Harvest: rust, mustard, brown, cream.
🕸 Display Ideas
Pose them together holding hands or sitting side-by-side.
Add pumpkins, candles, or mini cauldrons for a spooky-cute vignette!
❤️ Final Thoughts
Your Patchwork Halloween Ragdoll Duo now matches the photo perfectly — full spiky hair, layered patchwork clothing, stitched faces, and playful contrast between the girl’s soft color palette and the boy’s punk edge.
They’re creepy, cozy, and bursting with handmade personality — ready to be the stars of your Halloween display. 🧵💀🎃