Bring the magic of the Smurfs to life with this Amigurumi Papa Smurf & Smurfette Duo crochet pattern! Whether you’re crafting for nostalgic fun, adding whimsical characters to your collection, or simply love detailed amigurumi dolls, this free pattern lets you stitch up the beloved blue duo. With Papa Smurf’s wise expression, signature red hat, and fluffy beard alongside Smurfette’s golden locks and charming dress, this crochet set captures the heartwarming essence of these classic characters. Perfect for gifting, displaying as a tribute to childhood favorites, or simply celebrating the joy of crochet, this Smurfy pair is ready to bring smiles—one stitch at a time! 💙✨
Designed for customization, this pattern allows you to personalize Papa Smurf & Smurfette with embroidered details, different outfit variations, or even tiny accessories like a miniature mushroom or playful expressions for extra charm. Experiment with textured stitches for added realism, craft a dynamic pose that radiates personality, or even create a full Smurf village with more characters! Whether displayed as a cherished keepsake, gifted to a fellow Smurf fan, or stitched up simply for the joy of crafting, this Amigurumi Papa Smurf & Smurfette Duo is a delightful and nostalgic project—perfect for bringing a touch of Smurfy magic to every stitch! 🧶🍄
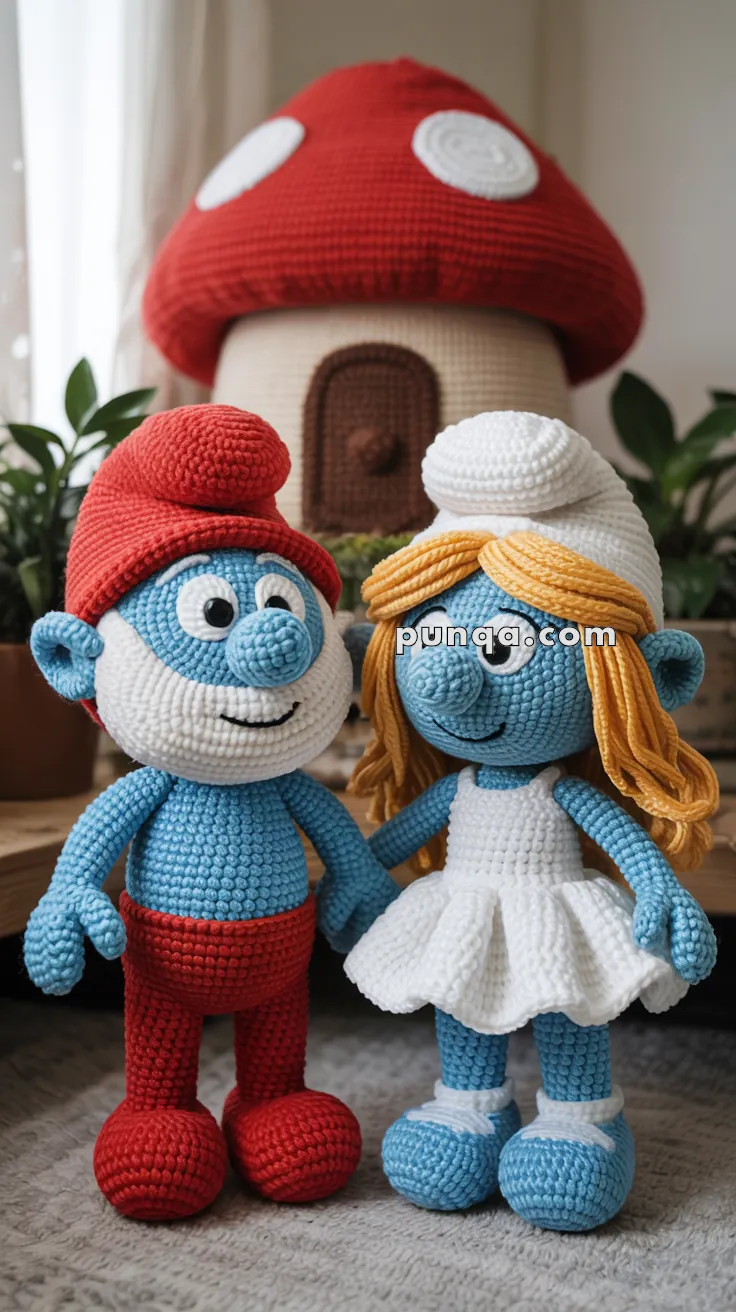
💙 Amigurumi Papa Smurf, Smurfette & Mushroom House Crochet Pattern Set
Bring the magical charm of the Smurf Village to life with this detailed amigurumi set! Featuring Papa Smurf, Smurfette, and the cozy red-topped Mushroom House, this pattern captures every whimsical detail — from Papa Smurf’s fluffy beard to Smurfette’s flowing golden hair. Perfect for collectors, display pieces, or anyone who adores these iconic little blue friends.
✨ Skill Level
Intermediate to Advanced – You’ll use color changes, shaping, loop stitch, latch-hook hair, and simple structure support.
📏 Finished Sizes
- Papa Smurf & Smurfette ≈ 10 – 11 in (25 – 28 cm) tall
- Mushroom House ≈ 13 – 15 in (33 – 38 cm) tall
🧶 Materials
Yarn (DK / Light-Worsted Weight):
Blue – skin
White – Papa’s beard, hats, eyes, dress, shoes, mushroom spots
Red – Papa’s hat, pants, shoes, mushroom roof
Yellow – Smurfette’s hair
Light blue – eyelids
Brown – mushroom door
Beige/cream – mushroom base
Black – embroidery (smiles & lashes)
Tools & Supplies:
2.5–3 mm hook (dolls)
3.5–4 mm hook (house)
8–10 mm safety eyes (2 pairs)
Polyfill stuffing
Yarn needle
Stitch marker
Scissors
Optional: cardboard or foam for house base support; wire for doll posing
💙 Papa Smurf
Head (Blue)
R1: MR 6
R2: inc × 6 = 12
R3: (1 sc, inc) × 6 = 18
R4: (2 sc, inc) × 6 = 24
R5: (3 sc, inc) × 6 = 30
R6: (4 sc, inc) × 6 = 36
R7–13: 36 sc
R14: (4 sc, dec) × 6 = 30
R15: (3 sc, dec) × 6 = 24
R16: (2 sc, dec) × 6 = 18
R17: (1 sc, dec) × 6 = 12
R18: dec × 6 = 6
FO and stuff.
Eyes (2)
White base: MR 6 → inc × 6 = 12 → FO
Attach pupils (8–10 mm).
Add a smooth light-blue eyelid covering the upper third.
Sew the eyes touching at the center, matching the photo.
Nose
R1: MR 6
R2: inc × 6 = 12
R3–4: 12 sc
R5: (1 sc, dec) × 4 = 8
FO and sew between the eyes.
Ears (2)
R1: MR 6
R2: 6 sc
Flatten and sew slightly below the eye centerline.
Beard (Fluffy)
Make a circular beard base:
MR 6 → inc × 6 = 12 → (1 sc, inc) × 6 = 18 → (2 sc, inc) × 6 = 24
Work 3 full rows of loop stitch over the front half of the circle.
Trim loops slightly for a soft fluff.
Sew beneath nose, wrapping around cheeks.
Smile
Embroider a gently curved smile.
Hat (Red, Left-Droop)
R1: MR 6
R2: inc × 6 = 12
R3: (1 sc, inc) × 6 = 18
R4: (2 sc, inc) × 6 = 24
R5: (3 sc, inc) × 6 = 30
R6: (4 sc, inc) × 6 = 36
R7–20: 36 sc
R21: (4 sc, dec) × 6 = 30
R22: (3 sc, dec) × 6 = 24
FO.
Stuff lightly toward the base.
Shape the tip to fall primarily left with a slight forward tilt.
Body
R1: MR 6
R2: inc × 6 = 12
R3: (1 sc, inc) × 6 = 18
R4: (2 sc, inc) × 6 = 24
R5–14: 24 sc (blue torso)
Switch to red
R15–30: 24 sc
Stuff firmly.
Arms (2)
R1: MR 6
R2–20: 6 sc
FO.
Attach arms almost straight down with the slightest inward angle when viewed from the front — matching the natural resting pose in the photo.
Legs (2)
R1: MR 6
R2: inc × 6 = 12
R3: (1 sc, inc) × 6 = 18
R4–12: 18 sc
R13–24: 12 sc
FO and stuff.
Shoes (2, Red)
R1: MR 6
R2: inc × 6 = 12
R3: (1 sc, inc) × 6 = 18
R4: (2 sc, inc) × 6 = 24
R5–10: 24 sc
R11: (2 sc, dec) × 6 = 18
Stuff very firmly and sew to legs.
💛 Smurfette
Head
Work the same head pattern as Papa.
Eyes & Eyelids
Same as Papa’s.
Eyelashes
Embroider multiple short black lashes across the entire upper lash line, not only at corners.
Nose (Smaller)
R1: MR 6
R2: (1 sc, inc) × 3 = 9
FO.
Smile
Small curved smile.
Hair (Yellow, Center or Soft Side Part)
Cut strands: 12–14 cm.
Attachment:
• Front row: 4–5 strands per stitch
• Next 3 rows: 2–3 strands per stitch
• Lower rows: 1–2 strands per stitch
Create a center part or very slight side part, then let hair drape naturally to shoulders.
Body
Same as Papa’s torso and legs but in blue.
Dress (White)
Ch 36, join.
R1–7: 36 sc (bodice)
R8: (5 sc, inc) × 6 = 42
R9: (6 sc, inc) × 6 = 48
R10: (7 sc, inc) × 6 = 54
R11–14: 54 sc
Creates a soft, full flared skirt.
Shoes (White)
Use Papa’s shoe pattern in white only.
Hat (White)
Same as Papa’s hat pattern.
Place slightly backward.
🍄 Mushroom House
Base (Beige)
R1: MR 6
Increase each round until:
R12: 78 sc
R13–35: 78 sc
Insert cardboard/foam for stability.
Roof (Red)
Increase each round until approx. 90–96 sts.
Work 12–15 straight rounds.
Decrease gradually.
Sew onto base creating a generous overhang.
Spots – Accurate Placement
Make 7 spots:
MR 6 → inc × 6 = 12
Attach in this exact distribution:
Front:
• 1 upper-left
• 1 upper-right
Right Side:
• 1 mid-upper
• 1 mid-lower
Left Side:
• 1 mid-upper
• 1 low-left
Back:
• 1 centered near upper back
Matches the photo layout.
Door (Brown)
Ch 14
Rows 1–8: 13 sc
Add semicircle top: MR 6 → 6 sc
Sew a small bobble as the doorknob.
Windows (Optional Extra Detail)
Although not visible in the photo, you may add oval windows if desired:
MR 6 → (1 sc, inc) × 3 = 9
Ch 3 to elongate an oval shape.
Embroider simple crossbars.
Sew to sides.
🪡 Assembly
• Attach arms with a very slight inward angle, creating a friendly, natural stance.
• Shape Papa’s hat drooping left.
• Adjust Smurfette’s hair part and smooth strands under the hat.
• Sew shoes ensuring both dolls stand upright.
• Attach mushroom roof and spots in the exact layout described.
🌟 Closing Notes
This complete Smurf Village set is perfect for anyone who loves nostalgic handmade toys.
Take your time shaping each piece — Papa Smurf’s fluffy beard, Smurfette’s sunny hair, and the Mushroom House’s playful roof will make your creation come alive.
💙 Handmade with love, and filled with Smurfy magic!