Oh, the joy of creating amigurumi! 😊 There’s something truly magical about taking a simple ball of yarn and transforming it into a delightful character, like Nobita from Doraemon. Whether you’re a seasoned crocheter or just starting out, the process of making amigurumi is both enchanting and rewarding. With each loop and stitch, you breathe life into your creation, watching it evolve from a mere idea to a tangible, huggable toy. The best part? It’s an art that welcomes creativity with open arms. You can personalize each piece with different colors and expressions, making every amigurumi unique and special.
Now, let me tell you about the process. First, gather your supplies: soft yarn in Nobita’s signature colors, a trusty crochet hook, some stuffing, and a tapestry needle. ✨ The pattern usually starts with creating the head and body as separate pieces before moving on to the limbs and small details like the iconic glasses. Constructing each part is a journey of its own, filled with repetitive yet soothing motions. As you join the pieces, the excitement builds, and before you know it, Nobita is sitting right in front of you, ready for adventures! It’s such a rewarding way to spend your crafting time, and the end result is a testament to your creativity and patience.
🧸 Amigurumi Nobita Character Doll Crochet Pattern
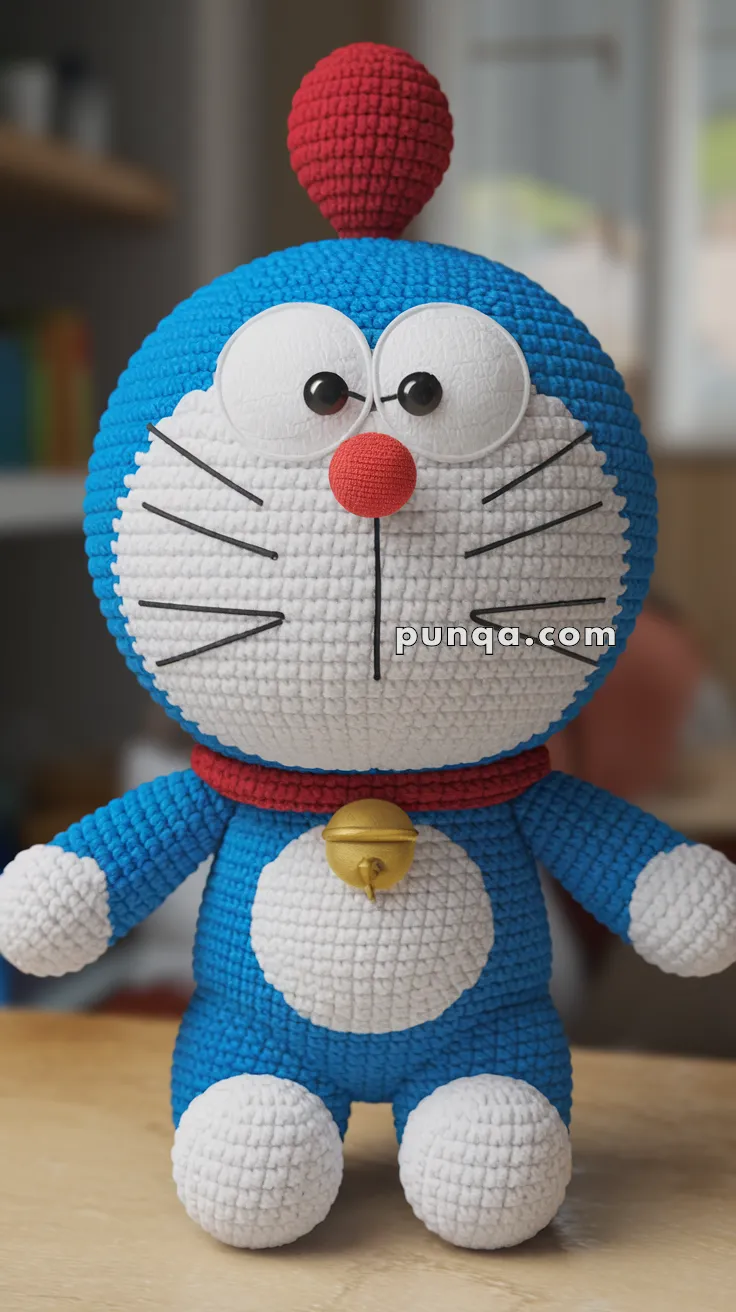
Bring this iconic blue robotic cat character to life with yarn and hook! This amigurumi doll features a perfectly round oversized head, classic white face panel, red nose, signature whiskers, red collar with golden bell, and a sturdy standing body.
With its cheerful expression and nostalgic charm, this doll is perfect for collectors, anime lovers, or as a handmade gift that will make anyone smile. 💙✨
🧶 Skill Level
Intermediate
Includes color changes, appliqué face panel, embroidery, and multi-part assembly.
📏 Finished Size
Approx. 28–32 cm (11–12.5 inches) tall
Using worsted weight yarn and a 3.5 mm hook
🧵 Materials
Worsted weight yarn:
-
Blue – body and head
-
White – face panel, belly, hands, feet
-
Red – nose, collar, head top detail
-
Yellow or gold – bell
-
Black – whiskers and mouth embroidery
Other supplies:
-
3.5 mm crochet hook
-
10–12 mm safety eyes
-
Polyester fiberfill
-
Tapestry needle
-
Stitch marker
-
Scissors
Optional: small plastic bell
✂️ Abbreviations (US Terms)
MR – Magic Ring
sc – Single crochet
inc – Increase (2 sc in same stitch)
dec – Decrease (sc2tog)
sl st – Slip stitch
ch – Chain
FO – Fasten off
Work in continuous rounds.
🟦 Head (Blue Outer Head)
With blue yarn:
R1: MR 6
R2: inc x6 (12)
R3: (sc, inc) x6 (18)
R4: (2 sc, inc) x6 (24)
R5: (3 sc, inc) x6 (30)
R6: (4 sc, inc) x6 (36)
R7: (5 sc, inc) x6 (42)
R8: (6 sc, inc) x6 (48)
R9–16: sc around (48)
Insert safety eyes between R12–13, spaced 10–11 sts apart.
R17: (6 sc, dec) x6 (42)
R18: (5 sc, dec) x6 (36)
R19: (4 sc, dec) x6 (30)
R20: (3 sc, dec) x6 (24)
Stuff firmly.
R21: (2 sc, dec) x6 (18)
R22: (sc, dec) x6 (12)
R23: dec x6 (6)
FO and close.
🤍 Face Panel (White Oval)
With white yarn:
R1: MR 6
R2: inc x6 (12)
R3: (sc, inc) x6 (18)
R4: (2 sc, inc) x6 (24)
R5: (3 sc, inc) x6 (30)
R6–7: sc around (30)
Flatten slightly.
Sew centered on front of head.
🔴 Nose
With red yarn:
R1: MR 6
R2: inc x6 (12)
R3–5: sc around (12)
Stuff lightly.
FO and sew centered between eyes.
😸 Mouth & Whiskers (Embroidery)
Using black yarn:
-
Stitch a straight vertical line from nose downward
-
Add a small curved smile
-
Add 3 whiskers on each cheek
🔴 Head Top Detail
With red yarn:
R1: MR 6
R2: inc x6 (12)
R3–5: sc around (12)
Stuff lightly.
FO and sew centered on top of head.
🟦 Body
With blue yarn:
R1: MR 6
R2: inc x6 (12)
R3: (sc, inc) x6 (18)
R4: (2 sc, inc) x6 (24)
R5: (3 sc, inc) x6 (30)
R6: (4 sc, inc) x6 (36)
R7–12: sc around (36)
R13: (4 sc, dec) x6 (30)
R14: (3 sc, dec) x6 (24)
Stuff firmly.
R15: (2 sc, dec) x6 (18)
R16: (sc, dec) x6 (12)
R17: dec x6 (6)
FO and close.
🤍 Belly Panel
With white yarn:
R1: MR 6
R2: inc x6 (12)
R3: (sc, inc) x6 (18)
R4: (2 sc, inc) x6 (24)
R5: (3 sc, inc) x6 (30)
Flatten and sew to front of body.
🧤 Arms (Make 2)
Start with white:
R1: MR 6
R2: inc x6 (12)
R3–5: sc around (12)
Change to blue:
R6–12: sc around (12)
Stuff lightly.
FO and sew to sides.
👣 Legs (Make 2)
Start with white:
R1: MR 6
R2: inc x6 (12)
R3: (sc, inc) x6 (18)
R4–6: sc around (18)
Change to blue:
R7–11: sc around (18)
Stuff firmly.
FO and sew to bottom for standing posture.
🔴 Collar
With red yarn:
Ch 36
Join to ring
sc around for 2 rounds
FO and sew around neck.
🟡 Bell
With yellow/gold yarn:
R1: MR 6
R2: inc x6 (12)
R3–4: sc around (12)
R5: (2 sc, dec) x3 (9)
Stuff lightly.
FO, flatten slightly.
Sew to front of collar.
🪡 Assembly
-
Sew head to body
-
Attach arms and legs
-
Sew face panel, nose, whiskers
-
Attach collar and bell
-
Add head top detail
-
Shape for upright standing pose
🎉 Final Result
Your handmade Nobita-inspired amigurumi is now complete — full of charm, personality, and nostalgic magic! 💙 With his round smiling face, bright red nose, classic whiskers, and signature blue outfit, this little character instantly brings joy wherever he’s placed.
Whether you display him on a shelf, gift him to an anime lover, or keep him as a cozy desk companion, this adorable crochet friend is guaranteed to make people smile. Every stitch tells a story, and yours is now part of that timeless adventure. ✨🧸
Happy crocheting, and may your yarn always stay untangled! 🪡💙