Hit the road in style with this Amigurumi Motorcycle Rider Set crochet pattern! Inspired by the thrill of adventure and the freedom of the open road, this dynamic design captures the essence of a fearless rider and their trusty motorcycle. With detailed gear, a sleek bike, and a confident stance, this crochet set is perfect for adding a bold and exciting touch to your handmade collection. Whether you’re crafting for motorcycle enthusiasts, creating a unique display piece, or simply enjoy making character-inspired amigurumi designs, this pattern lets you stitch up a high-speed duo bursting with personality! 🏍️✨
Designed for customization, this pattern allows you to experiment with different shades of leather, embroidered details, or even tiny accessories like a miniature helmet or a stretch of road for extra flair. Craft a classic rider with traditional biker hues, create a whimsical version with vibrant colors, or even stitch up a full set of motorcycle-inspired amigurumi for an adventurous display! Whether gifted as a cherished keepsake, displayed as a bold accent, or made simply for the joy of crafting, this Amigurumi Motorcycle Rider Set is a fun and creative project—perfect for bringing a touch of handmade biker magic to every stitch! 🧶💖
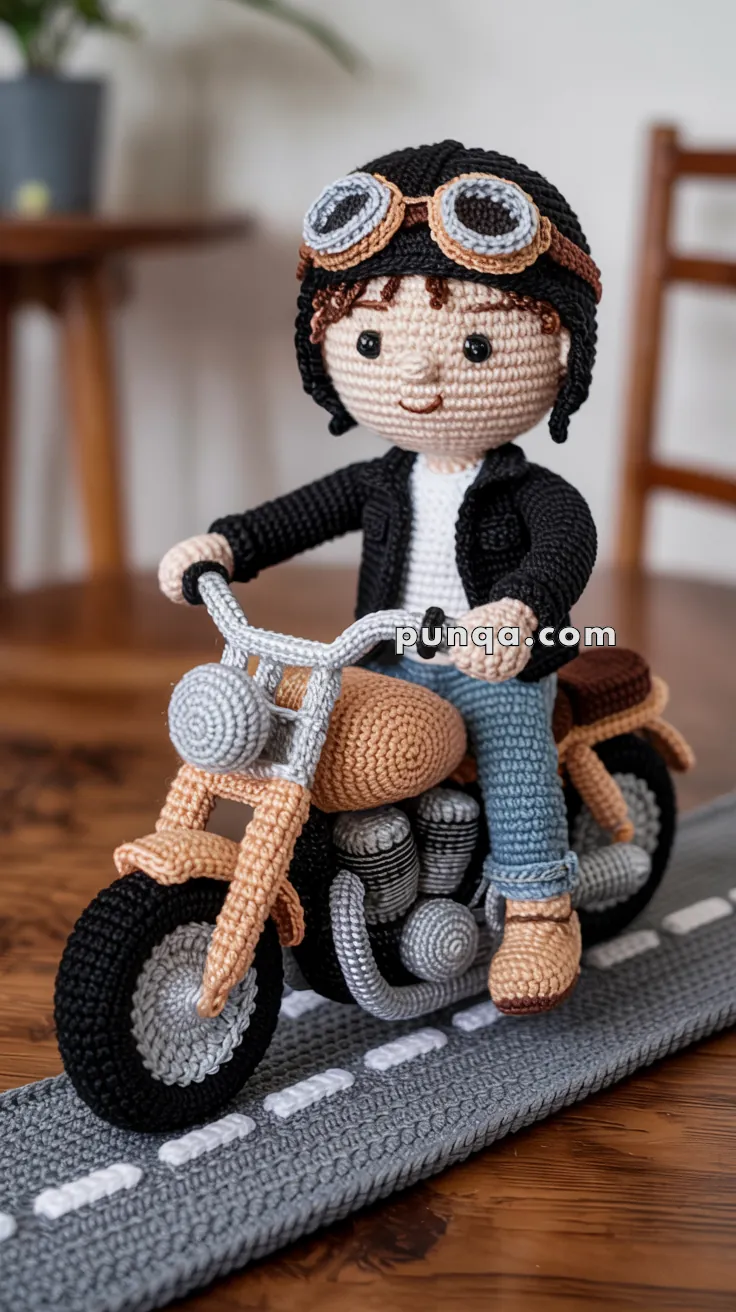
🏍️✨ Amigurumi Motorcycle Rider & Classic Cruiser Bike Crochet Pattern
Bring the spirit of open roads and cool vintage style into your crochet world! This pattern recreates the full biker scene exactly as shown in the photo — a cheerful rider in a retro helmet with pushed-up goggles, a soft-sculpted camel-colored motorcycle with domed fuel tank and ribbed cylinders, chunky treaded wheels, curved-back cruiser handlebars, and a realistic stitched road base. Every detail is built to match the look, proportions, and character seen in the image — perfect as a decor showpiece, collector’s handmade treasure, or unforgettable gift for motorcycle lovers of all ages. 🧶💛
✨ Skill Level
Advanced – shaping, wire support, multi-part assembly, and precise positioning.
📏 Finished Size
Rider: ~22–24 cm seated
Motorcycle: ~28–30 cm long
Base: ~34 × 9 cm
🧶 Materials & Yarn Amount
DK / light worsted yarn:
Beige (skin) – 25 g (~50 m)
Brown (hair, goggles) – 12 g (~25 m)
Black (helmet, jacket, tires) – 50 g (~100 m)
Light blue (jeans) – 20 g (~40 m)
White (shirt, road lines) – 10 g (~20 m)
Camel/tan (frame, fork, tank) – 40 g (~80 m)
Rust brown (seat) – 12 g (~25 m)
Grey/silver (engine, handlebar, rims, headlight) – 50 g (~100 m)
Dark grey (road) – 55 g (~110 m)
Other:
2.5–3.0 mm hook
Wire (arms + handlebar + frame stability)
Polyfill stuffing
8–10 mm safety eyes
🧵 Abbreviations
MR, sc, inc, dec, ch, sl st, BLO, FO
👦 Rider
🧑 Head (Rounded, slightly wide)
R1: MR 6
R2: inc ×6 (12)
R3: (1 sc, inc) ×6 (18)
R4: (2 sc, inc) ×6 (24)
R5: (3 sc, inc) ×6 (30)
R6–11: sc (30)
Insert eyes between R8–9
R12: (3 sc, dec) ×6 (24)
R13: (2 sc, dec) ×6 (18)
Stuff firmly, shaping cheeks
R14: (1 sc, dec) ×6 (12)
R15: dec ×6 (6)
👂 Ears (Make 2)
R1: MR 6
R2: (1 sc, inc) ×3 (9)
R3: sc around (9)
Flatten slightly and sew low on sides of head
👉 Ears must sit just below helmet edge and slightly forward
👃 Nose
MR 5
2 rounds sc
Attach centered
😊 Face Details
• Small embroidered smile
• Tiny brows
• Optional light blush
🧑🦱 Hair
Attach short strands (2–3 cm) along front edge
🪖 Helmet (Snug fit)
R1: MR 6
R2: inc ×6 (12)
R3: (1 sc, inc) ×6 (18)
R4: (2 sc, inc) ×6 (24)
R5: (3 sc, inc) ×6 (30)
R6–9: sc (30)
👉 Helmet sits low and close to head
🥽 Goggles
Frames (2):
MR 6 → inc → 12 → 1 round
Lenses (2):
MR 6 → inc
Strap:
ch 45
👉 Place goggles raised on helmet, slightly tilted forward
👕 Body (Compact torso)
R1: MR 6
R2: inc ×6 (12)
R3: (1 sc, inc) ×6 (18)
R4–6: sc (18) white
Switch to black
R7–13: sc (18)
Light stuffing
👉 Keep body short for seated proportions
✋ Hands with Thumb (Make 2)
Thumb
R1: MR 4
R2–3: sc around
FO
Palm
R1: MR 6
R2: inc ×6 (12)
R3–5: sc (12)
Attach thumb at side (work 3–4 stitches into thumb)
R6: (2 sc, dec) ×3 (9)
Light stuffing
👉 Shape slightly curved for gripping
💪 Arms (Make 2)
R1: MR 6
R2–3: sc (6) beige
Switch black
R4–10: sc (6)
Insert wire
Attach hand to arm
👉 Bend into forward curve
👖 Legs (Make 2 – seated shape)
R1: MR 6
R2: inc ×6 (12)
R3–5: sc (12) blue
Switch tan
R6–9: sc (12)
👉 Slight bend at top for sitting
👞 Shoes
Add 2–3 extra rounds at foot base
Flatten front slightly
🏍️ Motorcycle
🛞 Wheels (Make 2)
R1: MR 6
R2: inc ×6 (12)
R3: (1 sc, inc) ×6 (18)
R4: (2 sc, inc) ×6 (24)
R5–6: sc (24)
R7: BLO sc (24)
R8: (2 sc, dec) ×6 (18)
R9: (1 sc, dec) ×6 (12)
Slightly flatten bottom
💿 Rims
MR 6 → inc → 12 → 18
Attach
🧱 Frame (Low cruiser style)
2 rails:
ch 26 → sc back
Add 3 crossbars
🪝 Fork
2 tubes:
ch 14 → sc back
Attach at forward angle
🪝 Handlebar
ch 16 → sl st back
Insert wire
👉 Shape into wide U curve, ends slightly down and back
💡 Headlight
MR 6
inc ×6 (12)
2 rounds sc
Attach between forks
🔩 Engine (Compact cylinders)
Make 2:
MR 6
inc ×6 (12)
R3–6: sc
Add rib lines
Attach under tank
⛽ Fuel Tank
R1: MR 6
R2: inc ×6 (12)
R3: (1 sc, inc) ×6 (18)
R4–7: sc
R8: (1 sc, dec) ×6 (12)
Firm stuffing
🪑 Seat
ch 10
Rows 1–6: sc
Light stuffing
🎗️ Seat Straps
ch 30
Wrap over seat
🔧 Exhaust
ch 20 → sl st
Attach under engine
🛣️ Road Base
ch 60
Rows 1–10: sc
Border with sc
Add white dash lines
🧩 Final Assembly
✔️ Attach head to body
✔️ Sew ears before helmet placement
✔️ Place helmet low, partially covering ears
✔️ Attach arms, then sew hands to handlebar ends
✔️ Position legs bent naturally on bike
✔️ Place tank close to rider
✔️ Align engine under tank
✔️ Ensure bike stands evenly
🌟 Finishing Touches
✨ Slight bend in elbows for realism
✨ Hands wrapped naturally around grips
✨ Goggles angled forward
✨ Subtle shaping of cheeks and limbs
✨ Ensure posture looks relaxed, not stiff
🏁 Final Result
Your amigurumi biker is road-ready! 🏍️💨
With pulled-back cruiser handlebars, twin ribbed cylinders, camel tank, strapped saddle, perfectly rolled jeans, and a confident smile, this matching set looks like it rolled straight out of the photo.
Take your time with shaping, enjoy every stitch, and let the finished piece become a proud display, memorable handmade gift, or centerpiece in a themed collection.
Wherever the journey takes this yarn-wound motorcycle, may your creativity lead the way. 🧶❤️


Love this!!! Thanks!!!