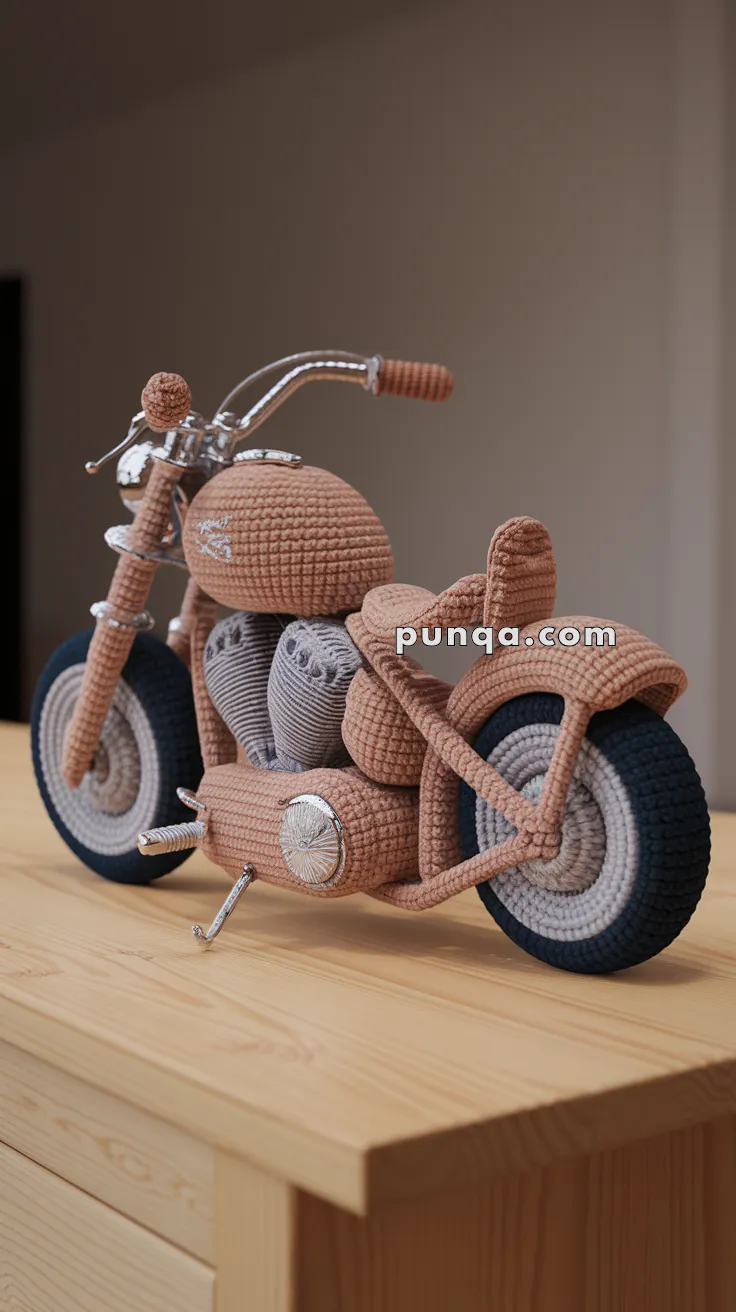
Welcome to the adventurous and dynamic world of amigurumi! 🏍️✨ Today, I’m excited to share my free crochet pattern for an Amigurumi Motorcycle—a bold and detailed creation perfect for vehicle enthusiasts, road trip lovers, or anyone who enjoys crafting structured and expressive plush designs! 🧶 Whether you love stitching up miniature machines, experimenting with sleek shaping, or simply want to add a stylish motorcycle to your handmade lineup, this pattern will guide you through crafting a beautifully sculpted plush with sturdy wheels, a classic frame, and a touch of high-speed charm! 🌍
This design embraces deep blacks, metallic grays, and precise shaping to bring a rugged and adventurous presence to your crochet projects! 🧶✨ I’ve carefully outlined each step to ensure your Amigurumi Motorcycle turns out just right—ready to rev up your collection or become a treasured handmade gift! 🎁 So grab your hooks, pick out bold hues, and let’s stitch up a fantastic motorcycle! 🏍️
🏍️ Amigurumi Motorcycle Crochet Pattern
Bring your crochet skills into full throttle with this detailed amigurumi motorcycle pattern — a true showpiece for bikers and craft lovers alike!
This design combines crocheted structure with metallic accents for a realistic and photo-accurate finish. The final model features layered tires, dual side engine coils, shiny chrome-like buttons, and a raised seat back — just like a classic handmade display bike.
✨ Skill Level
Advanced
This project includes:
- structural crochet
- mixed-media assembly
- wire shaping
- realistic model construction
- dimensional mechanical details
📏 Finished Size
Approx. 30 cm (12 inches) long
Approx. 17 cm (6.7 inches) tall
Using DK cotton yarn and a 2.25–2.5 mm hook.
🧶 Yarn Requirements
Camel Brown
Approx. 110 g
Used for:
- frame
- gas tank
- seat
- fenders
- fork covers
- side frame rails
Dark Navy or Black
Approx. 35 g
Used for:
- outer tires
Light Gray
Approx. 40 g
Used for:
- engine
- wheel centers
- exhaust pipe
Cream or Pale Gray
Approx. 20 g
Used for:
- wheel inner rings
Metallic Silver Embroidery Thread
Small amount
Used for chrome accents and decorative detailing.
🧵 Supplies
- 2.25–2.5 mm crochet hook
- Polyester stuffing
- Stitch markers
- Yarn needle
- Hot glue gun
- Floral wire
- Aluminum craft wire
- Silver metal straws or aluminum tubes
- Metal washers
- Silver buttons or jewelry findings
- Pipe cleaners
- Jewelry pliers
- Cardboard or plastic canvas scraps
🔤 Abbreviations (US Terms)
- MR – magic ring
- sc – single crochet
- inc – increase
- dec – invisible decrease
- ch – chain
- sl st – slip stitch
- BLO – back loop only
- FO – fasten off
🛞 Oversized Cruiser Tires (Make 2)
The wheels in the photo are very thick and rounded, so they need significantly more width than a typical amigurumi wheel.
Outer Tire
Dark Navy Yarn
R1: MR 6 sc (6)
R2: inc x6 (12)
R3: (1 sc, inc) x6 (18)
R4: (2 sc, inc) x6 (24)
R5: (3 sc, inc) x6 (30)
R6: (4 sc, inc) x6 (36)
R7: (5 sc, inc) x6 (42)
R8: (6 sc, inc) x6 (48)
R9–R14: sc around (48)
Switch to cream.
R15–R17: sc around (48)
Switch to light gray.
R18–R20: sc around (48)
Stuff firmly.
Insert:
- pipe cleaner ring
or - lightweight wire ring
inside tire before closing.
R21: (6 sc, dec) x6 (42)
R22: (5 sc, dec) x6 (36)
R23: (4 sc, dec) x6 (30)
R24: (3 sc, dec) x6 (24)
R25: (2 sc, dec) x6 (18)
FO.
Flatten very slightly so wheel sits naturally.
⚙️ Wheel Hub Caps (Make 2)
Light Gray Yarn
R1: MR 6
R2: inc x6 (12)
R3: (1 sc, inc) x6 (18)
R4: (2 sc, inc) x6 (24)
R5: (3 sc, inc) x6 (30)
FO.
Glue metal washer or decorative silver button into center.
Attach to wheel sides.
🧱 Main Motorcycle Frame
The body frame is long, narrow, and sits low between the wheels.
Camel Brown Yarn
R1: MR 6
R2: inc x6 (12)
R3: (1 sc, inc) x6 (18)
R4: (2 sc, inc) x6 (24)
R5–R32: sc around (24)
Lightly stuff.
Insert thick floral wire through entire frame.
Shape into slightly flattened horizontal tube.
FO.
⛽ Large Rounded Fuel Tank
The tank is oversized and rounded with a classic cruiser profile.
Camel Brown Yarn
R1: MR 6
R2: inc x6 (12)
R3: (1 sc, inc) x6 (18)
R4: (2 sc, inc) x6 (24)
R5: (3 sc, inc) x6 (30)
R6: (4 sc, inc) x6 (36)
R7–R14: sc around (36)
R15: (4 sc, dec) x6 (30)
R16: (3 sc, dec) x6 (24)
R17: (2 sc, dec) x6 (18)
Stuff very firmly.
FO leaving long tail.
Sew to top center of frame with front tilted slightly downward.
Optional:
embroider tiny metallic emblem on side.
🪑 Padded Cruiser Seat
The seat in the photo is thick, rectangular, and has a large upright rear support.
Seat Base
Camel Brown Yarn
Ch 13
Row 1:
sc across (12)
Rows 2–10:
sc across
Do not fasten off.
Edge entire seat with sl st.
Insert thin cardboard or plastic canvas inside.
Raised Backrest
Ch 8
Rows 1–5:
sc across (7)
Lightly stuff.
Fold slightly curved.
Attach upright at rear edge of seat.
The backrest should sit noticeably higher than the tank.
⚙️ Twin Engine Cylinders (Make 2)
The engine is one of the largest visible features.
Light Gray Yarn
Ch 34
Row 1:
sc across
Rows 2–14:
sc BLO across
FO.
Roll tightly into ribbed cylinder.
Secure seam.
Attach side-by-side beneath tank at slight V angle.
🛡️ Rear Support Rails (Make 2)
These create the triangular rear motorcycle frame.
Camel Brown Yarn
Ch 30
Rows 1–4:
sc across
Insert floral wire inside each strip.
Shape into angled triangular supports.
Attach:
- under seat
- down toward rear axle
- forward toward engine
🛞 Front Forks
The front suspension is thicker and more angled than typical amigurumi bike patterns.
Metal Fork Structure
Use:
- silver aluminum tubes
- metal straws
- thick aluminum wire
Cut:
2 pieces approx. 13 cm long.
Angle slightly backward near top.
Yarn Fork Covers
Wrap lower half with camel yarn using glue.
Leave upper section metallic for chrome appearance.
Attach directly to front wheel hub.
🏍️ Wide Cruiser Handlebars
Use aluminum jewelry wire.
Cut approximately 16 cm.
Bend into soft upward cruiser shape.
Wrap handle grips with camel yarn.
Glue onto fork bridge.
The handlebars should sit:
- higher than tank
- wider than wheel
to match realistic cruiser proportions.
🔦 Headlight
Light Gray Yarn
R1: MR 6
R2: inc x6 (12)
R3: (1 sc, inc) x6 (18)
R4–R5:
sc around
Stuff lightly.
FO.
Glue tiny reflective silver fabric or metallic sticker to front.
Attach between forks.
🛡️ Front Fender
The front fender hugs tightly around wheel.
Camel Brown Yarn
R1: MR 6
R2: inc x6 (12)
R3: (1 sc, inc) x6 (18)
R4: (2 sc, inc) x6 (24)
R5–R12:
sc around
Flatten slightly.
Insert flexible floral wire.
Curve over wheel closely.
🛡️ Rear Fender
Rear fender is much larger and longer than front.
Camel Brown Yarn
R1: MR 6
R2: inc x6 (12)
R3: (1 sc, inc) x6 (18)
R4: (2 sc, inc) x6 (24)
R5: (3 sc, inc) x6 (30)
R6–R14:
sc around
Flatten gently.
Insert floral wire.
Curve over upper rear wheel.
🔩 Side Covers
Use:
- silver buttons
- metal findings
- jewelry discs
Glue onto both sides beneath tank.
Optional:
embroider metallic outlines around edges.
🔧 Exhaust Pipe
The exhaust pipe is long, low, and slightly curved upward at rear.
Light Gray Yarn
Ch 7 and join.
Work 7 sc around for 26 rounds.
Insert floral wire inside.
Curve gently upward toward rear.
Wrap end with metallic thread.
Attach beneath engine on right side.
🦶 Foot Pegs
Use short silver wires.
Wrap centers with camel yarn.
Attach:
- beneath engine
- beneath seat
Secure firmly with glue.
🦿 Kickstand
Use sturdy silver wire.
Bend into angled support shape.
Wrap upper section with camel yarn.
Attach beneath left side of frame.
Adjust angle so motorcycle leans naturally.
✨ Creating the Realistic Metal Parts
Chrome Handlebars & Forks
Use:
- aluminum rods
- metallic straws
- jewelry wire
These create the realistic chrome reflections seen in the finished motorcycle.
Strong Frame Structure
Insert floral wire inside:
- frame
- fenders
- exhaust
- rear rails
This prevents collapsing and keeps the motorcycle rigid.
Realistic Wheel Shape
Insert:
- pipe cleaner rings
or - lightweight wire rings
inside tires before closing.
This keeps the wheels perfectly circular and thick.
Metallic Engine & Side Details
Use:
- silver buttons
- washers
- metallic beads
- jewelry charms
to imitate polished chrome engine covers.
Stable Standing Position
The motorcycle in the photo leans naturally using a metal kickstand.
A stiff wire kickstand is essential for stability.
🪡 Final Assembly
Step 1
Attach rear wheel to frame.
Step 2
Attach front wheel between forks.
Step 3
Install fork bridge and handlebars.
Step 4
Attach fuel tank.
Step 5
Install engine cylinders.
Step 6
Attach seat and backrest.
Step 7
Add rear support rails.
Step 8
Attach front and rear fenders.
Step 9
Install exhaust pipe.
Step 10
Add side covers, foot pegs, and kickstand.
🌟 Final Thoughts
This vintage cruiser motorcycle amigurumi captures the unmistakable silhouette of a classic retro bike with oversized tires, exposed engine cylinders, metallic forks, curved handlebars, and a deeply padded seat. Combining crochet with structural materials creates a stunning realistic miniature motorcycle that feels both handcrafted and mechanically authentic — a true statement piece for any amigurumi collection. 🏍️✨🧶


Muchas gracias por compartir tus saberes