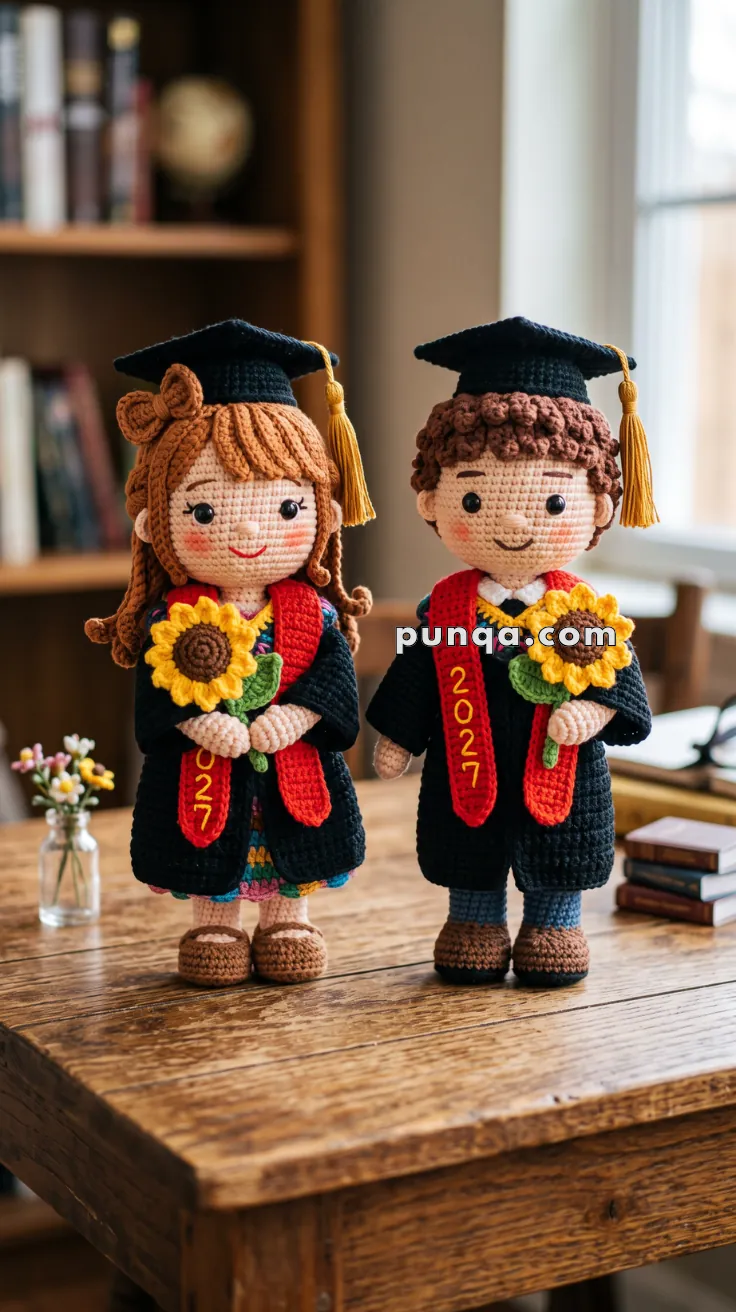
Looking for a meaningful handmade gift to celebrate graduation day? This Amigurumi Graduation Couple Crochet Pattern is a charming way to create personalized graduate dolls complete with classic black graduation gowns, mortarboard caps, golden tassels, red graduation stoles, and cheerful sunflower bouquets. Designed with detailed hairstyles, expressive embroidered faces, carefully shaped outfits, and balanced standing proportions, these crochet graduation dolls make beautiful keepsakes for high school, college, or university graduates.
Whether you’re making a crochet graduation gift, personalized commencement decoration, graduation party centerpiece, or handmade keepsake for a special couple or pair of friends, this detailed amigurumi pattern offers plenty of opportunities for customization. Change the hair colors, graduation year, school colors, clothing, flowers, or stole details to match the graduates you’re celebrating, and create a one-of-a-kind graduation amigurumi doll they can treasure long after the ceremony is over.
🎓 Amigurumi Graduation Couple Crochet Pattern
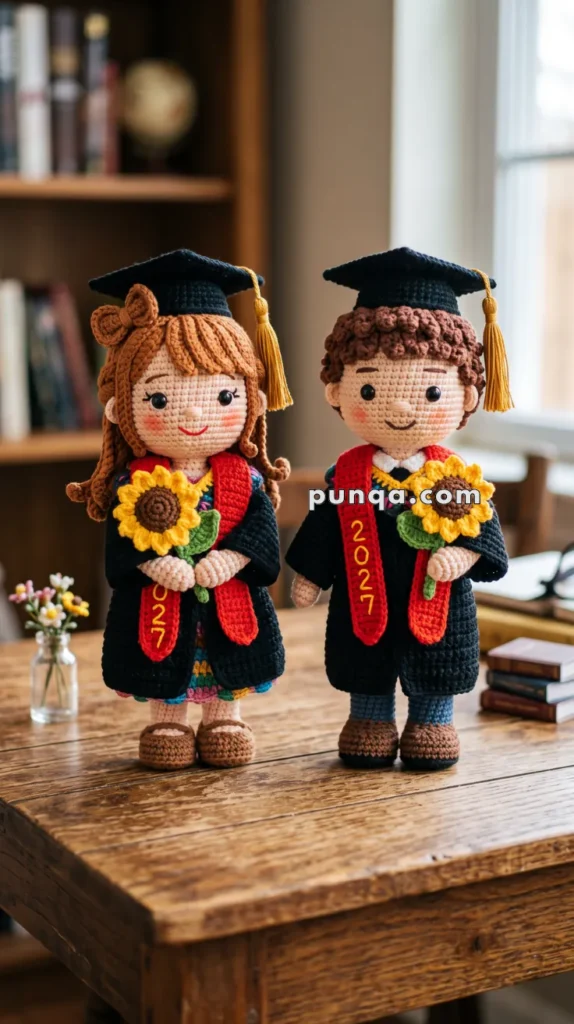
Celebrate a milestone with this sweet crocheted graduation couple, complete with black academic gowns, square mortarboards, gold tassels, bright red graduation stoles, sunflower bouquets, and carefully styled outfits underneath. 🌻🎓
The two dolls share the same soft, rounded proportions but have distinct details. The graduate on the left wears long auburn hair with loose curls and a large side bow, a colorful floral dress, brown Mary Jane shoes, and a red stole embroidered with the graduation year. The graduate on the right has short textured brown curls, gray trousers, brown shoes, a crisp white collar, and his own matching red year stole.
Both figures are designed to stand independently and measure roughly the same height, making them perfect as graduation gifts, keepsakes, cake-table decorations, or personalized commemorative dolls.
✨ Skill Level
Intermediate to Advanced
This project includes:
- Doll shaping
- Joined-leg construction
- Color changes
- Separate graduation gowns
- Mortarboard construction
- Tassel making
- Long and curly hairstyles
- Embroidered facial details
- Red graduation stoles
- Sunflower bouquets
- Small garment details
- Standing-balance assembly
📏 Finished Size
Using DK or light worsted cotton yarn with a 2.5–3 mm crochet hook:
- Female graduate: approximately 27–29 cm / 10½–11½ in
- Male graduate: approximately 27–29 cm / 10½–11½ in
- Width across mortarboard: approximately 9–10 cm / 3½–4 in
Finished size will vary depending on yarn, hook size, stuffing, hair volume, and tension.
🧶 Required Yarn Amounts
For the complete pair:
- Skin tone — approximately 115–130 g
- Black — approximately 150–175 g
- Red — approximately 45–55 g
- Dark brown — approximately 45–55 g
- Auburn/copper brown — approximately 60–70 g
- Medium brown for shoes — approximately 30–35 g
- Gray — approximately 30–35 g
- White/cream — approximately 20–25 g
- Golden yellow — approximately 25–30 g
- Leaf green — approximately 15–20 g
- Small amounts of pink, teal, yellow, green, and burgundy for the floral dress
- Small amount of dark brown or black embroidery yarn
- Small amount of blush pink
Polyester fiberfill — approximately 220–260 g total
🧵 Materials
- 2.5–3 mm crochet hook
- Four 8–10 mm black safety eyes
- Polyester fiberfill
- Tapestry needle
- Fine embroidery needle
- Stitch markers
- Pins
- Scissors
- Optional plastic canvas for shoe soles
- Optional plastic pellets for standing stability
- Gold embroidery thread or thin yarn for tassels and year numbers
For toys intended for young children, embroider the eyes instead of using safety eyes.
🔤 Abbreviations — US Terms
MR — Magic Ring
sc — Single Crochet
inc — Increase: 2 sc in one stitch
dec — Invisible Decrease
sl st — Slip Stitch
ch — Chain
hdc — Half Double Crochet
dc — Double Crochet
BLO — Back Loop Only
FLO — Front Loop Only
FO — Fasten Off
st — Stitch
Work in continuous rounds unless otherwise stated.
👩🎓 Female Graduate
😊 Head
Using skin-tone yarn:
R1
MR 6.
(6)
R2
inc ×6.
(12)
R3
(1 sc, inc) ×6.
(18)
R4
(2 sc, inc) ×6.
(24)
R5
(3 sc, inc) ×6.
(30)
R6
(4 sc, inc) ×6.
(36)
R7
(5 sc, inc) ×6.
(42)
R8–15
sc around.
(42)
Insert the safety eyes between Rounds 11 and 12, approximately 7 stitches apart.
R16
(5 sc, dec) ×6.
(36)
R17
(4 sc, dec) ×6.
(30)
R18
(3 sc, dec) ×6.
(24)
Begin stuffing firmly.
R19
(2 sc, dec) ×6.
(18)
R20
(1 sc, dec) ×6.
(12)
R21
dec ×6.
(6)
FO and close.
Gently shape the cheeks so the face remains round and youthful.
👂 Ears — Make 2
Using skin tone:
R1
MR 6.
(6)
R2
(1 sc, inc) ×3.
(9)
R3
sc around.
(9)
FO.
Flatten and sew to the sides of the head level with the eyes.
😊 Facial Details
Using medium-brown embroidery yarn:
- Make two gently arched eyebrows.
- Add three short lashes to the outer edge of each eye.
Using skin-tone yarn, make a tiny horizontal nose stitch.
Using red or dark pink embroidery floss, create a small curved smile.
Add light blush beneath the eyes with pink embroidery stitches or fabric-safe pastel.
🧡 Female Hair Cap
Using auburn or copper-brown yarn:
R1
MR 6. (6)
R2
inc ×6. (12)
R3
(1 sc, inc) ×6. (18)
R4
(2 sc, inc) ×6. (24)
R5
(3 sc, inc) ×6. (30)
R6
(4 sc, inc) ×6. (36)
R7
(5 sc, inc) ×6. (42)
R8–10
sc around.
(42)
FO and sew over the crown and back of the head.
Leave the forehead exposed.
🧡 Long Hair Strands
Cut approximately 45–55 strands, each about 24–28 cm long.
Attach them along:
- Both sides of the hair cap
- The back hairline
- The temples
- The crown near the part line
Leave most strands loose.
For soft curls, twist several strands individually and tack them lightly near the shoulders.
Create a side-swept fringe with shorter strands across the forehead.
🎀 Hair Bow
Using auburn yarn:
Bow Center Strip
Ch 14.
Starting in second chain, hdc across.
(13)
Work 4 rows total.
FO.
Fold the rectangle into two loops and wrap yarn around the center several times.
Sew the bow high on one side of the hair.
👗 Female Legs — Make 2
Begin with skin tone:
R1
MR 6.
(6)
R2
inc ×6.
(12)
R3
(1 sc, inc) ×6.
(18)
R4–14
sc around.
(18)
Stuff firmly.
FO after the first leg.
Make the second leg but do not fasten off.
🧍♀️ Joining the Legs
From the second leg:
Ch 3.
Join to the first leg.
Work:
18 sc around first leg,
3 sc along chain,
18 sc around second leg,
3 sc along opposite side of chain.
(42)
🌸 Floral Dress Body
Use a dark base color such as navy, teal, or very dark green.
R1–6
sc around.
(42)
R7
(5 sc, dec) ×6.
(36)
R8–11
sc around.
(36)
R12
(4 sc, dec) ×6.
(30)
R13–15
sc around.
(30)
R16
(3 sc, dec) ×6.
(24)
R17
sc around.
(24)
Switch to skin tone.
R18
(2 sc, dec) ×6.
(18)
R19–21
sc around.
(18)
Stuff firmly.
FO, leaving a long head-sewing tail.
🌸 Floral Dress Skirt
Attach the dark dress yarn around the lower waist.
R1
inc around.
R2
(2 sc, inc) around.
R3–7
sc around.
FO.
Using pink, yellow, teal, green, and burgundy yarn, embroider small flower and leaf motifs randomly over the skirt.
Only the bottom portion of the dress needs to remain visible beneath the graduation gown.
👠 Female Shoes — Make 2
Using medium brown yarn:
R1
Ch 8.
Starting in second chain:
6 sc, 3 sc in final chain.
Continue on opposite side:
5 sc, inc.
(16)
R2
inc, 5 sc, 3 inc, 5 sc, 2 inc.
(22)
R3
sc around.
(22)
R4
BLO sc around.
(22)
R5–6
sc around.
(22)
R7
7 sc, dec ×4, 7 sc.
(18)
Lightly stuff.
FO.
Sew each shoe around the lower end of a leg.
👠 Mary Jane Straps
Using brown:
Ch 9.
FO.
Sew one chain across the top of each shoe.
Add a tiny brown knot or French knot on one outer side to imitate a button.
🤲 Female Arms — Make 2
Using skin tone:
R1
MR 6. (6)
R2
inc ×6. (12)
R3–13
sc around. (12)
Stuff lightly.
Flatten the shoulder opening.
FO.
The hands remain uncovered because they extend from the gown sleeves.
👨🎓 Male Graduate
😊 Head
Work the same head pattern as for the female graduate.
Place the eyes approximately 8 stitches apart for a slightly different expression.
Add:
- Medium-brown eyebrows
- Tiny skin-tone nose
- Small curved dark-red smile
- Light cheek blush
🤎 Male Hair Cap
Using dark brown:
Work the same basic hair cap:
MR 6 → 12 → 18 → 24 → 30 → 36 → 42.
Work another 3 rounds sc around.
FO and sew to the crown.
🌀 Curly Hair
The hairstyle is short, dense, and heavily textured.
Using brown yarn:
Attach yarn to the hair cap.
Repeatedly work:
ch 5, 3 sc in second ch from hook, sc in remaining chains, sl st into next cap stitch.
Continue around the front and sides of the cap.
Make the curls especially dense along the forehead.
Trim or tack the loops as necessary to form a neat rounded silhouette.
👞 Male Legs — Make 2
Begin with brown shoes.
R1
Ch 8.
Starting in the second chain:
6 sc, 3 sc in final chain,
5 sc along opposite side, inc.
(16)
R2
inc, 5 sc, 3 inc, 5 sc, 2 inc.
(22)
R3
sc around.
(22)
R4
BLO sc around.
(22)
R5–6
sc around.
(22)
Switch to gray-blue.
R7
(9 sc, dec) ×2.
(20)
R8–17
sc around.
(20)
Stuff firmly.
FO after the first leg.
Do not fasten off after the second.
👖 Join Male Legs
Ch 3 and join the legs.
Work:
20 sc around first leg,
3 sc across chain,
20 sc around second leg,
3 sc across opposite side.
(46)
👖 Male Pants & Torso
Continue in gray-blue.
R1–6
sc around.
(46)
R7
(21 sc, dec) ×2.
(44)
R8
(9 sc, dec) ×4.
(40)
Switch to black.
R9–13
sc around.
(40)
R14
(8 sc, dec) ×4.
(36)
R15–16
sc around.
(36)
R17
(4 sc, dec) ×6.
(30)
R18
(3 sc, dec) ×6.
(24)
Switch to skin tone.
R19
(2 sc, dec) ×6.
(18)
R20–22
sc around.
(18)
Stuff firmly.
FO.
🤍 Shirt Collar
Make two small white collar points.
Row 1
Ch 7.
Starting in second chain, sc across.
(6)
Row 2
dec, 2 sc, dec.
(4)
Row 3
dec twice.
(2)
Row 4
dec.
(1)
FO.
Sew one on either side of the front neckline.
🤲 Male Arms — Make 2
Using skin tone:
R1
MR 6.
(6)
R2
inc ×6.
(12)
R3–5
sc around.
(12)
Switch to black.
R6–15
sc around.
(12)
Stuff lightly.
Flatten upper opening.
FO.
🖤 Graduation Gown — Make 2
The gowns are worked separately so they hang over the underlying outfits.
Using black yarn:
Back Panel
Ch 25.
Starting in second chain, sc across.
(24)
Work 22 rows.
FO.
🖤 Front Panels — Make 2 per Doll
Ch 12.
Starting in second chain, sc across.
(11)
Work 22 rows.
FO.
🪡 Gown Assembly
Place the back panel behind the doll.
Place one front panel on each side of the torso.
Sew the shoulder seams.
Sew only the upper sides, leaving the lower gown loose and open.
The gown should reach approximately to knee level.
Leave the center front open so the clothing underneath is visible.
🖤 Graduation Sleeves
Make two per doll.
Ch 19 and join.
R1–11
sc around.
(18)
R12
(4 sc, dec) ×3.
(15)
R13–16
sc around.
(15)
FO.
Sew the sleeve tops into the gown arm openings.
Thread or sew the doll arms through the sleeves.
🔴 Graduation Stoles — Make 2
Each red stole is made from two long narrow strips.
Make 4 strips total.
Using red:
Row 1
Ch 25.
Starting in second chain, sc across.
(24)
Rows 2–5
sc across.
(24)
FO.
Round the lower end slightly by working several sc around the short edge.
Place two strips around each doll’s neck so they hang vertically down the front.
Sew together at the back neck only.
🔢 Graduation Year
Using golden-yellow embroidery yarn, stitch the graduation year vertically down one side of each red stole.
For a 2027 design, embroider:
2
0
2
7
Stack the numbers vertically with even spacing.
Keep the opposite stole plain.
🎓 Mortarboard Cap — Make 2
The cap consists of a fitted black band and a flat square top.
🖤 Cap Band
Using black yarn:
R1
MR 6.
(6)
R2
inc ×6.
(12)
R3
(1 sc, inc) ×6.
(18)
R4
(2 sc, inc) ×6.
(24)
R5
(3 sc, inc) ×6.
(30)
R6
(4 sc, inc) ×6.
(36)
R7
(5 sc, inc) ×6.
(42)
R8–11
sc around.
(42)
FO.
The cap should fit snugly over the hair without covering the eyes.
⬛ Mortarboard Square
Using black yarn:
Row 1
Ch 19.
Starting in second chain, sc across.
(18)
Rows 2–18
sc across.
(18)
FO.
Work one round of sc around all four edges.
At each corner work 3 sc in the same stitch.
FO.
Sew the square centered over the cap band.
Lightly steam or block flat if needed.
💛 Tassels — Make 2
Using golden-yellow yarn:
Wrap yarn around three fingers about 20 times.
Tie securely near one end.
Cut the opposite end.
Wrap another piece of yarn around the upper section to form the tassel head.
Trim evenly.
Make a long twisted or chained cord approximately 8–10 cm / 3–4 in long.
Attach one end to the center-top of the mortarboard and the tassel to the other.
Let the tassel fall down one side.
🌻 Sunflower — Make 2
Brown Flower Center
Using dark brown:
R1
MR 6. (6)
R2
inc ×6. (12)
R3
(1 sc, inc) ×6. (18)
FO.
🌻 Yellow Petals
Join golden-yellow yarn.
Around the flower center work:
(sl st, ch 5, sc in second ch, hdc, dc, sl st in next center stitch)
Repeat all the way around.
Aim for approximately 10–12 petals.
FO.
🌿 Leaves — Make 2–3 per Flower
Using green:
Ch 7.
Starting in second chain:
sl st, sc, hdc, dc, hdc, sc.
Work the same sequence down the opposite side of the chain.
FO.
🌿 Flower Stem
Using green:
Ch approximately 12–14.
Sl st back along the chain.
FO.
Sew the flower and leaves onto the top of the stem.
Make one complete sunflower for each graduate.
🤲 Positioning the Bouquets
For the female graduate, bring both hands toward the center front and sew them lightly around the stem.
For the male graduate, position one hand around the stem while the other arm rests more naturally at the side.
Use one or two hidden stitches through the bouquet to keep it securely in place.
👩🎓 Female Gown Styling
Keep the front of the gown slightly open so the colorful floral dress is visible near the hem.
The red stole should sit above the gown front edges.
The sunflower should cover part of the upper stole while leaving the embroidered year visible lower down.
The long hair should fall outside the gown rather than being trapped underneath it.
👨🎓 Male Gown Styling
The male gown falls straighter and slightly more narrowly.
Keep the gray-blue trousers visible beneath the hem.
Let the brown shoes project clearly below the trouser legs.
The white collar should remain visible above the black gown.
Position the stole symmetrically around the neck.
🪡 Head-to-Body Assembly
Center each head over the neck.
Add extra stuffing to the neck if required.
Pin before sewing.
Sew around the entire neck opening several times.
Because the graduation caps and hair add weight, reinforce the back of the neck with hidden vertical stitches.
⚖️ Standing Stability
To help the dolls stand independently:
- Stuff both legs firmly.
- Keep the shoes well stuffed.
- Flatten each shoe sole before assembly.
- Insert plastic canvas into the shoe bottoms if needed.
- Add a tiny sealed pouch of plastic pellets to the lower torso.
- Keep both legs directly beneath the body.
- Check balance after adding the gown and mortarboard.
The floral bouquet should remain lightweight so it does not pull the doll forward.
🪡 Recommended Assembly Order
For the cleanest finish:
- Crochet both heads.
- Install eyes and complete facial embroidery.
- Attach ears.
- Add each hairstyle.
- Make legs and underlying outfits.
- Join legs and finish bodies.
- Make and attach shoes.
- Attach arms.
- Sew heads to bodies.
- Make graduation gowns.
- Dress the dolls.
- Add red stoles.
- Embroider graduation years.
- Make mortarboards.
- Add tassels.
- Make the sunflowers and leaves.
- Position bouquets in the hands.
- Make final hair, gown, and posture adjustments.
✨ Final Shaping
For the female graduate:
- Keep the face round and softly blushed.
- Let the auburn curls frame both sides of the face.
- Place the large hair bow high on one side.
- Leave the colorful floral skirt visible beneath the gown.
- Keep the brown Mary Jane shoes visible.
- Hold the sunflower bouquet centrally.
- Let the red stole fall nearly to knee level.
For the male graduate:
- Keep the brown curls dense across the forehead.
- Leave the white shirt collar clearly visible.
- Keep the gown straighter than the female gown.
- Show the gray-blue trouser legs beneath it.
- Keep the brown shoes flat and parallel.
- Position the sunflower slightly to one side of the chest.
- Let the golden tassel hang freely beside the cap.
💡 Helpful Crochet Tips
Pin the mortarboard square to the cap before sewing so all four corners remain evenly positioned.
Do not overstuff the hair caps. The mortarboards need to sit flat on top.
When embroidering the graduation year, use a thinner strand than the stole yarn so the numbers remain crisp.
Make both sunflowers at the same time so their size and petal count match.
For the female curls, lightly twist yarn strands rather than brushing them apart.
For the male curls, pack the front hair loops closely together so the forehead has a full textured edge.
Keep the gown sleeves loose enough for the hands to remain clearly visible.
🧼 Care Instructions
Spot clean gently with a damp cloth.
Allow the dolls to air dry completely.
Reshape the gowns, mortarboards, tassels, sunflowers, and hairstyles while damp.
Avoid machine washing when safety eyes, plastic canvas, pellets, or structural inserts are used.
Store the dolls standing upright so the mortarboards stay flat.
🌻 A Handmade Graduation Celebration
These graduation dolls make a meaningful way to celebrate years of study, hard work, friendship, and new beginnings. 🎓💛
With their matching black gowns and mortarboards, bright red year stoles, golden tassels, cheerful sunflower bouquets, carefully styled hair, and individual outfits, the finished pair has all the details of a joyful commencement-day keepsake.
Personalize the stole year, hair colors, outfit colors, school colors, bouquet, or gown details to create a one-of-a-kind graduation gift for someone special.
Happy crocheting, and congratulations to the graduates! 🎓🌻🧶