Welcome to the adventurous and dynamic world of amigurumi! 🏍️✨ Today, I’m excited to share my free crochet pattern for an Amigurumi Motorcycle—a bold and detailed creation perfect for vehicle enthusiasts, road trip lovers, or anyone who enjoys crafting structured and expressive plush designs! 🧶 Whether you love stitching up miniature machines, experimenting with sleek shaping, or simply want to add a stylish motorcycle to your handmade lineup, this pattern will guide you through crafting a beautifully sculpted plush with sturdy wheels, a classic frame, and a touch of high-speed charm! 🌍
This design embraces deep blacks, metallic grays, and precise shaping to bring a rugged and adventurous presence to your crochet projects! 🧶✨ I’ve carefully outlined each step to ensure your Amigurumi Motorcycle turns out just right—ready to rev up your collection or become a treasured handmade gift! 🎁 So grab your hooks, pick out bold hues, and let’s stitch up a fantastic motorcycle! 🏍️
🏍️ Amigurumi Motorcycle Crochet Pattern
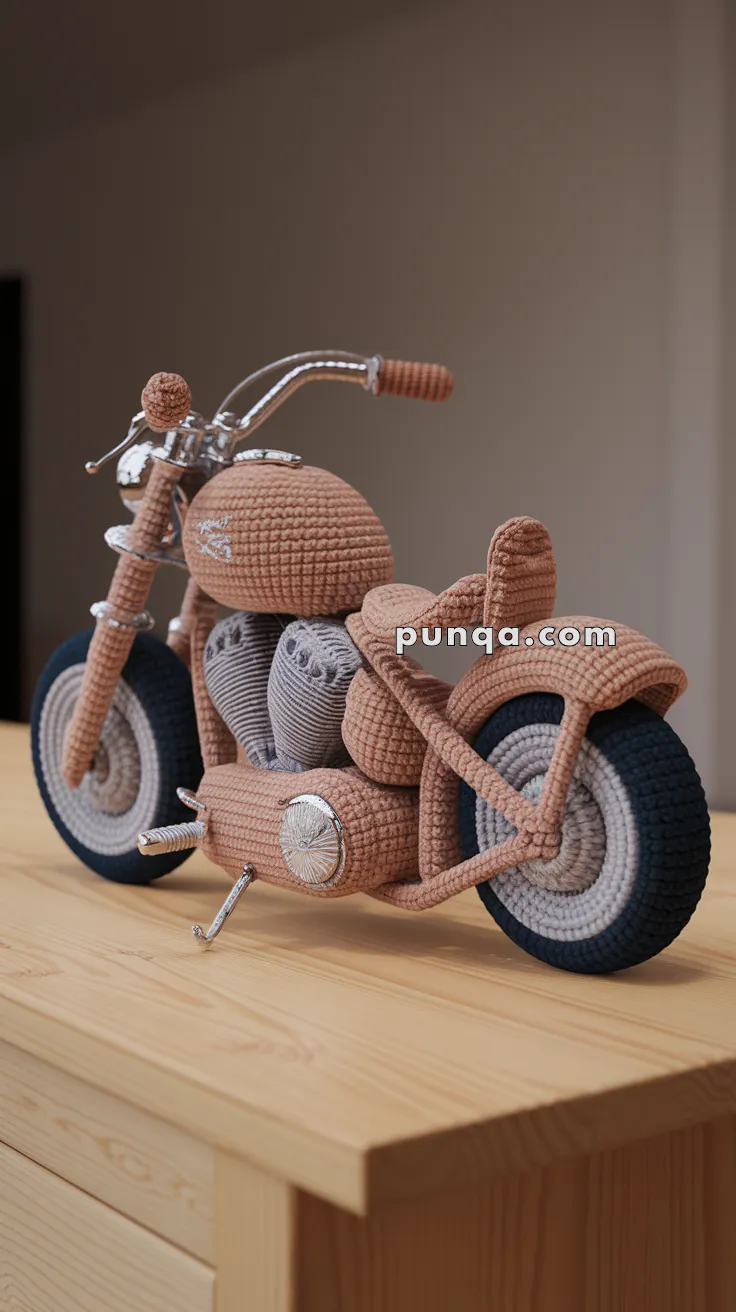
Bring your crochet skills into full throttle with this detailed amigurumi motorcycle pattern — a true showpiece for bikers and craft lovers alike!
This design combines crocheted structure with metallic accents for a realistic and photo-accurate finish. The final model features layered tires, dual side engine coils, shiny chrome-like buttons, and a raised seat back — just like a classic handmade display bike.
✨ Skill Level
Advanced – Includes shaping, mixed materials, and assembly of multiple small parts.
📏 Finished Size
Approx. 25 cm (10 in) long × 15 cm (6 in) tall when made with DK or worsted yarn and a 2.5 mm hook.
🧶 Materials
Yarn (DK or Light Worsted weight):
-
Terracotta brown – body, tank, seat, fenders, frame
-
Light grey – engine coils, wheel centers, exhaust pipe
-
Stone or cream – tire inner ring
-
Dark navy or black – tire outer ring
Hook: 2.5 mm
Stuffing: Polyfill
Accessories & Tools:
-
2 thin aluminum straws or silver rods (for handlebars & forks)
-
2 metal washers (wheel hubs)
-
2 large silver buttons (side covers)
-
Silver cord or metallic thread (optional chrome lines)
-
Black pipe cleaners (optional inner tire reinforcement)
-
A few short silver wires (kickstand, footpegs)
-
Hot glue gun or super glue
-
Yarn needle, scissors, stitch markers
🔤 Abbreviations (US Terms)
MR – Magic Ring
sc – Single Crochet
inc – Increase (2 sc in same st)
dec – Decrease (sc 2 sts together)
ch – Chain
sl st – Slip Stitch
BLO – Back Loop Only
FLO – Front Loop Only
( ) – Repeat sequence
🛠️ Crochet Pattern
🛞 Tires (Make 2)
Outer navy, middle stone, inner grey — for layered effect
R1: MR, 6 sc [6]
R2: inc ×6 [12]
R3: (sc, inc) ×6 [18]
R4: (2 sc, inc) ×6 [24]
R5: (3 sc, inc) ×6 [30]
R6–7: With dark navy, sc around [30]
R8–9: Switch to stone/cream, sc around [30]
R10: Switch to light grey, sc BLO around [30]
R11: (3 sc, dec) ×6 [24]
R12: (2 sc, dec) ×6 [18]
Stuff firmly for solid tire shape.
R13: (sc, dec) ×6 [12]
R14: dec ×6 [6], close and weave end.
(Optional: coil a black pipe cleaner inside R6–9 for stiffness.)
⚙️ Wheel Hubs (Make 2)
R1: With light grey, MR, 6 sc [6]
R2: inc ×6 [12]
R3: (sc, inc) ×6 [18]
R4: (2 sc, inc) ×6 [24]
Fasten off.
Sew one hub to the outer side of each tire and hot glue a metal washer in the center.
🧱 Frame Base (Main Body)
R1: With terracotta, MR, 6 sc [6]
R2: inc ×6 [12]
R3: (sc, inc) ×6 [18]
R4–18: sc around [18]
Stuff lightly and shape into a long oval (peanut shape).
This is the core connecting both wheels.
🔩 Engine Coils (Make 2)
Ch 30, sc in 2nd ch from hook and across [29].
Roll tightly into a cylinder and stitch ends to hold shape.
Make two coils and attach symmetrically to both sides of the lower frame.
(Front coil slightly higher than rear for realism.)
⛽ Gas Tank
R1: With terracotta, MR, 6 sc [6]
R2: inc ×6 [12]
R3: (sc, inc) ×6 [18]
R4: (2 sc, inc) ×6 [24]
R5–10: sc around [24]
R11: (2 sc, dec) ×6 [18]
R12: (sc, dec) ×6 [12]
R13: dec ×6 [6], close and stuff firmly.
Sew to the top of the frame with a slight forward tilt (nose lower than seat side).
🪑 Seat with Raised Backrest
Seat Base
Ch 9, sc in 2nd ch from hook and across [8]
Rows 2–5: sc across [8]
Row 6: dec, 4 sc, dec [6]
Fasten off.
Backrest
Ch 6, sc in 2nd ch and across [5]
Rows 2–3: sc across [5]
Fasten off.
Attach seat directly behind tank.
Stitch backrest upright on the rear edge for the curved high-back seat shape seen in the photo.
🛡️ Rear Triangle / Side Rails (Make 2)
Ch 24, sc in 2nd ch from hook and across [23]
Rows 2–3: sc across [23]
Fasten off.
Pin one rail per side, forming a triangle from under the seat down to the rear wheel axle, then forward toward the engine area. Sew along edges securely.
🧲 Side Covers (Metallic Circles)
Sew or glue one silver button on each side below the gas tank, in front of the rear wheel area.
🪛 Front Forks & Handlebars (Non-Yarn Parts)
Cut two 11 cm rods/straws for the forks.
Wrap each with silver yarn or leave metallic.
Glue or stitch the lower ends near the front wheel center (like real fork posts).
Fork Bridge:
Ch 8, sc across (7 sts). Make 3 rows, then fasten off.
Attach horizontally across the two fork tops.
Steering Head Cap:
R1: With terracotta, MR, 6 sc [6]
R2: inc ×6 [12]
R3: sc around [12], lightly stuff, and sew on top center of bridge.
Handlebars:
Bend a 12 cm silver wire into a U shape.
Wrap 2 cm of each end with terracotta yarn for grips.
Glue ends atop the fork bridge so the bars curve slightly backward and sit higher than the tank.
💡 Headlight Sphere
R1: With terracotta, MR, 6 sc [6]
R2: inc ×6 [12]
R3: sc around [12]
R4: (sc, dec) ×4 [8], stuff lightly.
FO.
Attach to the front center of the fork bridge.
🧲 Exhaust Pipe (Right Side)
With light grey, ch 5, join to ring.
Work 5 sc per round for ~18 rounds.
Stuff thinly or insert wire to keep shape.
Switch to silver yarn for final 2 rounds for metallic tip.
Sew along right side of frame base, starting under engine coil and ending just past the rear wheel.
🦶 Footpegs & Kickstand
Use short silver wires:
-
Wrap with terracotta for pegs and attach symmetrically below the seat area.
-
Bend a longer wire for the kickstand and sew under the left side so the motorcycle leans slightly.
🛞 Fenders (Front & Rear)
Front Fender
R1: MR, 6 sc [6]
R2: inc ×6 [12]
R3–8: sc around [12]
Flatten and edge with sl st for stiffness.
Sew directly over the front wheel, close to the tire.
Rear Fender
R1: MR, 6 sc [6]
R2: inc ×6 [12]
R3: (sc, inc) ×6 [18]
R4–9: sc around [18]
Flatten, edge, and sew covering the upper half of the rear tire.
🧩 Assembly Order
-
Attach rear wheel to back of frame base.
-
Attach front wheel between fork posts.
-
Connect fork bridge and steering cap, then add handlebars.
-
Sew headlight to front center of bridge.
-
Attach tank to top of frame base.
-
Attach seat and backrest behind tank.
-
Add both side rails forming rear triangle.
-
Sew engine coils to both sides.
-
Add side buttons, exhaust pipe, and fenders.
-
Add footpegs and kickstand last.
🪙 Optional Embellishments
-
Embroider a small logo or emblem on the tank.
-
Add silver cord detailing along frame edges or around engine coils for “chrome lines.”
-
Use a touch of glossy fabric glue on fenders for a realistic shine.
🎉 Final Touch
You’ve completed your Amigurumi Motorcycle! 🏍️✨
It’s a perfect handmade collectible — display it proudly or gift it to a bike lover.