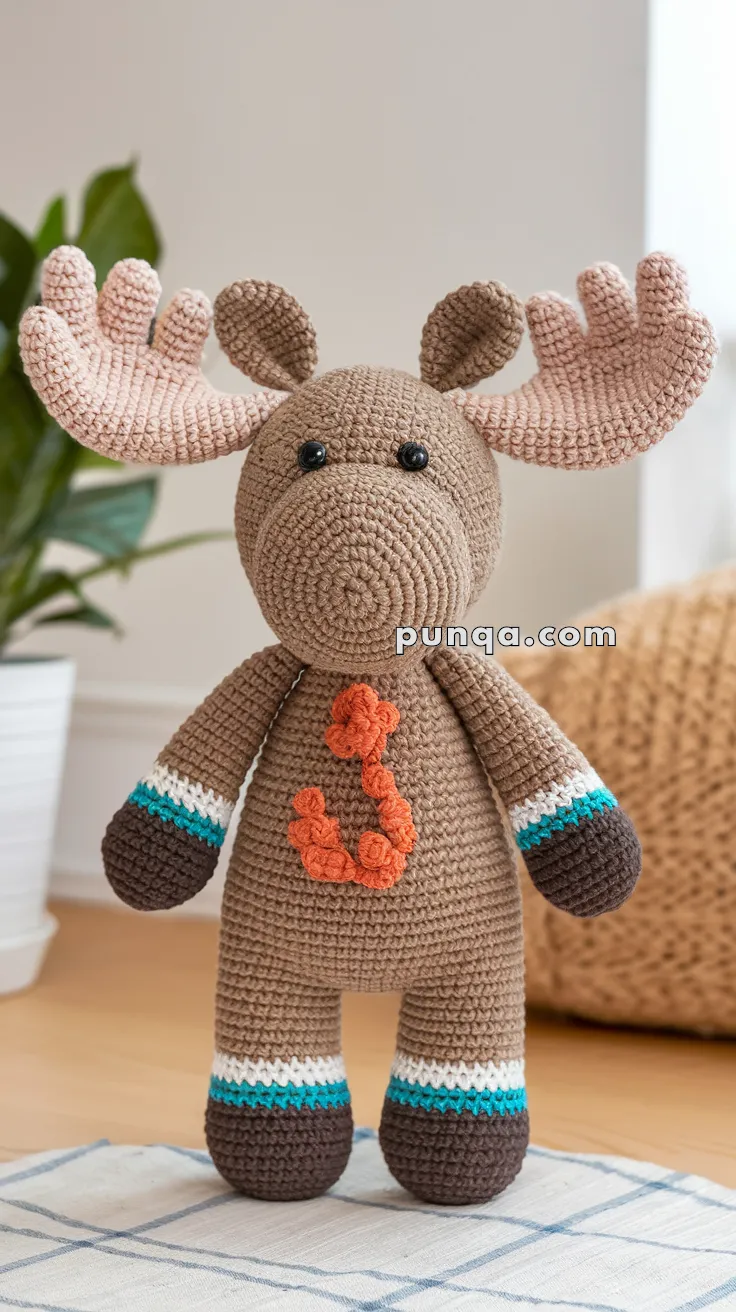
Bring the majestic charm of a Moose to life with this Amigurumi Moose crochet pattern! 🦌✨ With its grand antlers, sturdy stance, and gentle expression, this design captures the essence of this beloved woodland giant in yarn form. Whether you’re crafting for a nature-inspired décor piece, a heartfelt gift, or simply love forest-themed amigurumi, this FREE pattern is a fantastic addition to your collection.
Designed for intermediate crocheters, this pattern allows for customization in fur textures, antler shapes, and even tiny accessories like embroidered details or a miniature forest setting to enhance its personality. Choose classic rich browns and creams for a realistic look or experiment with whimsical hues for a unique twist! Whether displayed as part of a woodland setup or gifted to a fellow crochet enthusiast, this amigurumi moose is sure to impress.
Grab your hook, select your favorite yarn, and let’s bring this gentle giant to life—one stitch at a time! 🧶✨
🦌 Amigurumi Moose Crochet Pattern
Say hello to your cozy forest friend — this adorable amigurumi moose! With soft antlers, vibrant sleeve stripes, and a cheerful belly embellishment, this woodland buddy makes the perfect gift or nursery decor piece.
✨ Skill Level
Intermediate – Includes color changes, antler shaping, and sewing multiple parts.
📏 Finished Size
Approximately 10–12 inches (25–30 cm) tall using DK weight yarn and a 2.5–3.5 mm hook.
🧶 Materials
-
DK weight yarn in:
-
Light Brown (Main Body)
-
Pale Pink (Antlers & Inner Ears)
-
Dark Brown (Hooves & Snout)
-
White (Stripes)
-
Turquoise (Stripes)
-
Orange (Belly embroidery detail)
-
-
Crochet hook: 2.5 mm–3 mm
-
Safety eyes (10 mm or 12 mm)
-
Tapestry needle
-
Stitch markers
-
Fiberfill stuffing
-
Hot glue (optional for flower detail attachment)
🧵 Abbreviations (US Terms)
MR – Magic Ring
sc – Single Crochet
inc – Increase
dec – Decrease
sl st – Slip Stitch
ch – Chain
BLO – Back Loop Only
FO – Fasten Off
🧸 Head
With light brown:
-
MR, 6 sc
-
inc x6 (12)
-
(1 sc, inc) x6 (18)
-
(2 sc, inc) x6 (24)
-
(3 sc, inc) x6 (30)
-
(4 sc, inc) x6 (36)
7–14. sc around (36) -
(4 sc, dec) x6 (30)
-
(3 sc, dec) x6 (24)
-
(2 sc, dec) x6 (18)
-
(1 sc, dec) x6 (12)
Stuff firmly. FO, leave a long tail for sewing.
🐽 Snout
With dark brown:
-
MR, 6 sc
-
inc x6 (12)
3–5. sc around (12)
Stuff lightly. FO, sew to lower front of head.
👀 Eyes
Insert safety eyes between Rounds 10–11 of head, spacing them about 6 stitches apart.
🦴 Ears (Make 2)
With light brown:
-
MR, 6 sc
-
(1 sc, inc) x3 (9)
3–5. sc around (9)
Flatten and FO. Leave tail for sewing.
🦌 Antlers (Make 2)
With pale pink:
-
MR, 6 sc
-
inc x6 (12)
3–6. sc around (12) -
ch 6, sl st in 2nd ch from hook and back down with sc, hdc, dc, sc, sl st in next st on round — repeat 4 times for each prong
FO and stuff lightly. Sew to top of head.
🧍 Body
With light brown:
-
MR, 6 sc
-
inc x6 (12)
-
(1 sc, inc) x6 (18)
-
(2 sc, inc) x6 (24)
-
(3 sc, inc) x6 (30)
6–20. sc around (30) -
(3 sc, dec) x6 (24)
-
(2 sc, dec) x6 (18)
Stuff firmly. FO, leave long tail for sewing.
✋ Arms (Make 2)
Start with dark brown:
-
MR, 6 sc
-
inc x6 (12)
3–4. sc around (12)
Change to white:
5–6. sc around (12)
Change to turquoise: -
sc around (12)
Change to light brown:
8–18. sc around (12)
Stuff lightly. FO, leave tail for sewing.
🦵 Legs (Make 2)
Start with dark brown:
-
MR, 6 sc
-
inc x6 (12)
-
(1 sc, inc) x6 (18)
4–5. sc around (18)
Change to white: -
sc around (18)
Change to turquoise: -
sc around (18)
Change to light brown:
8–15. sc around (18)
Stuff firmly. FO, leave tail for sewing.
🧶 Embellishment: Belly Swirl Flower
With orange yarn:
-
Use small chain and surface crochet spirals.
-
Make small rosettes by rolling chained strips (ch 10–12, then sc across), secure at base.
Sew to the center of body in a “J” or swirl shape as seen in image.
🧷 Assembly
-
Sew head to body securely.
-
Attach legs at bottom sides, evenly spaced.
-
Position and sew arms slightly forward-facing.
-
Sew ears behind the eyes.
-
Attach antlers just above ears.
-
Embroider nostrils and optional smile.
-
Add belly flower swirl securely using matching thread or glue.
🌲 Customization Tips
-
Use plaid or forest green for a lumberjack moose look!
-
Add a scarf, bow tie, or tiny sweater for seasonal versions
-
Personalize with initials or floral patches
This cuddly moose is full of charm, and whether it’s standing proud on a shelf or snuggled up at bedtime, it’s bound to bring smiles and woodsy warmth to any space! 🦌🌿