I’ve recently been captivated by the delightful world of amigurumi, where yarn and imagination intertwine to create the most charming creatures and objects. One of the most exciting projects I’ve embarked on is crafting a monster truck amigurumi pattern. Now, you might wonder, why a monster truck? 🛻 Well, there’s something irresistibly fun about mixing the soft and cuddly nature of amigurumi with the rugged, adventurous spirit of monster trucks. The juxtaposition of the two elements is what makes this project so enchanting. With every stitch, you get to infuse personality into a tiny, yarn-crafted vehicle, transforming it into a playful companion that sparks joy.
Creating a monster truck amigurumi pattern is both an art and a science, requiring a blend of creativity and technical skill. I start by visualizing the truck’s design, sketching out the features that make it unique—like oversized wheels, a robust body, and maybe even some quirky details that give it character. 🛠️ From there, I choose the perfect yarn colors to bring it all to life. The process is incredibly rewarding as each piece, whether it’s the snazzy wheels or the sturdy chassis, is lovingly crocheted and assembled. The joy of seeing the monster truck take shape stitch by stitch is unparalleled, and sharing the finished piece with others doubles the happiness.
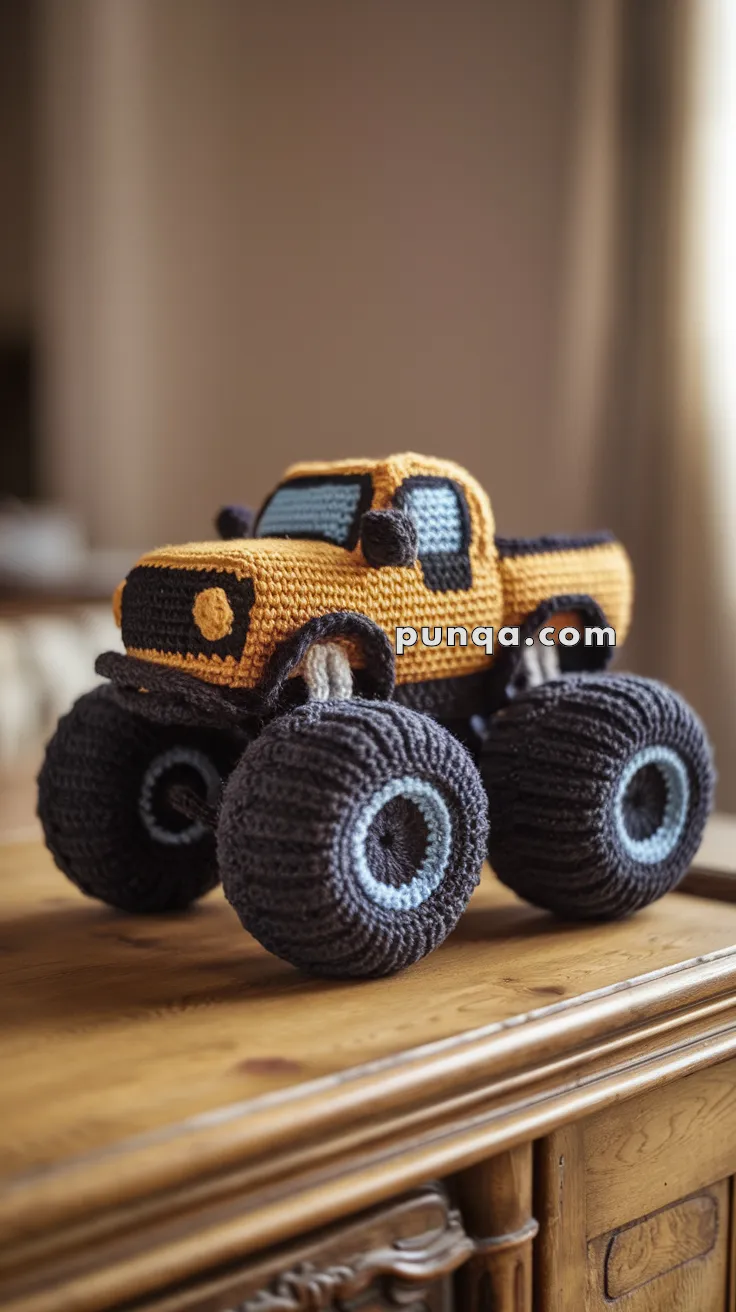
🚚 Amigurumi Monster Truck Crochet Pattern
Bring big-wheeled excitement to your crochet projects with this bold and bouncy monster truck! This pattern captures the chunky, oversized tires and boxy truck body perfect for play or display.
🧶 Skill Level
Intermediate – includes shaping and sewing parts.
📏 Finished Size
Approx. 22 cm (9 in) long x 16 cm (6.5 in) high when using worsted weight yarn.
✨ Materials
-
Worsted weight yarn in:
-
Mustard Yellow (Body)
-
Black (Tires & Details)
-
Light Blue (Windows)
-
Grey (Undercarriage)
-
-
3.5 mm crochet hook
-
Tapestry needle
-
Stitch markers
-
Stuffing
-
Optional: wire or pipe cleaners for wheel axles
🧵 Abbreviations (US Terms)
-
MR – Magic Ring
-
sc – Single Crochet
-
inc – Increase (2 sc in same stitch)
-
dec – Decrease (sc 2 together)
-
ch – Chain
-
sl st – Slip Stitch
-
BLO – Back Loop Only
-
FO – Fasten Off
🚛 Body – Truck Frame (Yellow)
Bottom Panel (Make 1):
-
ch 21
-
sc in 2nd ch from hook, sc across (20)
3–10. ch 1, turn, sc across (20)
FO and set aside.
Side Panels (Make 2):
-
ch 13
-
sc in 2nd ch from hook, sc across (12)
3–8. ch 1, turn, sc across (12)
FO.
Back Panel:
-
ch 9
-
sc in 2nd ch from hook, sc across (8)
3–8. ch 1, turn, sc across (8)
FO.
Cab Roof + Hood Panel (Single Strip):
-
ch 13
-
sc in 2nd ch and across (12)
3–4. ch 1, turn, sc across (12)
5–7. Switch to Light Blue (window area), sc across
8–9. Switch back to yellow (roof), sc across
FO.
Assemble Panels:
Sew together in a boxy truck shape with the roof/hood panel across the top. Leave undercarriage open for wheel assembly later.
🪞Windows (Light Blue – Optional if not done in panel)
Side Windows (Make 2):
-
ch 5
-
sc in 2nd ch, sc across (4)
3–4. ch 1, turn, sc across
FO and sew on side panels.
Windshield (Make 1):
-
ch 7
-
sc in 2nd ch, sc across (6)
3–5. ch 1, turn, sc across
FO and attach on front.
🛞 Monster Wheels (Black with Light Blue Center – Make 4)
Center Hubcap (Blue):
-
MR, 6 sc
-
inc x6 (12)
-
(sc, inc) x6 (18)
FO and set aside.
Tire (Black):
-
MR, 6 sc
-
inc x6 (12)
-
(sc, inc) x6 (18)
-
(2 sc, inc) x6 (24)
5–8. BLO sc around (24) -
(2 sc, dec) x6 (18)
-
(sc, dec) x6 (12)
-
dec x6 (6)
FO and stuff. Attach blue hubcap to one end.
🪛 Axles + Undercarriage
Axle Bar (Grey – Make 2):
-
ch 8
-
sc in 2nd ch from hook and across (7)
3–4. ch 1, turn, sc across
FO and roll into a cylinder, stitch closed.
Attach 2 tires on each axle. Secure both axles under the truck body.
🔧 Grille & Headlights
Grille (Black):
-
ch 7
-
sc in 2nd ch and across (6)
3–4. ch 1, turn, sc across
Sew to front center under windshield.
Headlights (Make 2 – Yellow or White):
-
MR, 6 sc
-
inc x6 (12)
FO, lightly stuff and attach to each side of grille.
🛑 Mirrors (Optional – Black)
Make 2 Small Ovals:
-
ch 4, sc in 2nd and across
-
ch 1, turn, sc across
FO and attach to cab sides.
🎯 Finishing Touches
-
Stuff the body firmly and close seams.
-
Embroider or surface-crochet details like doors or a grill if desired.
-
Add a face in the windshield area for a cute cartoon effect.