Bring a touch of diva flair to your crochet collection with this Amigurumi Miss Piggy pattern! Inspired by the glamorous and confident Muppet, this adorable amigurumi captures her signature style, expressive eyes, and unmistakable charm in every stitch. With her fabulous personality and iconic look, this crochet Miss Piggy is perfect for adding a playful and stylish accent to your handmade creations. Whether you’re crafting for Muppet fans, creating a fun display piece, or simply enjoy making character-inspired amigurumi designs, this pattern lets you stitch up a miniature Miss Piggy bursting with personality! 💄✨
Designed for customization, this pattern allows you to experiment with different shades of pink, embroidered details, or even tiny accessories like a miniature pearl necklace or elegant gloves for extra flair. Craft a classic Miss Piggy with her signature glamorous look, create a whimsical version with bold colors, or even stitch up a full set of Muppet-inspired amigurumi for a delightful display! Whether gifted as a cherished keepsake, displayed as a fabulous accent, or made simply for the joy of crafting, this Amigurumi Miss Piggy is a fun and creative project—perfect for bringing a touch of handmade star power to every stitch! 🧶💖
💖 Amigurumi Miss Piggy Crochet Pattern
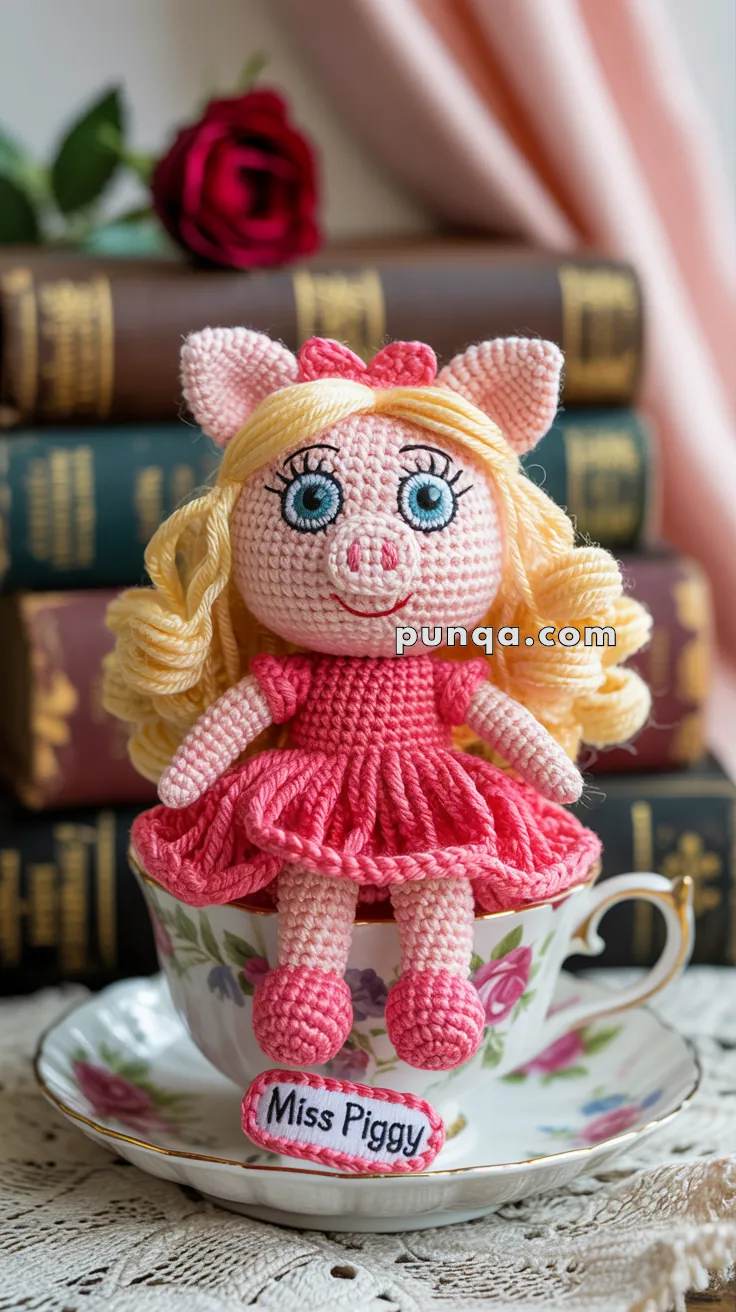
Bring the glamour of the spotlight to your yarn with this stunning Miss Piggy-inspired amigurumi doll. From her bright curls to her flirty lashes and signature magenta dress, every stitch captures her larger-than-life charm!
✨ Skill Level
Intermediate – involves shaping, color placement, layered features, and dress construction.
📏 Finished Size
Approx. 9–10 in (23–25 cm) tall when made with DK or light-worsted yarn and a 2.75 mm hook.
🧶 Materials
- Light pink – 50 g (skin)
- Magenta or bright pink – 40 g (dress & shoes)
- Blonde / light yellow – 30 g (hair)
- White – small amount (eye whites)
- Blue – small amount (irises)
- Black – small amount (lashes & eyebrows)
- Silver or pearl thread (optional for earrings)
- 2.75 mm crochet hook
- Safety eyes 8–9 mm (flat back preferred)
- Polyester fiberfill stuffing
- Tapestry needle & stitch marker
- Optional hot glue / earring findings
🧵 Abbreviations (US)
MR = Magic Ring sc = Single Crochet inc = Increase dec = Decrease sl st = Slip Stitch ch = Chain FO = Fasten Off
🐷 Head (Light Pink)
1️⃣ MR 6 sc (6)
2️⃣ inc ×6 (12)
3️⃣ (1 sc, inc) ×6 (18)
4️⃣ (2 sc, inc) ×6 (24)
5️⃣ (3 sc, inc) ×6 (30)
6️⃣ (4 sc, inc) ×6 (36)
7–15️⃣ sc around (36)
16️⃣ (5 sc, inc) ×6 (42) → gives fuller head as in photo
17–21️⃣ sc around (42)
22️⃣ (5 sc, dec) ×6 (36)
23️⃣ (4 sc, dec) ×6 (30)
24️⃣ (3 sc, dec) ×6 (24)
Insert eyes between rounds 10–11, 7 sts apart.
25️⃣ (2 sc, dec) ×6 (18)
26️⃣ (1 sc, dec) ×6 (12)
27️⃣ dec ×6 (6) → FO and close.
Stuff firmly.
👃 Snout (Light Pink)
1️⃣ MR 6 sc (6)
2️⃣ inc ×6 (12)
3️⃣ (1 sc, inc) ×6 (18)
4️⃣ (2 sc, inc) ×6 (24) — larger for photo shape
5–7️⃣ sc around (24)
Stuff lightly, flatten slightly oval, sew low on face so a broad forehead remains.
Embroider two vertical nostrils in darker pink yarn.
Add subtle nose highlight with a few horizontal stitches.
👁 Eyes & Lashes
Use 8–9 mm safety eyes or flat buttons for a smooth look.
Attach slightly above snout (1 row gap between snout and eyes).
Embroider blue iris rings and tiny white highlights.
Sew or embroider thick, curved black lashes extending up and outward — 3 each side.
Add arched eyebrows 2 rounds above eyes for expression.
👂 Ears (Make 2 – Light Pink)
1️⃣ MR 6 sc (6)
2️⃣ (1 sc, inc) ×3 (9)
3️⃣ (2 sc, inc) ×3 (12) — larger ratio matches photo
4–6️⃣ sc around (12)
7️⃣ (2 sc, dec) ×3 (9) → slight taper
FO, pinch bottom and sew angled forward on top sides of head.
💇♀️ Hair (Blonde)
Cut 40–45 strands ≈ 6 in (15 cm).
Latch-knot across crown line from ear to ear.
For curls: wrap each strand tightly around a pencil, mist with water, let dry overnight.
Attach shorter bangs at front and sweep to one side.
Trim to form a full, bouncy look.
🧥 Body (Light Pink → Dress Color)
1️⃣ MR 6 sc (6)
2️⃣ inc ×6 (12)
3️⃣ (1 sc, inc) ×6 (18)
4️⃣ (2 sc, inc) ×6 (24)
5–8️⃣ sc around (24)
Switch to dress color using invisible join.
9–18️⃣ sc around (24) → slightly elongated for realistic torso.
19️⃣ (2 sc, dec) ×6 (18)
Stuff firmly.
FO, leaving long tail for attaching head.
👗 Skirt (Dress Color)
Attach to front loops of Round 9 (body).
R1 – (ch 1, (1 sc, inc) around) (36)
R2 – (1 sc, inc) ×18 (54)
R3 – (2 sc, inc) ×18 (72) → fuller ruffle as in photo
R4–5 – sc around (72)
FO and weave ends.
Optional: Surface-stitch edging in lighter pink or silver for sparkle.
💪 Arms (x2 – Light Pink)
1️⃣ MR 6 sc (6)
2️⃣ (1 sc, inc) ×3 (9)
3–11️⃣ sc around (9) → slimmer arm profile
Stuff lightly only at shoulder.
For fingers: ch 4, sc back (3 times) to create three mini-fingers at tip.
FO and sew to shoulders angled forward.
🦵 Legs (x2 – Light Pink → Shoe Color)
1️⃣ MR 6 sc (6)
2️⃣ inc ×6 (12)
3–6️⃣ sc around (12)
7️⃣ (1 sc, dec) ×4 (8)
Switch to shoe color.
8–12️⃣ sc around (8) – slightly rounded toe.
Stuff and sew to bottom of body at a slight angle forward so she “poses.”
Optional: Embroider tiny bows or add sl st trim around ankle line.
🎀 Bow (Dress Color or Red)
Ch 10, sc across (9).
Work 4 rows even.
FO, wrap center tightly with same yarn to cinch.
Sew to top of head behind bangs.
💎 Accessories
Earrings (optional): Use silver thread or tiny jump rings on earlobes.
Makeup touches: Add a hint of pink blush on cheeks with yarn or fabric pastel.
Mouth: Embroider soft smile below snout with red thread.
🧩 Final Assembly
1️⃣ Sew head securely onto body.
2️⃣ Attach arms and legs proportionally to maintain balance.
3️⃣ Arrange hair and curls into Miss Piggy’s classic style.
4️⃣ Attach bow and optional earrings.
5️⃣ Smooth stitches and reshape gently with steam or hand blocking.
✨ Designer Notes & Adjustments
To ensure your Miss Piggy doll matches the photo perfectly, here are a few optional refinements you can try:
🩷 Hands – For a softer, classic look, skip the crocheted fingers and finish each arm as a rounded mitten shape. It keeps the proportions clean and enhances her plush, toy-style charm.
💃 Leg Positioning – When attaching the legs, angle them slightly forward. This subtle tilt helps the doll stand or sit gracefully — just like Miss Piggy’s poised stance in the photo.
These small adjustments help your finished doll capture her signature elegance and make her photo-accurate while keeping the pattern beginner-friendly. 💖🐷
🌟 The Final Look
And there she is — Miss Piggy in all her diva glory! From her golden curls to her sparkling pink dress and perfectly arched lashes, every stitch celebrates her timeless glamour. Whether she’s the star of your crochet shelf or a gift for a fellow Muppet fan, this handmade icon is sure to steal the spotlight (and a few hearts). 💋✨
🌟 Result
Your Miss Piggy amigurumi is now ready to steal the show 💋
She features an enlarged snout, precisely placed eyes, a voluminous ruffled dress, and beautifully curled blonde hair — just like the photo. Display her proudly or gift her to a fellow Muppets fan for a touch of handmade Hollywood glamour! 🎀💖