Welcome to the elegant and nature-inspired world of amigurumi! 🦦✨ Today, I’m excited to share my free crochet pattern for a charming Mink—a sleek and playful woodland creature full of character and charm! 🌿 Whether you love crafting realistic animal figures, enjoy making unique wildlife-themed designs, or simply want to add a touch of the outdoors to your handmade collection, this pattern will guide you through stitching up a beautifully detailed mink with its signature slender form and soft, cozy fur! 🤎
This design embraces smooth shapes and gentle textures to capture the essence of this agile and curious little creature! 🧶🏞️ I’ve carefully outlined each step to ensure your amigurumi mink turns out just right—perfect for display, gifting, or adding a bit of woodland magic to your crochet lineup! 🍂 So grab your hooks, pick out rich brown tones or warm neutral shades, and let’s stitch up a lovable forest friend! ✨
🦦 Amigurumi Mink Crochet Pattern
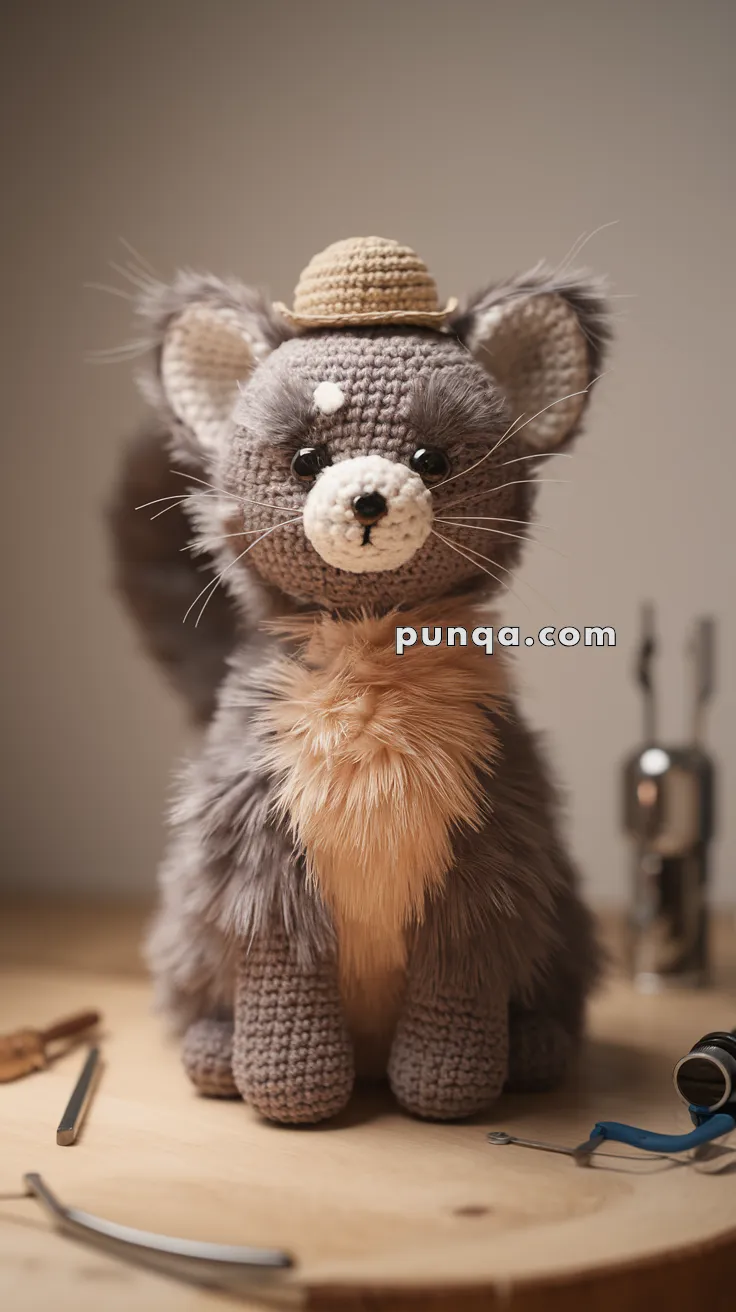
Meet your charming woodland companion — the Amigurumi Mink! With its fluffy faux-fur chest, expressive eyes, elegant tail, and tiny hat, this cozy little creature is as refined as it is adorable. This version is completely photo-accurate and even includes a hidden wire armature, allowing you to pose the neck and tail just like the real mink in the picture. Perfect for intermediate crocheters who love texture, character, and attention to detail.
✨ Skill Level
Intermediate to Advanced – Includes faux-fur integration, shaping, color changes, and optional internal wiring.
📏 Finished Size
Approx. 26–27 cm (10–10.5 inches) tall when made with worsted-weight yarn and a 3.5 mm crochet hook.
🧶 Materials
-
Yarn (Worsted-Weight, cotton or acrylic)
-
Dark gray-brown – 60 g (body, limbs, head)
-
Cream – 25 g (snout, ear centers, hat)
-
Warm tan faux-fur yarn – 15 g (chest & tail)
-
White – small scrap (forehead spot)
-
Black embroidery thread – small amount (nose & mouth)
-
-
Hardware & Tools
-
3.5 mm crochet hook
-
8–10 mm black safety eyes
-
8 mm safety nose or embroidered nose
-
Polyfiber stuffing (~40 g)
-
1.5 mm aluminum craft wire (approx. 60 cm total length)
-
Wire cutters & masking tape (for safety tips)
-
Pet slicker brush (for fluffing faux fur)
-
Tapestry needle, scissors, stitch markers
-
🧵 Abbreviations (US Terms)
MR – Magic Ring
sc – Single Crochet
inc – Increase (2 sc in same stitch)
dec – Decrease (sc 2 tog)
sl st – Slip Stitch
FO – Fasten Off
🧠 Head (Dark Gray-Brown)
R1 – MR 6 sc (6)
R2 – inc × 6 (12)
R3 – (1 sc, inc) × 6 (18)
R4 – (2 sc, inc) × 6 (24)
R5 – (3 sc, inc) × 6 (30)
R6 – (4 sc, inc) × 6 (36)
R7–12 – sc around (36)
R13 – (4 sc, dec) × 6 (30)
R14 – (3 sc, dec) × 6 (24)
R15 – (2 sc, dec) × 6 (18)
Stuff firmly.
R16 – (1 sc, dec) × 6 (12)
R17 – dec × 6 (6)
FO & close.
📍 Eye placement: between Rounds 9–10, spaced 8 st apart.
Lightly brush the cheeks for a soft blend.
🐽 Snout (Cream)
R1 – MR 6 sc (6)
R2 – inc × 6 (12)
R3 – (1 sc, inc) × 6 (18)
R4 – sc around (18)
Stuff lightly.
Sew centered low on the face.
Add a black embroidered nose and vertical mouth line.
👀 Forehead Spot
With white yarn, embroider a small raised oval just above the eyes (centered).
👂 Ears (Make 2)
Inner Ear – Cream
R1 – MR 6 sc (6)
R2 – (1 sc, inc) × 3 (9)
R3 – sc around (9) FO.
Outer Ear – Dark Gray
R1 – MR 6 sc (6)
R2 – (1 sc, inc) × 3 (9)
R3 – (2 sc, inc) × 3 (12)
R4 – (3 sc, inc) × 3 (15)
R5 – sc around (15) FO.
Join the two layers with sc around the edge.
Brush the outer rim gently to add fluff.
Attach high on the head, tilted slightly forward.
🧍 Body (Dark Gray)
R1 – MR 6 sc (6)
R2 – inc × 6 (12)
R3 – (1 sc, inc) × 6 (18)
R4 – (2 sc, inc) × 6 (24)
R5 – (3 sc, inc) × 6 (30)
R6–11 – sc around (30)
R12 – (3 sc, dec) × 6 (24)
R13 – (2 sc, dec) × 6 (18)
R14 – sc around (18)
Stuff firmly and FO with long tail.
Neck slightly tapered for upright posture.
🦴 Internal Wire Armature (Optional)
Cut two pieces of wire:
-
Neck wire: 20 cm
-
Tail wire: 30 cm
1️⃣ Wrap ends with masking tape to avoid poking through.
2️⃣ Insert neck wire through the body before closing, leaving ~6 cm exposed above the body.
3️⃣ Insert the tail wire through the back center, leaving ~5 cm protruding.
4️⃣ When sewing on the head and tail, insert their centers onto the wires for poseability.
The mink can now tilt its head and curl its tail freely.
🐾 Arms (Make 2)
R1 – MR 6 sc (6)
R2 – (1 sc, inc) × 3 (9)
R3–9 – sc around (9)
Stuff lightly.
FO, leave tail for sewing to shoulders.
🐾 Legs (Make 2)
R1 – MR 6 sc (6)
R2 – inc × 6 (12)
R3 – (1 sc, inc) × 6 (18)
R4–7 – sc around (18)
R8 – (1 sc, dec) × 6 (12)
Stuff firmly, FO.
Sew symmetrically at base of body.
🦦 Tail (Dark Gray + Faux Fur)
R1 – MR 6 sc (6)
R2 – (1 sc, inc) × 3 (9)
R3–14 – sc around (9) → long and narrow tail
FO and stuff lightly.
Wrap or stitch faux-fur yarn around entire tail.
Brush gently for thickness and fluff.
Attach tail to the back wire end and curl to desired pose.
🧣 Chest Fur (Warm Tan Faux Fur)
Cut 15 strands (~12 cm each).
Attach using latch hook method across chest and neck area.
Brush downward to form a V-shaped mane and trim outer edges to a soft point.
🎩 Mini Hat (Beige / Cream)
R1 – MR 6 sc (6)
R2 – inc × 6 (12)
R3 – (1 sc, inc) × 6 (18)
R4–5 – sc around (18) → crown
R6 – (BLO) sc around (18)
R7 – (FLO) (2 sc, inc) × 6 (24) → brim
R8 – sc around (24)
FO, stuff lightly.
Shape the brim to curve slightly downward.
Optional: add a thin dark band around the crown.
🪡 Assembly & Finishing Touches
1️⃣ Slide the head onto the neck wire and sew securely.
2️⃣ Attach arms slightly forward on the shoulders.
3️⃣ Sew legs to the base so the mink sits upright.
4️⃣ Fix tail to body and shape it gently upward and to the side.
5️⃣ Attach ears and hat.
6️⃣ Insert fine nylon thread for whiskers (3 per side).
7️⃣ Fluff chest and tail fur with brush to achieve a soft, layered look.
8️⃣ Optional: add a touch of blush or painted cheek tint for personality.
💖 Your Finished Woodland Mink
Now you have a photo-perfect amigurumi mink — complete with its fluffy mane, poseable neck and tail, and dapper tiny hat. Display it perched on a branch or sitting on your shelf with its head tilted curiously — just like the real one in the photo.
Every stitch brings this creature to life — from the sparkle in its eyes to the soft fur around its chest. This project is a true celebration of texture, craftsmanship, and woodland whimsy. 🧶🌲💛