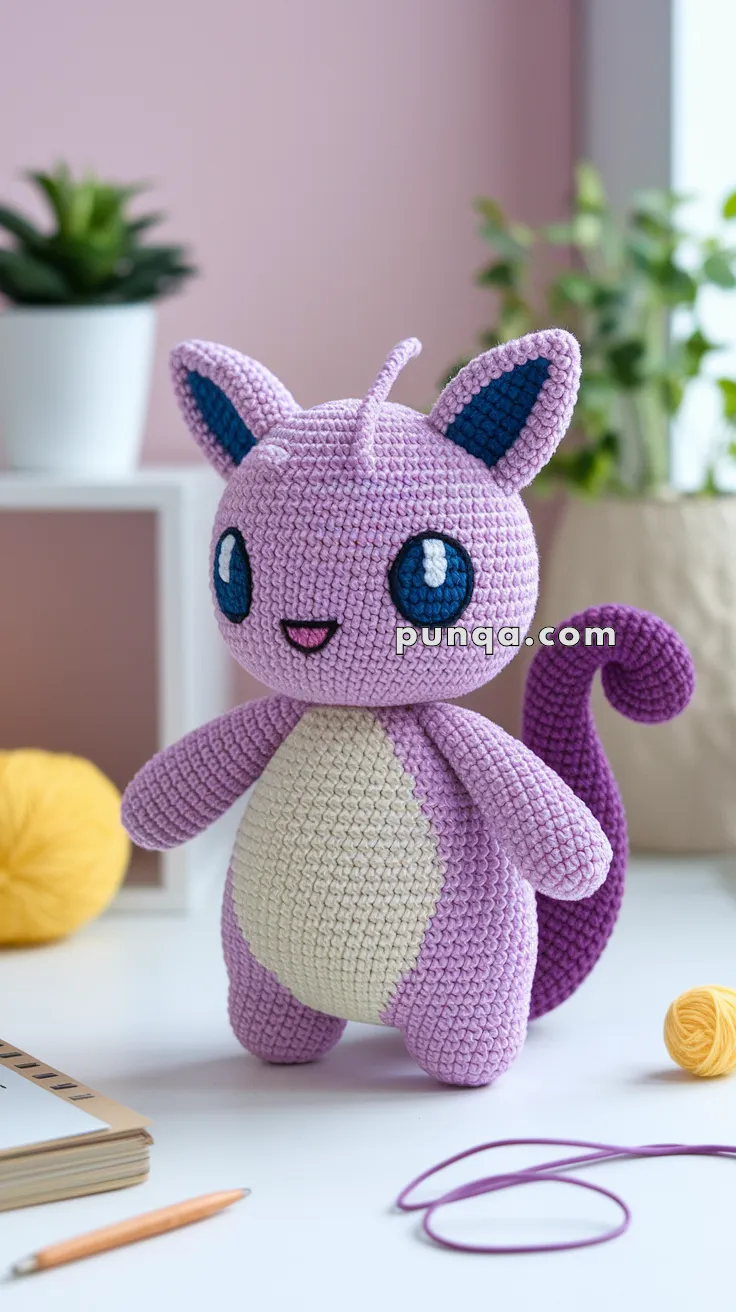
Welcome to the extraordinary world of legendary Pokémon amigurumi! 🔮✨ Today, I’m thrilled to share my free crochet pattern for Amigurumi Mewtwo—the genetically enhanced Psychic-type Pokémon in perfectly powerful yarn form! Whether you’re a fan of first-generation Pokémon, love crafting mythical creatures, or simply want to add some scientific-superiority to your collection, this pattern will guide you through stitching your very own pocket-sized clone with its piercing purple eyes, sleek lavender body, and signature hovering tail.
This design captures Mewtwo’s imposing presence through sharp angles and otherworldly details! 🧶💜 I’ve carefully outlined each step to help you create its muscular frame, three-fingered hands, and optional psychic energy effects. Perfect for display, gifting to fellow trainers, or keeping as the ultimate guardian of your yarn stash! So grab your hooks, pick out eerie lavenders and deep purples, and let’s stitch up a Pokémon whose power is truly unmatched! ✨
🟣 Amigurumi Mewtwo-Inspired Plush Crochet Pattern
Inspired by the legendary psychic Pokémon, this Mewtwo-inspired amigurumi brings cuteness and character together in a soft purple plushie! With large eyes, expressive ears, and a curled tail, it’s a wonderful project for fans of fantasy creatures or anime collections.
✨ Skill Level
Intermediate – includes color changes, embroidery, shaping, and eye layering.
📏 Finished Size
Approximately 9–10 in (23–25 cm) tall when made with DK or worsted yarn and a 3.0–3.5 mm hook.
🧶 Materials
-
Yarn (DK or Worsted Weight):
-
Light lavender – main body, arms, legs, ears
-
Dark purple – tail
-
Cream – belly patch
-
Navy or dark blue – inner ears, eye fill
-
Dark violet or deep blue – eye outline
-
White – eye reflection
-
Black – mouth embroidery
-
-
Crochet hook 3.0–3.5 mm
-
Fiberfill stuffing
-
Tapestry needle
-
Optional: thin wire or pipe cleaner for tail shaping
🧵 Abbreviations (US Terms)
MR – Magic Ring
sc – Single Crochet
inc – Increase (2 sc in one stitch)
dec – Decrease (sc2tog)
ch – Chain
sl st – Slip Stitch
FO – Fasten Off
🧠 Head
Light lavender yarn
R1: MR, 6 sc (6)
R2: inc ×6 (12)
R3: (1 sc, inc) ×6 (18)
R4: (2 sc, inc) ×6 (24)
R5: (3 sc, inc) ×6 (30)
R6: (4 sc, inc) ×6 (36)
R7–R14: sc around (36)
R15: (4 sc, dec) ×6 → (30)
R16: (3 sc, dec) ×6 → (24)
R17: (2 sc, dec) ×6 → (18)
Stuff firmly.
R18: (1 sc, dec) ×6 → (12)
R19: dec ×6 → (6)
FO and close.
👁 Eyes (Layered Appliqué – for accuracy)
To create the large expressive oval eyes:
Eye Base (Make 2 – Navy):
MR, 6 sc (6)
R2: (sc, inc) ×3 (9)
R3: (2 sc, inc) ×3 (12)
Ch 1, turn, sc 6 across to elongate one side into an oval shape. FO.
Eye Outline (Dark Violet):
Surface stitch or embroider around the navy eye shape to give a thin outer rim.
Eye Reflection (White):
Add two small asymmetric white stitches or tiny felt ovals near upper left of each eye for sparkle.
Sew or glue eyes between R8–R11 on head, spaced about 4–5 stitches apart.
😺 Mouth
Use black embroidery floss to stitch a small smiling curve centered just below the eyes.
Add a single pink line above it for a hint of a tongue if desired.
👂 Ears (with contrasting inner triangles)
Outer Ear (Light Lavender, make 2):
R1: MR, 4 sc (4)
R2: (sc, inc) ×2 (6)
R3: (2 sc, inc) ×2 (8)
R4: (3 sc, inc) ×2 (10)
R5–R6: sc around (10)
FO, flatten slightly.
Inner Ear (Navy, make 2):
Ch 6
R1: sc in 2nd ch from hook, hdc, dc, tr, dc, FO.
Shape into a triangle and sew to inner part of ear.
Attach completed ears symmetrically on top sides of the head, angled outward.
🌀 Head Spike
Ch 8, sl st back along the chain. FO.
Sew to top center of head.
It should stand upright about 1–1.5 cm tall.
🧍 Body
Light lavender yarn:
R1: MR, 6 sc (6)
R2: inc ×6 (12)
R3: (1 sc, inc) ×6 (18)
R4: (2 sc, inc) ×6 (24)
R5: (3 sc, inc) ×6 (30)
R6–R12: sc around (30)
R13: (3 sc, dec) ×6 → (24)
R14: (2 sc, dec) ×6 → (18)
R15: (1 sc, dec) ×6 → (12)
Stuff firmly. FO.
🤍 Belly Patch
Cream yarn:
R1: MR, 6 sc (6)
R2: (sc, inc) ×3 (9)
R3: (2 sc, inc) ×3 (12)
R4: (3 sc, inc) ×3 (15)
R5: sc around (15)
Ch 1, turn, sc halfway across to make a slightly longer bottom edge (rounded-rectangle / teardrop shape).
FO and sew to front center of body.
💪 Arms ×2
Light lavender:
R1: MR, 6 sc (6)
R2: inc ×6 (12)
R3–R8: sc around (12)
R9: (2 sc, dec) ×3 → (9)
R10–R11: sc around (9)
FO, stuff lightly.
Sew to body sides, slightly below head joint.
🦵 Legs ×2
Light lavender:
R1: MR, 6 sc (6)
R2: inc ×6 (12)
R3: (sc, inc) ×6 (18)
R4–R7: sc around (18)
R8: (1 sc, dec) ×6 → (12)
R9–R10: sc around (12)
FO and stuff firmly.
Sew to lower sides of body to create a standing posture.
🌀 Tail
Dark purple yarn:
R1: MR, 6 sc (6)
R2: (sc, inc) ×3 (9)
R3–R5: sc around (9)
R6: (2 sc, inc) ×3 (12)
R7–R20: sc around (12)
FO, stuff lightly while shaping into a smooth curl.
Insert a small wire or pipe cleaner if you’d like a stronger curve.
Sew securely to the back base of the body.
🪄 Final Assembly
-
Attach head firmly to body.
-
Position and sew arms and legs symmetrically.
-
Sew or glue the belly patch flat against the front.
-
Attach tail so that it curves naturally to one side.
-
Adjust eyes, smile, and ear placement for the friendliest expression.
🌸 Finishing Touches
-
Add blush using pink yarn or pastel.
-
Lightly shape the head spike upward for balance.
-
Brush the tail to soften the texture if using velvet yarn.
🧶 Result
A cheerful lavender creature with big blue eyes, contrasting inner ears, a cream belly, and a spiraled purple tail — just as delightful and expressive as the one in the photo. It’s round, huggable, and full of personality — ready to charm everyone who meets it!