Find your inner peace—one stitch at a time—with the Amigurumi Meditating Girl, a serene crochet companion designed to bring calm and mindfulness to your crafting journey 🧘♀️🧶. With her gentle pose, closed eyes, and tranquil expression, she’s the perfect reminder to slow down and breathe deeply. Whether seated on a tiny cushion or nestled among your favorite cozy décor, this little yogi radiates warmth and quiet joy.
This pattern is ideal for crocheters who love thoughtful details and soothing vibes. You can personalize her outfit with soft pastels, earthy tones, or even add a tiny yoga mat or flower crown to reflect your own peaceful style. Whether you’re gifting her to a meditation-loving friend or creating a calming presence for your own space, the Meditating Girl is a beautiful way to stitch mindfulness into your day. 🌸🧵
🧘 Meditating Girl Amigurumi Crochet Pattern
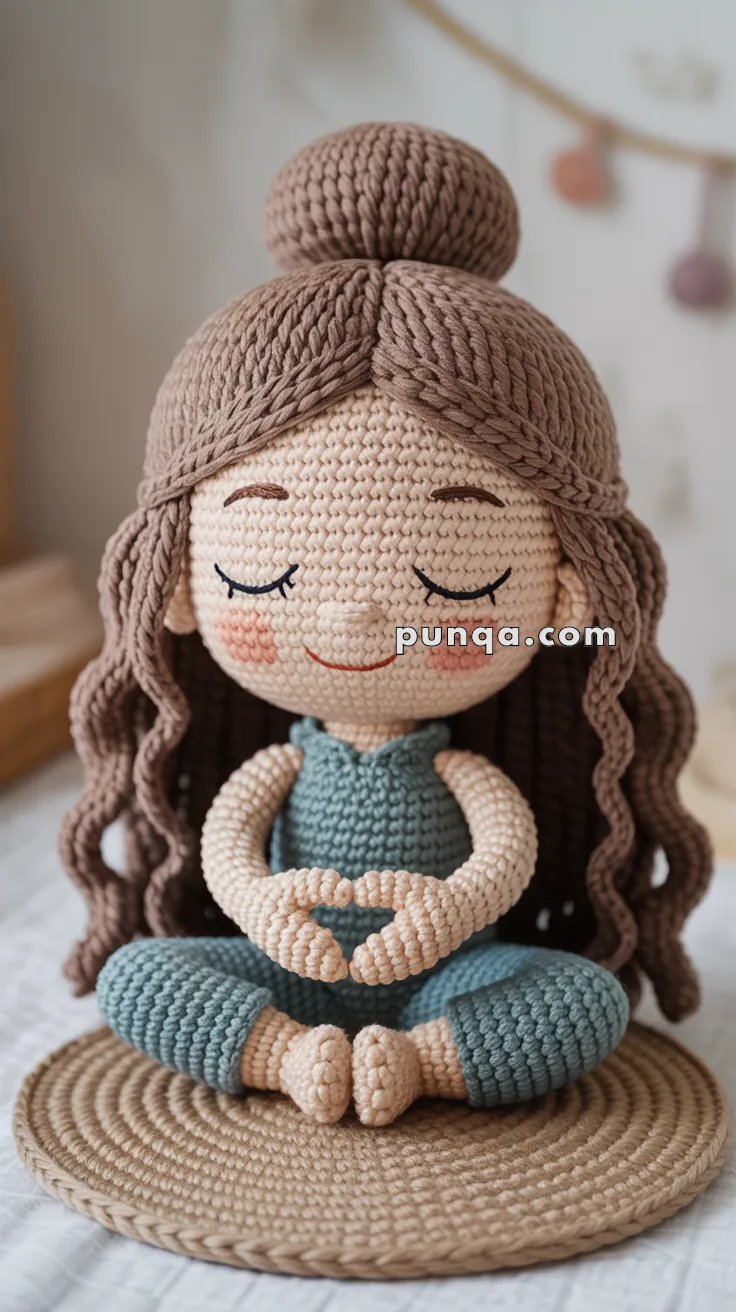
Find your center with this serene Meditating Girl Amigurumi, sitting gracefully in the lotus pose with her hands forming a heart. Her wavy, voluminous hair, soft bun, peaceful smile, and cozy teal outfit make her a perfect project for mindfulness lovers and calm-inspired makers.
✨ Skill Level
Intermediate to Advanced – includes shaping for seated lotus pose, layered hair construction, and expressive placement for the heart hand gesture.
📏 Finished Size
Approx. 25–30 cm (10–12 in) tall when seated, using DK or light-worsted cotton yarn and a 2.5–3 mm crochet hook.
🧶 Materials
- Skin tone yarn: 40 g (head, arms, hands, feet, ears, nose)
- Teal / blue yarn: 40 g (top + pants)
- Brown yarn: 50 g (hair + bun)
- Tan / beige yarn: 20 g (optional yoga-mat base)
- Pink yarn: small amount (cheeks)
- Black / dark-brown embroidery thread: small amount (eyes, lashes, brows, mouth)
- 2.5–3 mm crochet hook
- Polyfill stuffing
- Yarn needle, scissors, stitch markers
🔤 Abbreviations (US Terms)
MR – Magic Ring
sc – Single Crochet
inc – Increase (2 sc in same st)
dec – Invisible Decrease (sc2tog)
ch – Chain
sl st – Slip Stitch
st – Stitch
FLO – Front Loop Only
BLO – Back Loop Only
FO – Fasten Off
👩 Head (Skin Tone)
R1 MR 6 sc (6)
R2 inc × 6 (12)
R3 (sc, inc) × 6 (18)
R4 (2 sc, inc) × 6 (24)
R5 (3 sc, inc) × 6 (30)
R6 (4 sc, inc) × 6 (36)
R7 (5 sc, inc) × 6 (42)
R8 (6 sc, inc) × 6 (48)
R9–20 sc around (48)
R21 (6 sc, dec) × 6 (42)
R22 (5 sc, dec) × 6 (36)
R23 (4 sc, dec) × 6 (30) – begin stuffing
R24 (3 sc, dec) × 6 (24)
R25 (2 sc, dec) × 6 (18)
R26 (sc, dec) × 6 (12)
R27 dec × 6 (6) → FO, close and weave in.
Stuff firmly into a smooth round head.
👃 Nose
MR 5 sc (5) → FO. Stuff lightly and sew mid-face between eyes.
👂 Ears (2)
MR 6 sc, sl st to close, FO. Flatten and sew to head sides at eye level.
😊 Face Embroidery
Closed arc eyes with 3–4 lashes each.
Thin curved brows above eyes.
Tiny smile in red or pink thread.
Cheeks: MR 6 sc, inc around (12), FO and sew below eyes.
💇 Hair & Bun (Brown Yarn) – Revised
Materials Note: For photo-accurate hair, use bulky twisted / rope-style yarn or velvet / chenille yarn that forms natural spiral curls. Alternatively, use DK yarn and create thick crocheted cords (below).
Wig Cap
Repeat head pattern through R6 to 36 sts. FO with long tail.
Sew on slightly lower at front hairline, higher at back.
Hair Strands (Thick Rope Method)
Option 1 – Bulky Twisted Yarn:
Cut 30–40 strands 40–50 cm long.
Attach with lark’s-head knots: fold, pull loop through stitch, draw ends through loop, tighten.
Rows from nape to crown:
• Bottom row 8–10 strands
• Middle rows 6–8 each
• Top rows 4–6 each, leave center clear for bun
Option 2 – Crocheted Cords (DK Yarn):
Ch 35–45, sl st back through each chain or sc BLO for soft cord. Make 35–45 cords.
Attach as above.
💡 Twist 2–3 cords together before attaching for spiral texture; lightly steam after to set curl.
Front Swept Sections
Make 2 extra-thick strands (ch 40–45). Work back with sl st or twist 3 strands together.
Position one on each side from temple to bun, crossing forehead if desired. Secure ends beneath bun.
Top Bun
R1 MR 6 sc (6)
R2 inc × 6 (12)
R3 (sc, inc) × 6 (18)
R4 (2 sc, inc) × 6 (24)
R5 (3 sc, inc) × 6 (30)
R6–8 sc around (30)
R9 (3 sc, dec) × 6 (24)
R10 (2 sc, dec) × 6 (18)
R11 (sc, dec) × 6 (12)
R12 dec × 6 (6) → FO.
Stuff firmly and sew slightly back from center. Tuck front sections under bun edges.
Finishing Hair
Arrange strands over shoulders and back. Twist or braid sections, steam lightly, trim ends. Brush gently for soft separated curls. Secure any loose strands.
🧘 Body (Teal / Blue Yarn – Revised)
Option 1 – Single Color:
R1 MR 6 sc (6)
R2 inc × 6 (12)
R3 (sc, inc) × 6 (18)
R4 (2 sc, inc) × 6 (24)
R5 (3 sc, inc) × 6 (30)
R6–15 sc around (30)
R16 (3 sc, dec) × 6 (24)
R17–22 sc around (24) → FO.
Option 2 – Two-Tone Top:
R1–10 (teal pants) then switch to dark teal or black for R11–22. Follow same stitch counts.
💡 Use Option 2 if upper top appears darker in photo.
💪 Arms & Hands (Revised – 2 pcs Skin Tone)
R1 MR 6 sc (6)
R2 inc × 6 (12)
R3–12 sc around (12) → FO with tail.
Stuff lightly so arms remain flexible.
Heart Pose Assembly:
- Sew arms at shoulders, angled forward and inward.
- Position hands meeting at center chest, palms facing body.
Thumbs touch at top, pinky edges meet below. - Stitch thumb tips together, then outer edges at bottom to form heart.
- Add 2–3 small stitches along inner palm edges to define heart curves.
- Gently curve arms for natural shape; check symmetry before final stitching.
💡 Pin hands first to ensure the heart is clearly visible from front.
🦵 Legs & Feet (Revised – 2 pcs)
Legs (Teal / Blue Pants)
R1 MR 6 sc (6)
R2 inc × 6 (12)
R3 (sc, inc) × 6 (18)
R4–7 sc around (18) – stuff firmly (thigh)
R8–10 sc around (18) – stuff lightly (knee bend)
R11–14 sc around (18) – stuff moderately (lower leg)
Feet (Skin Tone)
R15 switch to skin tone → (2 sc, inc) × 6 (24)
R16–18 sc around (24)
R19 (2 sc, dec) × 6 (18)
R20 (sc, dec) × 6 (12)
R21 dec × 6 (6) → FO.
Stuff toe area firmly, ankle soft. Flatten slightly.
Optional: embroider 3–4 toe lines or tiny pink “nails.”
Lotus Pose Assembly
- Bend each leg at knee ≈ 90°.
- Attach legs to front-bottom torso: left knee points up-left, right up-right.
- Cross ankles in front; place right foot on left thigh and left foot on right thigh.
- Sew feet to opposite thighs and tack ankles together.
- Under-stuff lower back for flat sitting balance.
💡 If needed, slightly moisten legs and pin in place to set curve while drying.
🧘 Yoga Mat Base (Optional)
With tan or beige yarn and 3.5–4 mm hook:
R1 MR 6 sc (6)
R2 inc × 6 (12)
R3 (sc, inc) × 6 (18)
R4 (2 sc, inc) × 6 (24)
R5 (3 sc, inc) × 6 (30)
R6 (4 sc, inc) × 6 (36)
R7 (5 sc, inc) × 6 (42)
R8 (6 sc, inc) × 6 (48)
R9 (7 sc, inc) × 6 (54)
R10 (8 sc, inc) × 6 (60)
R11 (9 sc, inc) × 6 (66)
Continue increasing until ≈ 20–25 cm (8–10 in) wide. FO, weave ends, block flat.
🪡 Assembly Order (Revised)
1️⃣ Finish head and facial embroidery.
2️⃣ Attach ears and nose.
3️⃣ Add blush cheeks.
4️⃣ Sew head to body.
5️⃣ Attach arms angled inward.
6️⃣ Form heart pose and stitch hands.
7️⃣ Attach legs in lotus position.
8️⃣ Sew wig cap in place.
9️⃣ Attach hair rows from nape to crown.
🔟 Add front swept sections and bun.
1️⃣1️⃣ Style hair and trim ends.
1️⃣2️⃣ Seat figure on yoga mat (optional).
💡 Updated Builder’s Notes
Hair – Bulky twisted yarn gives perfect spiral texture. If using DK, make sl-st cords. Attach 30–40 thick strands densely in rows for full coverage.
Hands – Keep tube shape; heart formed by positioning and stitching. Pin before sewing for symmetry.
Lotus Pose – Under-stuff knees for bend; angle legs outward; cross feet on opposite thighs; under-stuff lower back for flat sit.
Feet – Simple rounded ovals; optional light embroidery for toe lines. Most of feet hidden when posed.
Balance – Check upright sitting before final stitching. Adjust stuffing distribution for stability.
🎉 Result
Your Meditating Girl Amigurumi is complete — peaceful, balanced, and full of calming energy. With her spiraled brown hair, soft bun, crossed legs, and heart-shaped hands, she’s a beautiful reminder to pause and breathe. Perfect for yoga enthusiasts or as a decorative piece for any mindful space.