Celebrate love in every stitch with this sweet and snuggly Amigurumi Lovebirds crochet pattern! 💕🧶 Perched side by side with soft feathers and gentle expressions, these charming little birds are perfect for Valentine’s Day, wedding gifts, or simply adding a romantic touch to your handmade collection. Their cozy round shapes and delicate details make them a joy to craft, whether you’re a seasoned crocheter or just starting your amigurumi journey.
With endless possibilities for color combinations and accessories, you can personalize your lovebirds to match any mood or occasion—think tiny heart accents, floral crowns, or even a cozy little nest! Whether displayed on a shelf, gifted to someone special, or used as a sweet décor piece, these Amigurumi Lovebirds are a delightful way to stitch up a little affection, one loop at a time. 🐦💗✨
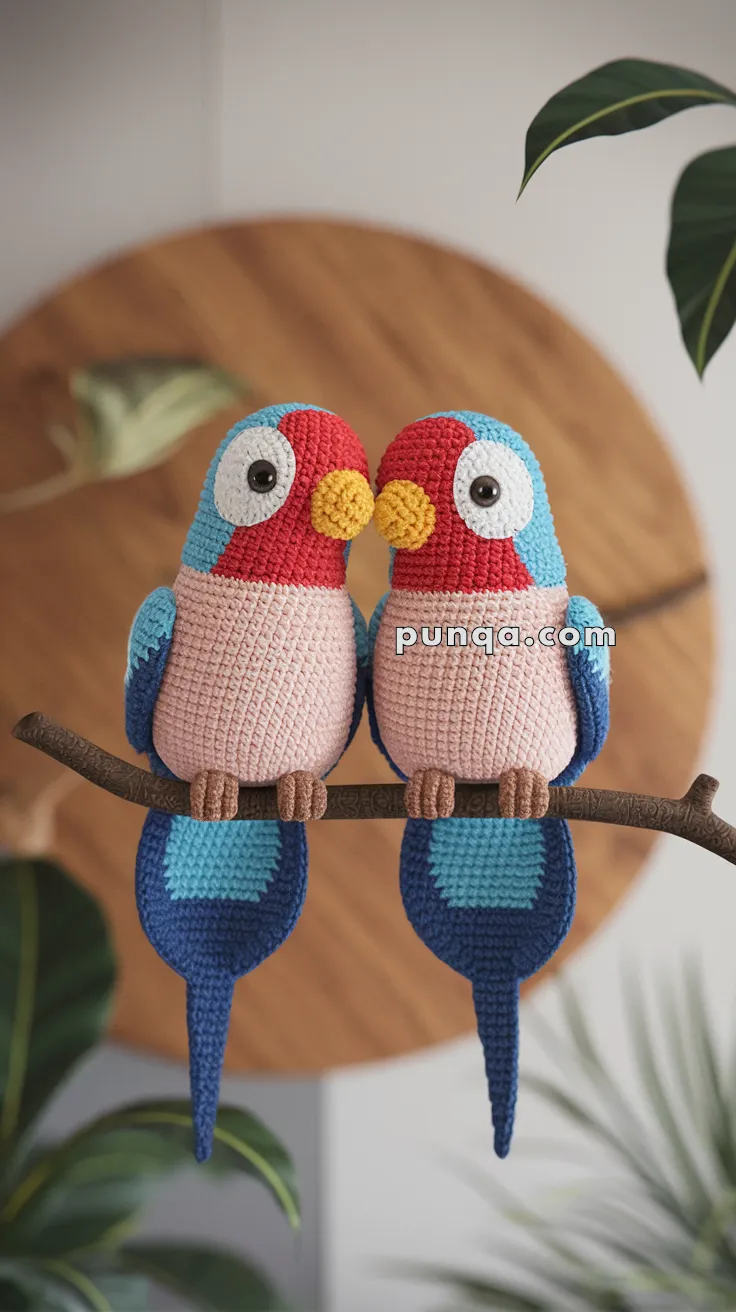
💕 Amigurumi Lovebirds Crochet Pattern
Bring home the charm of these affectionate lovebirds, perched close with their beaks touching! This pattern recreates every detail — from their red faces and sky-blue backs to the way they lean together in harmony.
✨ Skill Level
Intermediate – involves shaping, color management, and precise sewing.
📏 Finished Size
Each bird: approx. 18–20 cm (7–8″) tall with DK cotton yarn and a 2.5 mm hook.
🧶 Materials
-
DK cotton yarn in:
-
Light Pink – belly
-
Red – chest & face
-
Light Blue – crown & back
-
Dark Blue – lower wings & tail
-
White – eye patches
-
Yellow – beak
-
Brown – feet & perch (optional)
-
-
10 mm black safety eyes
-
Polyester stuffing
-
Crochet hook: 2.5 mm
-
Tapestry needle, scissors, stitch markers
🧵 Abbreviations (US Terms)
MR – Magic Ring
sc – Single Crochet
inc – Increase (2 sc in same st)
dec – Decrease (sc2tog)
ch – Chain
sl st – Slip Stitch
FO – Fasten Off
🪶 BODY (Make 2)
Light Pink (Belly)
-
MR, 6 sc (6)
-
inc ×6 → 12
-
(1 sc, inc) ×6 → 18
-
(2 sc, inc) ×6 → 24
-
(3 sc, inc) ×6 → 30
6–12. sc around (30)
Red (Chest & Face)
13–24. sc around (30)
(This extended range ensures full red coverage for eye patch placement.)
Light Blue (Crown & Back – worked in rows, not rounds)
➡️ To achieve accurate color placement as in the photo:
After completing Round 24, switch to working in rows instead of continuous rounds:
-
R25: sc across back 15 sts, ch 1, turn
-
R26–34: continue back and forth across these 15 sts only.
-
FO after R34.
💡 This keeps blue visible on the crown and down the back, while the red remains fully visible on the face and front.
Shaping & Finishing:
-
Maintain firm, even tension for a tall, cylindrical silhouette.
-
After finishing R34, resume full rounds to taper top if needed:
-
(3 sc, dec) ×6 → 24
-
(2 sc, dec) ×6 → 18
-
(1 sc, dec) ×6 → 12
-
dec ×6 → 6 → close.
Stuff firmly.
-
🪽 WINGS (Make 2 per Bird)
Light Blue (Outer Upper Wing)
-
Ch 18.
-
sc in 2nd ch from hook and across (17 sc).
3–8. sc rows (17). -
dec 1 st at each end (15).
-
dec 1 st at each end (13).
FO.
Dark Blue (Lower Accent Edge)
-
Attach to lower edge of light blue wing.
-
sc evenly across; ch 1, turn.
-
sc across again. FO.
Attachment:
-
Sew at R15–25 height, starting at back and curving forward to about R20 on the sides.
-
Let the wings wrap slightly forward, following the body contour.
🪚 TAIL (Two-Tone Gradient)
-
With light blue, ch 10.
-
sc 9 across, ch 1 turn.
3–4. sc rows (9). -
Switch to dark blue.
6–10. dec 1 st each side per row until 5 sts remain. FO.
Attachment:
-
Sew tail at R6–8 height, angled about 15–20° downward for the natural pose.
👁 EYE PATCHES (White, Make 2 per Bird)
-
MR, 6 sc (6)
-
inc ×6 → 12
-
(1 sc, inc) ×6 → 18 (optional, for larger eyes)
FO, leave a long tail.
Sew onto red face area (R20–23 range).
Insert safety eyes in the centers before sewing.
💛 BEAK (Compact Rounded Shape)
-
MR, 6 sc (6)
2–3. sc around (6)
Stuff lightly and FO.
Sew between eyes so tips meet when birds are side by side.
🦶 FEET (With Toes, Brown – Make 2 per Bird)
-
MR, 5 sc (5)
-
(ch 3, sl st back) ×3 to form three toes.
-
Reinforce by sc around the ring again. FO.
Sew beneath body so toes curl around the perch.
🌿 PERCH (Optional)
With brown yarn:
-
ch 40
-
sc across 2 rows
-
Roll and sew into a tube, or crochet around a wire base for stiffness.
Attach under both birds, sewing their feet securely to it.
🪡 ASSEMBLY
-
Sew tail to lower back at slight downward angle.
-
Attach wings wrapping around sides as described.
-
Place white eye patches, insert eyes.
-
Sew beaks touching together.
-
Add feet, curved naturally around the perch.
-
Stuff bodies evenly for upright posture.
-
Adjust the tilt so both heads lean inward slightly — for that adorable “in-love” look.
🎨 COLOR & FINISHING TIPS
-
Always change colors on the last pull-through of the stitch before the new color.
-
When switching red → blue, extend a few blue stitches into red’s back loops for smoother blending.
-
For a seamless gradient tail, lightly brush the color join area with matching blue strands.
-
Firm, upright stuffing ensures that elegant vertical silhouette.
💞 Final Touch
Your completed lovebirds should look tall and cylindrical with:
-
Pink bellies,
-
Red faces reaching up to the eye area,
-
Light blue crowns and backs,
-
Long two-toned tails, and
-
Wings wrapping forward naturally.
Perched together, their beaks gently touching, they’re the perfect handmade symbol of affection — ready to warm any heart. 🦜💖