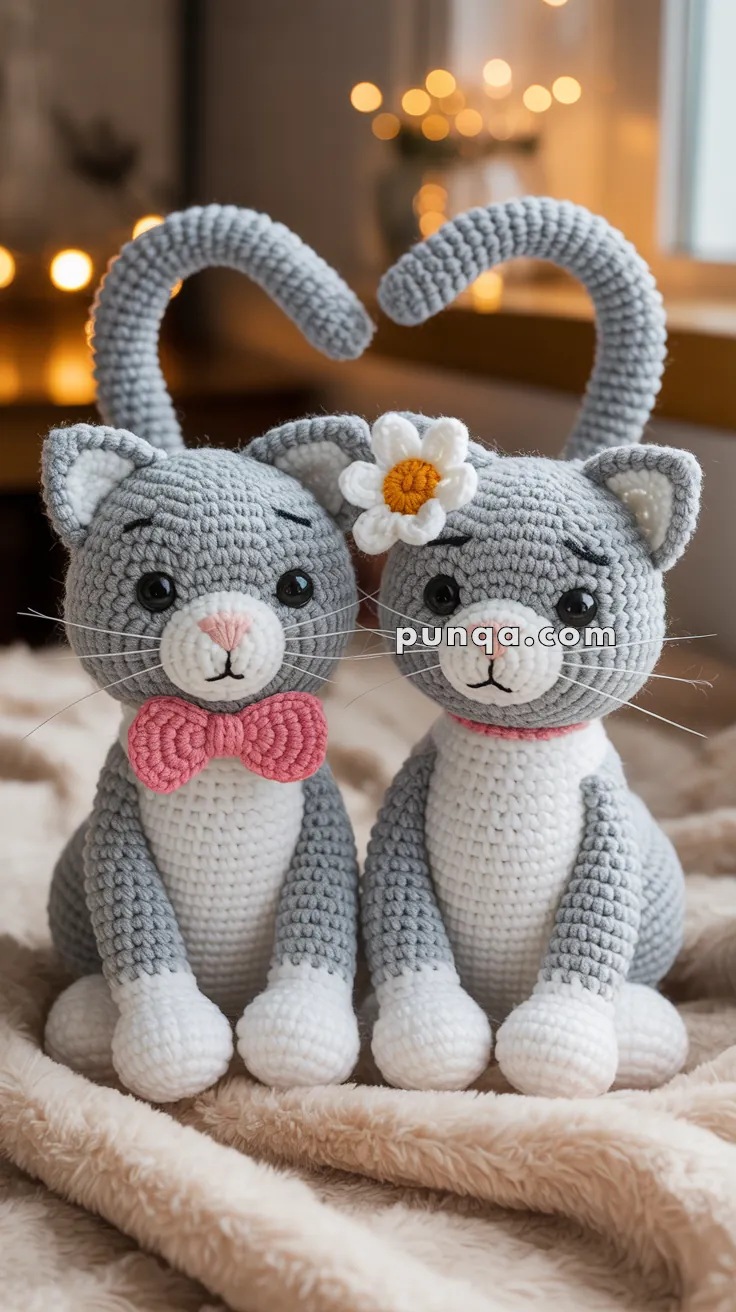
Fall in love with every stitch using this adorable Amigurumi Love Cat Duo crochet pattern! Featuring two sweet kitties with heart-shaped tails that curl together in a perfect symbol of affection, this charming pair is ideal for Valentine’s Day, anniversaries, or simply celebrating the joy of companionship. With their soft expressions, cozy poses, and cuddly shapes, these cats are a delightful way to share handmade love—whether you’re crafting for a partner, a friend, or your own plushie collection. 🧶🐱❤️
Designed for sweetness and symmetry, this pattern invites you to explore soft yarns, expressive features, and fun extras like tiny bows, blushy cheeks, or matching accessories. Customize their colors to reflect your favorite feline duo or add personal touches like embroidered initials or a shared toy. Whether perched on a shelf, nestled in a gift basket, or starring in a romantic handmade display, this Love Cat Duo Amigurumi is a joyful and satisfying project—perfect for stitching up a little handmade heart, one loop at a time! 💖✨🐾

🧶 Amigurumi Love Cat Duo Crochet Pattern
Two Cuddly Felines with Curly Tails and Romantic Accessories
Crochet your way to love with this adorable duo! Whether it’s for Valentine’s Day, an anniversary, or just for fun, these amigurumi kitties—with their heart-shaped tails and shy eyes—are irresistibly sweet.
✨ Skill Level
Intermediate
Includes color changes, shaping, wire-supported tails, and small accessories (bow and flower).
📏 Finished Size
Approx. 26–29 cm (10.5–11.5 inches) seated
(using DK yarn and a 3.0 mm hook)
🧶 Materials
Yarn (DK / light worsted):
- Light Gray – main body
- White – belly, muzzle, paws
- Pink – nose, bow, collar
- Yellow – flower center
Supplies:
- 2.5–3.0 mm crochet hook
- 10–12 mm safety eyes
- Polyester stuffing
- Aluminum craft wire (30–35 cm per tail)
- Yarn needle
- Stitch markers
- Black embroidery thread (mouth, eyebrows)
- White embroidery thread or fishing line (whiskers)
🧵 Abbreviations (US Terms)
MR – Magic Ring
sc – Single Crochet
inc – Increase (2 sc in same stitch)
dec – Invisible Decrease
ch – Chain
sl st – Slip Stitch
BLO – Back Loop Only
FO – Fasten Off
[ ] – Stitch count
Work in continuous rounds unless stated otherwise.
🐱 Head (Make 2 – Gray)
R1: MR, 6 sc [6]
R2: inc ×6 [12]
R3: (sc, inc) ×6 [18]
R4: (2 sc, inc) ×6 [24]
R5: (3 sc, inc) ×6 [30]
R6: (4 sc, inc) ×6 [36]
R7: (5 sc, inc) ×6 [42]
R8: (6 sc, inc) ×6 [48]
R9–19: sc around [48]
Insert safety eyes between R16–17, about 8–9 stitches apart.
R20: (6 sc, dec) ×6 [42]
R21: (5 sc, dec) ×6 [36]
R22: (4 sc, dec) ×6 [30]
R23: (3 sc, dec) ×6 [24]
R24: (2 sc, dec) ×6 [18]
R25: (sc, dec) ×6 [12]
Stuff firmly.
R26: dec ×6 [6]
FO and close.
🧡 Muzzle (Make 2 – White)
R1: MR, 6 sc [6]
R2: inc ×6 [12]
R3: (sc, inc) ×6 [18]
R4: (2 sc, inc) ×6 [24]
R5–6: sc around [24]
FO, stuff lightly and flatten.
Sew centered on face.
Embroider:
- Pink triangle nose
- Black mouth
- 3–4 whiskers on each side
👂 Ears (Make 4 – Gray)
R1: MR, 4 sc [4]
R2: (sc, inc) ×2 [6]
R3: (2 sc, inc) ×2 [8]
R4: (3 sc, inc) ×2 [10]
R5: (4 sc, inc) ×2 [12]
R6: sc around [12]
FO. Flatten into triangle shape.
Attach near top of head.
🧍 Body (White Belly + Gray Back)
The body is worked in continuous rounds. Each round is split into white stitches for the front belly and gray stitches for the back and sides.
Start with WHITE:
R1: MR, 6 sc [6]
R2: inc ×6 [12]
R3: (sc, inc) ×6 [18]
R4: (2 sc, inc) ×6 [24]
R5: (3 sc, inc) ×6 [30]
R6: (4 sc, inc) ×6 [36]
From now on, use color blocks:
R7–10:
18 sc WHITE (front belly)
18 sc GRAY (back)
[36]
R11: BLO, same color placement [36]
R12–18: repeat split color rounds [36]
R19:
(4 sc, dec) ×3 in WHITE
(4 sc, dec) ×3 in GRAY
[30]
R20:
15 white, 15 gray [30]
R21:
(3 sc, dec) ×3 white
(3 sc, dec) ×3 gray
[24]
R22–26:
12 white, 12 gray [24]
Stuff very firmly for a plump seated body.
FO, leaving a long tail to sew head on.
Attach head with white belly facing forward.
🐾 Arms (Make 4)
Start with WHITE:
R1: MR, 6 sc [6]
R2: inc ×6 [12]
R3: (sc, inc) ×6 [18]
R4–5: sc around [18]
Switch to GRAY:
R6: BLO sc around [18]
R7: (sc, dec) ×6 [12]
R8–16: sc around [12]
Stuff paws firmly, arms lightly.
Attach to body at R12–14, angled slightly forward.
🐾 Legs (Make 4)
Start with WHITE:
R1: MR, 6 sc [6]
R2: inc ×6 [12]
R3: (sc, inc) ×6 [18]
R4: (2 sc, inc) ×6 [24]
R5–7: sc around [24]
Switch to GRAY:
R8: BLO (2 sc, dec) ×6 [18]
R9–16: sc around [18]
Stuff firmly.
Attach wide apart for seated posture.
🐈 Tail with Wire Support (Make 2)
R1: MR, 6 sc [6]
R2: inc ×6 [12]
R3: (sc, inc) ×6 [18]
R4: (2 sc, inc) ×6 [24]
R5–7: sc around [24]
R8: (2 sc, dec) ×6 [18]
R9: (sc, dec) ×6 [12]
R10–38: sc around [12]
Insert wrapped wire.
R39: (sc, dec) ×4 [8]
R40: dec ×4 [4]
FO and close.
Attach to lower back of body.
Bend both tails upward to form a heart shape when cats sit together.
🎀 Bow Tie (Boy Cat)
Ch 12
Rows 1–7: sc across [11]
Wrap yarn around center to form bow shape.
Sew under muzzle.
🌼 Flower (Girl Cat)
Petals (White):
MR, (ch 4, dc, hdc, sc, sl st) ×6
Center (Yellow):
MR, 6 sc
inc ×6 [12]
Attach to ear.
🩷 Collar (Girl Cat)
Ch 24–26
2 rows sc
Wrap around neck and sew closed at back.
🧷 Final Assembly
- Sew head to body (white belly facing front)
- Attach arms and legs
- Attach tails and shape into heart
- Add bow, flower, and collar
- Position cats sitting side by side
🎉 Finished Look
Your Love Cat Duo is complete—two sweet crochet kitties with plump bodies, clean white bellies, curved heart tails, and charming romantic details. Perfect for Valentine’s Day, weddings, anniversaries, or cozy home décor. 💕🐱🐱


Me encanta sus amigurumi muy hermosos ,yo estoy asiendo sus amigurumi los felicito por compartir sus patrones