Oh, the joy of diving into the world of amigurumi! 🧶 There’s something incredibly satisfying about seeing a ball of yarn transform into a delightful little creature, like a cute turtle, right before your eyes. If you’re like me, the appeal of amigurumi lies in its blend of creativity and craftsmanship. Creating a little turtle amigurumi pattern is a fun adventure where each stitch adds to the story of your handmade buddy. Whether you’re a seasoned crocheter or a curious beginner, there’s always a magic in seeing how a simple skein of yarn, a hook, and a dash of imagination can bring these tiny wonders to life. 🐢
The process might seem a bit tricky at first, but trust me, it’s easier than it looks. It all starts with gathering the right materials: some colorful yarn, a trusty crochet hook, and a few other supplies like stuffing and safety eyes to give your turtle some character. Step by step, you’ll be working in rounds, starting with the turtle’s shell and then moving on to its cute little limbs. The joy is in the details — choosing the perfect color combinations, adding a touch of personality with embroidery, and stuffing it just right for that perfect cuddle factor. Before you know it, you’ve got a little turtle friend who’s ready to charm anyone who lays eyes on it. 🌟
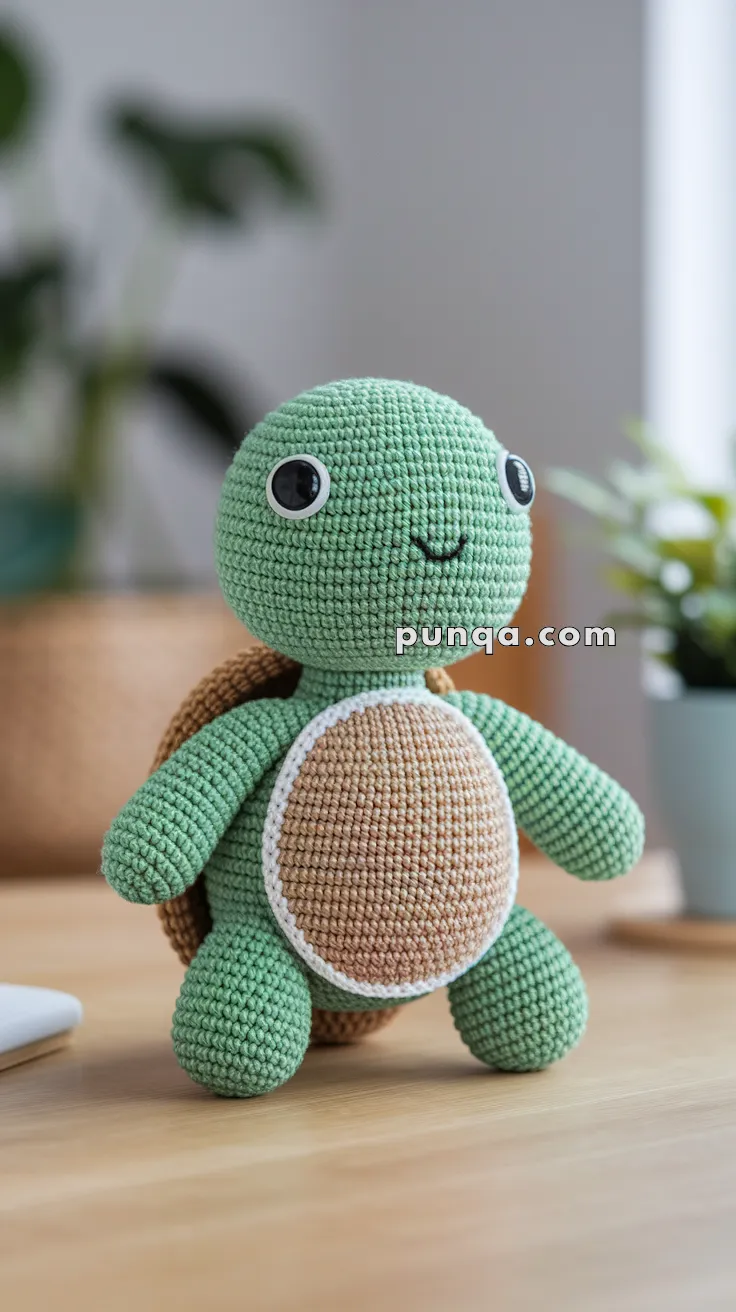
🐢 Amigurumi Little Turtle Crochet Pattern
This sweet little turtle, with its cheerful face and classic shell, makes a delightful companion or a perfect handmade gift. With rounded features and a soft color palette, it’s beginner-friendly and adorable enough to charm turtle lovers of all ages!
✨ Skill Level
Easy – Great for beginners with basic crochet skills.
📏 Finished Size
Approx. 6–7 inches (15–18 cm) tall when using DK or worsted yarn and a 2.5–3.5 mm hook.
🧶 Materials
-
Yarn (DK or Worsted):
-
Light Green (head, arms, legs, body)
-
Brown (shell)
-
Beige (belly)
-
White & Black (eyes, optional)
-
-
Crochet hook: 2.5 mm or 3.0 mm
-
10–12 mm safety eyes (or use black yarn for embroidered eyes)
-
Tapestry needle
-
Stitch marker
-
Polyfill stuffing
-
Black embroidery thread for smile
-
White yarn for belly edging (optional)
🧵 Abbreviations (US Terms)
MR – Magic Ring
sc – Single Crochet
inc – Increase (2 sc in same st)
dec – Decrease (sc 2 together)
sl st – Slip Stitch
BLO – Back Loop Only
FO – Fasten Off
🧠 Head (Light Green Yarn)
-
MR, 6 sc
-
inc x6 (12)
-
(1 sc, inc) x6 (18)
-
(2 sc, inc) x6 (24)
-
(3 sc, inc) x6 (30)
6–11. sc around (30) -
(3 sc, dec) x6 (24)
-
(2 sc, dec) x6 (18)
– Insert safety eyes between R7–8, 6–7 sts apart
– Embroider a smile in R9 -
(1 sc, dec) x6 (12)
-
dec x6 (6), FO and close
🐢 Body (Light Green Yarn)
-
MR, 6 sc
-
inc x6 (12)
-
(1 sc, inc) x6 (18)
-
(2 sc, inc) x6 (24)
5–8. sc around (24) -
(2 sc, dec) x6 (18)
-
(1 sc, dec) x6 (12), FO and stuff
🐚 Shell (Brown Yarn)
-
MR, 6 sc
-
inc x6 (12)
-
(1 sc, inc) x6 (18)
-
(2 sc, inc) x6 (24)
-
(3 sc, inc) x6 (30)
-
sc around (30)
-
(3 sc, dec) x6 (24)
-
(2 sc, dec) x6 (18), FO and stuff lightly before attaching
🍃 Belly (Beige Yarn + White edging optional)
-
MR, 6 sc
-
inc x6 (12)
-
(1 sc, inc) x6 (18)
-
(2 sc, inc) x6 (24)
-
sc around (24), FO and leave tail
– Optional: Surface crochet or stitch around the edge with white yarn for contrast
🦵 Legs (Make 2 – Light Green Yarn)
-
MR, 6 sc
-
inc x6 (12)
3–5. sc around (12) -
(1 sc, dec) x4 (8)
7–8. sc (8), FO and stuff lightly
💪 Arms (Make 2 – Light Green Yarn)
-
MR, 6 sc
-
(1 sc, inc) x3 (9)
3–6. sc around (9), FO and stuff lightly
🧲 Tail (Light Green Yarn)
-
MR, 4 sc
2–3. sc around (4), FO and leave a tail
👁 Eyes (Optional if not using safety eyes)
White Part:
-
MR, 6 sc, sl st to join, FO
Black Part: -
MR, 4 sc, sl st to join, FO
– Sew black onto white, then attach both to face
✂️ Assembly Instructions
-
Sew head to top of body
-
Attach arms to upper sides and legs to lower body
-
Sew belly piece to front of body
-
Sew shell to back
-
Attach tail at bottom rear
-
Add safety or crocheted eyes
-
Embroider smile with black thread
💡 Optional Add-ons
-
Add a bow tie or flower accessory
-
Use blush or fabric paint for rosy cheeks
-
Add a tiny backpack or heart on the shell