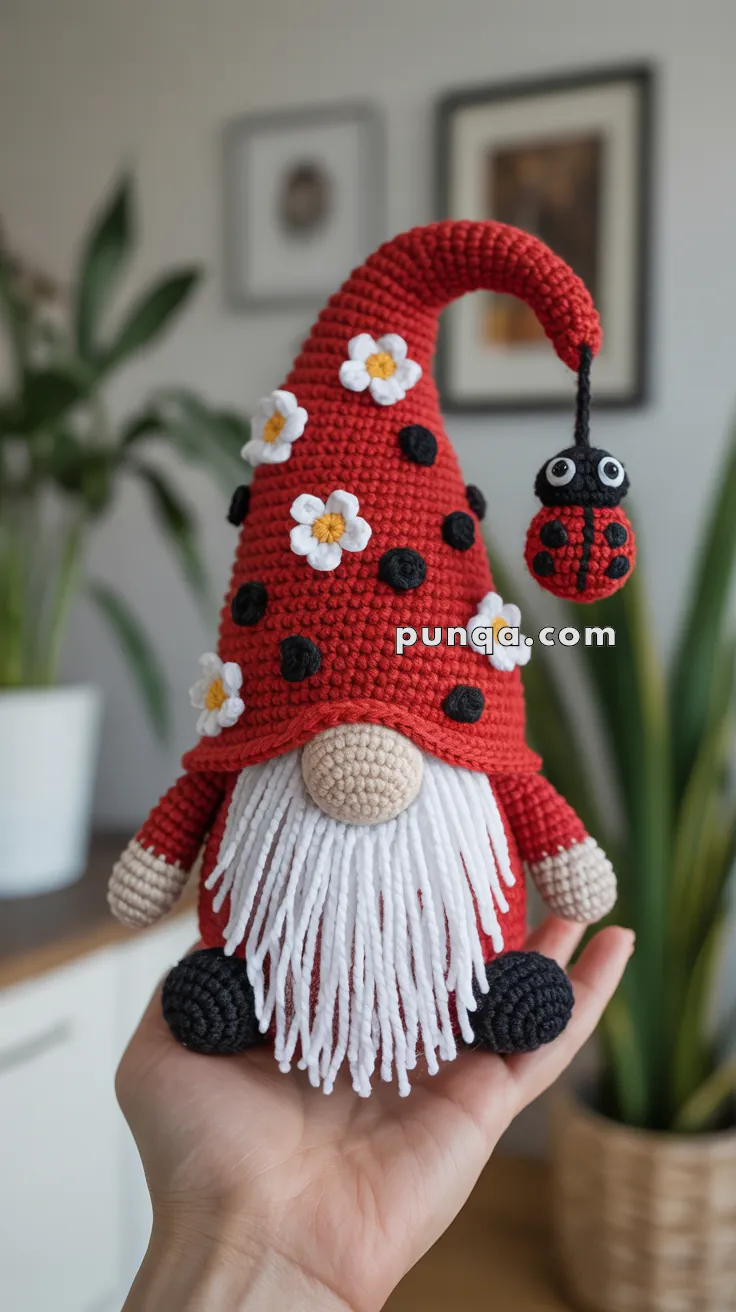
Say hello to the Amigurumi Ladybug Gnome, a cheerful little forest friend who’s ready to bring a pop of color and charm to your crochet collection! 🍄🧶 With his bright red hat sprinkled in polka dots and tiny flowers, a flowing white beard, and a sweet ladybug companion dangling from the tip of his hat, this gnome is bursting with personality. Whether you’re crafting for springtime décor, a nature-loving pal, or just want a dose of whimsy on your shelf, he’s sure to make hearts flutter.
Perfect for crocheters who love playful details and vibrant themes, this pattern invites you to mix textures, experiment with embellishments, and add your own creative twist. Stitch him up as a standalone cutie or pair him with other garden-inspired amigurumi for a full enchanted scene. The Amigurumi Ladybug Gnome is a delightful way to stitch up joy, nature, and a whole lot of handmade magic—one loop at a time! 🐞🧵
🐞 Ladybug Gnome Amigurumi Crochet Pattern
Bring woodland luck and springtime cheer into your home with this delightful Ladybug Gnome!
With his tall curved hat sprinkled with daisies and dots, his neat straight-cut beard, and his dangling ladybug companion, this gnome adds a dash of handmade magic to any shelf.
✨ Skill Level
Intermediate – includes shaping, color changes, embroidery, and accessory assembly.
📏 Finished Size
Approx. 22–25 cm (9–10 in) tall when made with DK/light-worsted yarn and a 3.0–3.5 mm hook.
🧶 Materials
- Yarn (DK / Light-Worsted ≈ 240–280 m / 100 g)
- Polyfill stuffing
- Crochet hook 3.0–3.5 mm
- Tapestry needle & scissors
🪡 Abbreviations (US Terms)
MR – Magic Ring
sc – Single Crochet
inc – Increase (2 sc in same st)
dec – Decrease (sc2tog)
ch – Chain
hdc – Half Double Crochet
dc – Double Crochet
sl st – Slip Stitch
FO – Fasten Off
👣 Body (Red)
R1 – MR 6 (6)
R2 – inc ×6 (12)
R3 – (1 sc, inc) ×6 (18)
R4 – (2 sc, inc) ×6 (24)
R5 – (3 sc, inc) ×6 (30)
R6 – (4 sc, inc) ×6 (36)
R7 – (5 sc, inc) ×6 (42)
R8–R12 – sc around (42)
R13 – (5 sc, dec) ×6 (36)
R14 – (4 sc, dec) ×6 (30)
R15 – (3 sc, dec) ×6 (24)
R16 – sc (24)
FO and stuff.
🥿 Shoes × 2 (Black)
R1 – MR 6 (6)
R2 – inc ×6 (12)
R3 – (1 sc, inc) ×6 (18)
R4 – (2 sc, inc) ×6 (24)
R5 – (3 sc, inc) ×6 (30)
R6 – sc (30)
R7 – (3 sc, dec) ×6 (24)
R8 – (2 sc, dec) ×6 (18)
R9 – (1 sc, dec) ×6 (12)
Stuff firmly.
R10 – dec ×6 (6)
FO and close.
Sew shoes to the lower front of the body.
✋ Arms with Hands × 2
Hands (Beige)
R1 – MR 6 (6)
R2 – inc ×6 (12)
R3 – sc 12
FO and lightly stuff.
Sleeves (Red)
R1 – Join red yarn to any stitch of the hand, sc 10 (10)
R2–R6 – sc around (10)
FO and lightly stuff.
Sew arms high on the body, with hands just under the hat brim.
👃 Nose (Beige)
R1 – MR 6 (6)
R2 – inc ×6 (12)
R3 – (1 sc, inc) ×6 (18)
R4 – (2 sc, inc) ×6 (24)
R5 – sc around (24)
FO and stuff lightly.
Sew nose centered near the top front of the body.
🧔 Beard (White)
Cut 15–17 cm strands of white yarn.
Attach in rows using lark’s head knots, placing strands densely at the center and fewer toward the sides, forming a long pointed shape.
Trim the bottom to create a clean tapered form that reaches near the shoes.
🎩 Hat (Red)
R1 – MR 4 (4)
R2 – sc (4)
R3 – (1 sc, inc) ×2 (6)
R4 – sc (6)
R5 – (2 sc, inc) ×2 (8)
R6 – sc (8)
R7 – (3 sc, inc) ×2 (10)
R8 – sc (10)
R9 – (4 sc, inc) ×2 (12)
R10 – sc (12)
R11 – (5 sc, inc) ×2 (14)
R12 – sc (14)
R13 – (6 sc, inc) ×2 (16)
R14 – sc (16)
R15 – (7 sc, inc) ×2 (18)
R16 – sc (18)
R17 – (8 sc, inc) ×2 (20)
R18 – sc (20)
R19 – (9 sc, inc) ×2 (22)
R20 – sc (22)
R21 – (10 sc, inc) ×2 (24)
R22 – sc (24)
R23 – (11 sc, inc) ×2 (26)
R24 – sc (26)
R25 – (12 sc, inc) ×2 (28)
R26 – (13 sc, inc) ×2 (30)
R27 – (4 sc, inc) ×6 (36)
R28–R34 – sc (36)
FO.
Stuff the lower portion lightly. Bend the top forward and downward, then stitch to hold the curve.
Sew hat onto body so the brim rests against the top of the nose.
⚫ Hat Dots (8 pieces, Black)
Small
MR 6 → sl st → FO.
Medium
R1 – MR 6
R2 – inc ×6 (12) → FO.
Attach eight dots spaced across the hat.
🌼 Daisies (6 pieces)
Small Flower
MR → (ch 2, 2 hdc, ch 2, sl st) ×5 → FO.
Large Flower
MR → (ch 3, 2 dc, ch 3, sl st) ×6 → FO.
Centers
MR 6 sc (yellow) → FO.
Sew six daisies among the black dots.
🐞 Ladybug Charm
Body (Red)
R1 – MR 6 (6)
R2 – inc ×6 (12)
R3 – (1 sc, inc) ×6 (18)
R4 – sc (18)
FO and lightly stuff.
Head (Black)
R1 – MR 6 (6)
R2 – inc ×6 (12)
R3 – sc (12)
FO and sew to body.
Spots
Make 6 tiny black dots: MR 5 sc each.
Eyes
White MR 5 sc; add black pupils.
Antennae
ch 3, sl st back → make 2.
Hanging String
ch 5–7.
Attach ladybug to the curved tip of the hat so it hangs beside the upper section of the beard.
🧵 Assembly
- Sew shoes to the bottom of the body.
- Attach beard to the front, forming a pointed shape.
- Sew nose centered above the beard.
- Place hat so the brim touches the top of the nose; sew in place.
- Attach arms so hands rest under the hat edge.
- Add 8 black dots and 6 daisies to the hat.
- Shape and secure the curved hat tip.
- Attach ladybug charm to the hat.
🌟 Final Look
Your Ladybug Gnome is complete — with a tall curved hat, daisy decorations, dotted details, long white beard, soft round shoes, small hands, and the adorable hanging ladybug. A perfect whimsical accent for any shelf or display.


Hermoso!!!!!
Grazie per lo schema, lo gnomo è veramente tanto carino
Merci pour ses beau patron
Lov it