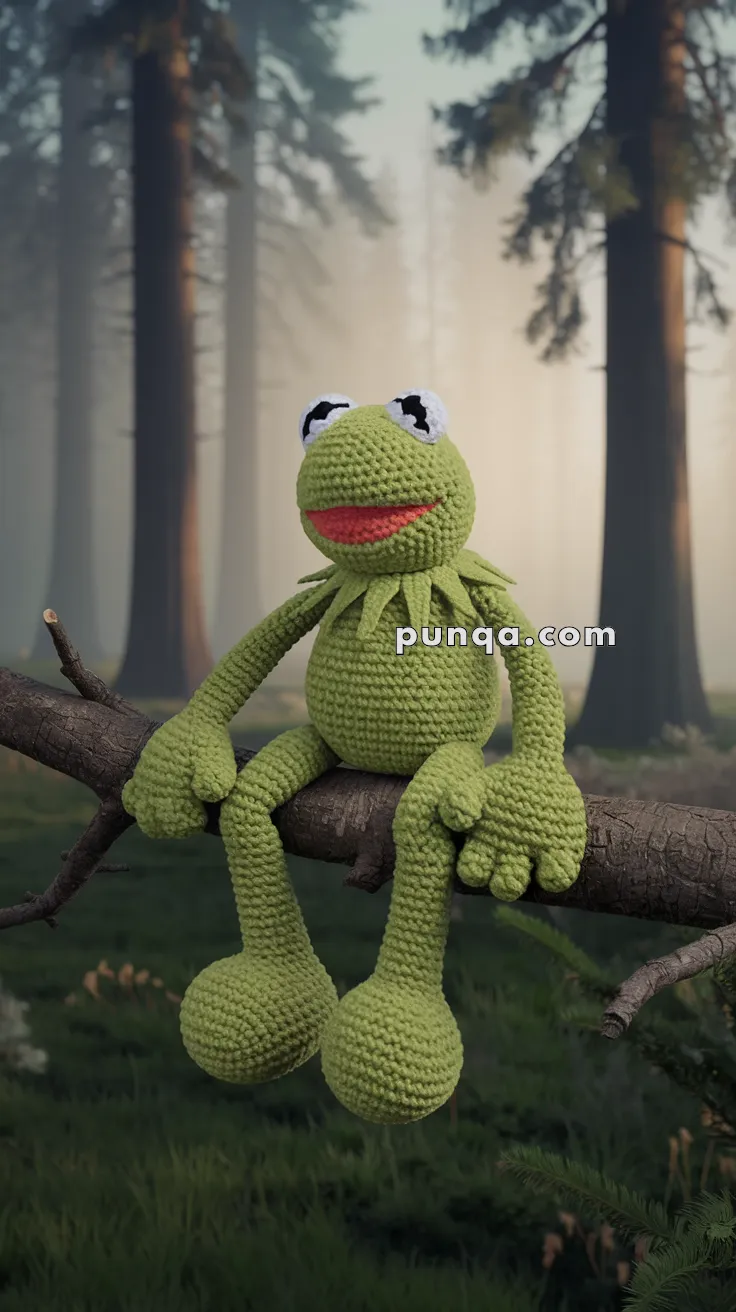
Bring a touch of nostalgia to your crochet collection with this Amigurumi Kermit the Frog pattern! Inspired by the beloved Muppets character, this adorable design captures Kermit’s signature bright green color, expressive eyes, and charming personality in every stitch. Whether you’re crafting for longtime fans, adding a playful accent to your decor, or simply enjoy making character-inspired amigurumi, this pattern lets you stitch up a miniature Kermit bursting with personality! Perfect for brightening up any space, this crochet creation brings a touch of handmade whimsy to your collection. 🐸✨
Designed for customization, this pattern allows you to experiment with different shades of green, embroidered details, or even tiny accessories like a miniature banjo or lily pad for extra flair. Craft a classic Kermit with his signature look, create a whimsical version with pastel hues, or even stitch up a full set of Muppets-inspired amigurumi for a nostalgic display! Whether gifted as a heartfelt keepsake, displayed as a cheerful accent, or made simply for the joy of crafting, this Amigurumi Kermit the Frog is a fun and creative project—perfect for bringing a touch of handmade puppet magic to every stitch! 🧶💖✨
🐸 Amigurumi Kermit the Frog Crochet Pattern
Bring the beloved Muppet magic into your home with this charming Kermit the Frog amigurumi! With his iconic bulging eyes, cheerful red smile, and long gangly limbs, this handcrafted Kermit captures all the whimsy and personality of everyone’s favorite green frog. Perfect for Muppet fans of all ages or as a nostalgic gift that’s sure to make someone smile! 🌟
✨ Skill Level
Intermediate
You should be comfortable with:
• Crocheting in continuous rounds
• Increasing and decreasing for shaping
• Sewing multiple pieces together
• Basic embroidery
📏 Finished Size
Using DK weight yarn and a 3.5–4 mm crochet hook:
Height when sitting: approximately 27–30 cm (10–12 inches)
🧶 Yarn Requirements
DK weight yarn recommended.
Light green yarn — about 75 g (225 m) for head, body, arms, legs, feet, collar
Red yarn — about 6 g (18 m) for mouth
White yarn — about 10 g (30 m) for eyes
Black yarn — about 5 g (15 m) for pupils and facial embroidery
🧰 Tools & Materials
3.5–4 mm crochet hook
Polyester fiberfill stuffing
Tapestry needle
Stitch marker
Scissors
Optional: black embroidery thread for facial details.
🧵 Abbreviations (US Terms)
MR – Magic Ring
sc – Single Crochet
inc – Increase
dec – Invisible Decrease
ch – Chain
sl st – Slip Stitch
st – Stitch
FO – Fasten Off
🐸 Head
With light green yarn.
Round 1
MR, 6 sc (6)
Round 2
inc ×6 (12)
Round 3
(1 sc, inc) ×6 (18)
Round 4
(2 sc, inc) ×6 (24)
Round 5
(3 sc, inc) ×6 (30)
Round 6
(4 sc, inc) ×6 (36)
Rounds 7–14
sc around (36)
Round 15
(4 sc, dec) ×6 (30)
Round 16
(3 sc, dec) ×6 (24)
Stuff firmly.
Round 17
(2 sc, dec) ×6 (18)
Round 18
(1 sc, dec) ×6 (12)
Round 19
dec ×6 (6)
FO and close.
The head should be round with a slightly flattened front where the mouth will sit.
🐸 Body
With light green yarn.
Round 1
MR, 6 sc (6)
Round 2
inc ×6 (12)
Round 3
(1 sc, inc) ×6 (18)
Round 4
(2 sc, inc) ×6 (24)
Round 5
(3 sc, inc) ×6 (30)
Rounds 6–9
sc around (30)
Round 10
(3 sc, dec) ×6 (24)
Round 11
(2 sc, dec) ×6 (18)
Rounds 12–15
sc around (18)
Stuff firmly so the body becomes slightly oval.
FO leaving long tail.
🌿 Collar (Frog Neck Frill)
With light green yarn.
Attach yarn around the neck edge.
Work (ch 3, sl st in next stitch) repeatedly around the neckline.
This creates pointed triangular spikes.
Continue until you have about 10–12 small spikes forming the frog collar.
FO and weave in ends.
🐸 Arms (Make 2)
With light green yarn.
Round 1
MR, 6 sc (6)
Round 2
(1 sc, inc) ×3 (9)
Rounds 3–20
sc around (9)
Keep arms lightly stuffed so they remain flexible.
Round 21
(1 sc, dec) ×3 (6)
FO leaving tail.
🐸 Hands (Three-Finger Shape)
The frog’s hands are slightly wide with three rounded fingers.
With light green yarn.
Round 1
MR, 6 sc (6)
Round 2
inc ×6 (12)
Round 3
sc around (12)
Round 4
(2 sc, dec) ×3 (9)
Stuff lightly.
FO leaving tail.
Sew to the ends of arms.
Use small embroidery stitches to define three fingers across the front of the hand.
🐸 Legs (Make 2)
With light green yarn.
Round 1
MR, 6 sc (6)
Round 2
inc ×6 (12)
Round 3
(1 sc, inc) ×6 (18)
Round 4
sc around (18)
Round 5
(4 sc, dec) ×3 (15)
Round 6
(3 sc, dec) ×3 (12)
Rounds 7–22
sc around (12)
Stuff feet firmly and legs lightly.
Round 23
(2 sc, dec) ×3 (9)
Round 24
dec until closed.
FO leaving long tail.
🐸 Feet
The frog’s feet are rounded and slightly larger than the legs.
With light green yarn.
Round 1
MR, 6 sc (6)
Round 2
inc ×6 (12)
Round 3
(1 sc, inc) ×6 (18)
Round 4
(2 sc, inc) ×6 (24)
Rounds 5–6
sc around (24)
Round 7
(2 sc, dec) ×6 (18)
Round 8
(1 sc, dec) ×6 (12)
Stuff firmly to maintain the rounded shape.
Sew to the ends of the legs.
👀 Raised Eyes (Make 2)
With white yarn.
Round 1
MR, 6 sc (6)
Round 2
inc ×6 (12)
Round 3
(1 sc, inc) ×6 (18)
Round 4
sc around (18)
Round 5
(1 sc, dec) ×6 (12)
Lightly stuff.
FO leaving tail.
These pieces should form slightly raised eye domes.
👁 Pupils (Make 2)
With black yarn.
Round 1
MR, 6 sc
Round 2
inc ×6 (12)
FO leaving tail.
Sew pupils onto the white eye pieces.
😊 Mouth
With red yarn.
Chain 14.
Row 1
sc in second chain and across (13)
Row 2
ch 1, turn, inc, 9 sc, inc
Row 3
ch 1, turn, sc across
Row 4
ch 1, turn, dec, 9 sc, dec
FO leaving long tail.
Shape slightly curved when attaching.
🧩 Assembly
Sew head to body securely.
Attach eyes high on the top front of the head so they sit raised and slightly angled outward.
Place the mouth centered on the lower head with a gentle smile.
Attach arms to the upper sides of the body.
Attach legs to the bottom front of the body so they hang freely.
Sew hands and feet firmly.
✂️ Final Shaping
Adjust stuffing so the frog sits comfortably.
Keep limbs soft for a relaxed pose.
Position the arms so the hands rest naturally on the legs.
🎉 Final Thoughts
This delightful Kermit will bring Muppet magic wherever he sits – from bookshelves to garden branches! He’s perfect for gifting to fans young and old, or keeping as your own little piece of childhood nostalgia. 🐸💚