Welcome to the cozy and cultural world of amigurumi! ❄️✨ Today, I’m excited to share my free crochet pattern for an Inuit Doll—a beautifully detailed creation perfect for winter lovers, heritage-inspired collections, or anyone who enjoys crafting expressive and symbolic plush figures! 🌿 Whether you love stitching up traditional characters, creating textured and lifelike designs, or simply want to add a charming Inuit doll to your handmade lineup, this pattern will guide you through crafting a sculpted plush with a fluffy parka, warm boots, and a touch of Arctic magic! 🏔️
This design embraces soft textures, intricate shaping, and rich cultural elements to bring a sense of warmth and storytelling to your crochet projects! 🧶🌾 I’ve carefully outlined each step to ensure your Amigurumi Inuit Doll turns out just right—ready to brighten up your collection or become a treasured handmade gift! 🎁 So grab your hooks, pick out snowy whites, deep blues, or earthy browns, and let’s stitch up a stunning Inuit doll! ✨
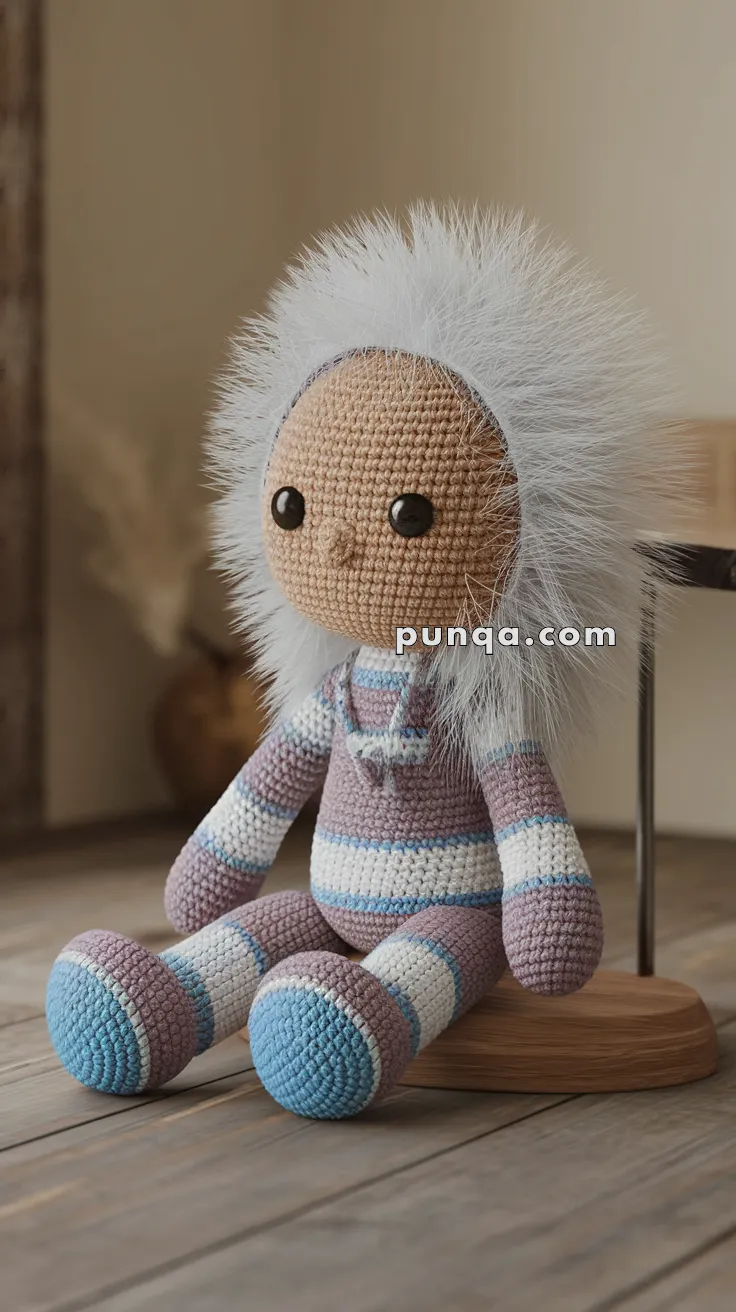
❄️ Amigurumi Inuit Doll – Free Crochet Pattern
Wrap up your crochet world in warmth with this cozy and adorable Amigurumi Inuit Doll! Dressed in a classic striped parka and surrounded by a soft faux fur hood, this winter-ready doll makes a heartwarming handmade gift or seasonal decor piece.
✨ Skill Level
Intermediate – Involves color changes, shaping, and sewing faux fur trim.
📏 Finished Size
Approx. 28 cm (11”) tall when using worsted weight yarn and 3.5 mm hook.
🧶 Materials
-
Yarn (Worsted weight / 4)
-
Skin tone (beige or light brown)
-
Main outfit color (lavender/mauve)
-
Accent stripe colors (white and icy blue)
-
Shoe/footpad color (light blue)
-
-
Crochet Hook: 3.0–3.5 mm
-
Safety Eyes: 10–12 mm
-
Stuffing: Polyester fiberfill
-
Tapestry needle
-
Stitch marker
-
Faux fur trim (white/gray – sew-on or glue-on)
-
Optional: Blush for cheeks, thread for nose and mouth
🧵 Abbreviations (US Terms)
-
MR – Magic Ring
-
sc – Single Crochet
-
inc – Increase
-
dec – Decrease
-
sl st – Slip Stitch
-
FO – Fasten Off
-
BLO – Back Loops Only
🧠 Pattern Instructions
👶 Head (Skin Tone)
-
MR, 6 sc (6)
-
inc x6 (12)
-
(1 sc, inc) x6 (18)
-
(2 sc, inc) x6 (24)
-
(3 sc, inc) x6 (30)
-
(4 sc, inc) x6 (36)
7–13. sc around (36) -
(4 sc, dec) x6 (30)
-
(3 sc, dec) x6 (24)
-
(2 sc, dec) x6 (18)
Insert safety eyes between R9–R10, about 6 sts apart.
Stuff firmly. -
(1 sc, dec) x6 (12)
-
dec x6 (6)
FO and close.
🧥 Body (Striped Pattern)
Color changes: lavender (main), white, icy blue
Alternate colors every 2–3 rounds for stripes.
-
With lavender: MR, 6 sc
-
inc x6 (12)
-
(1 sc, inc) x6 (18)
-
(2 sc, inc) x6 (24)
-
(3 sc, inc) x6 (30)
6–18. sc around (30) – switch colors every 2 rounds -
(3 sc, dec) x6 (24)
-
(2 sc, dec) x6 (18)
Stuff firmly. FO and leave tail for sewing to head.
💪 Arms (Make 2 – Striped)
-
With lavender: MR, 6 sc
-
inc x6 (12)
-
(3 sc, dec) x3 (9)
4–10. sc around (9), alternate colors every 2 rounds -
Flatten top and sc across to close
FO, leave tail for sewing.
🦵 Legs (Make 2 – Striped + Boots)
Start with light blue (footpad):
-
MR, 6 sc
-
inc x6 (12)
-
(1 sc, inc) x6 (18)
4–5. sc around (18)
Switch to white:
6–7. sc around (18)
Switch to lavender:
8–13. sc around (18)
Stuff. FO, leave tail for sewing.
🧵 Hood Base (Lavender)
-
MR, 6 sc
-
inc x6 (12)
-
(1 sc, inc) x6 (18)
-
(2 sc, inc) x6 (24)
-
(3 sc, inc) x6 (30)
6–8. sc around (30)
FO and sew behind head (this piece will be hidden beneath fur).
❄️ Faux Fur Trim
Cut a strip of faux fur long enough to circle the head’s opening.
Use sewing needle and thread or hot glue to attach it around the lavender hood base.
Make sure the fur fluffs outward.
🪡 Assembly
-
Attach body to head securely.
-
Sew arms to upper body sides.
-
Attach legs slightly forward-facing for seated position.
-
Add lavender hood base to back of head and attach fur trim around front.
-
Embroider small nose and smile with black or brown thread.
-
Optionally, apply blush with fabric-safe pink chalk or blush powder.
This cozy little Inuit doll is perfect for wintertime gifts and snow-loving hearts! ☃️🧣 Ready to bring warmth to your handmade world.


