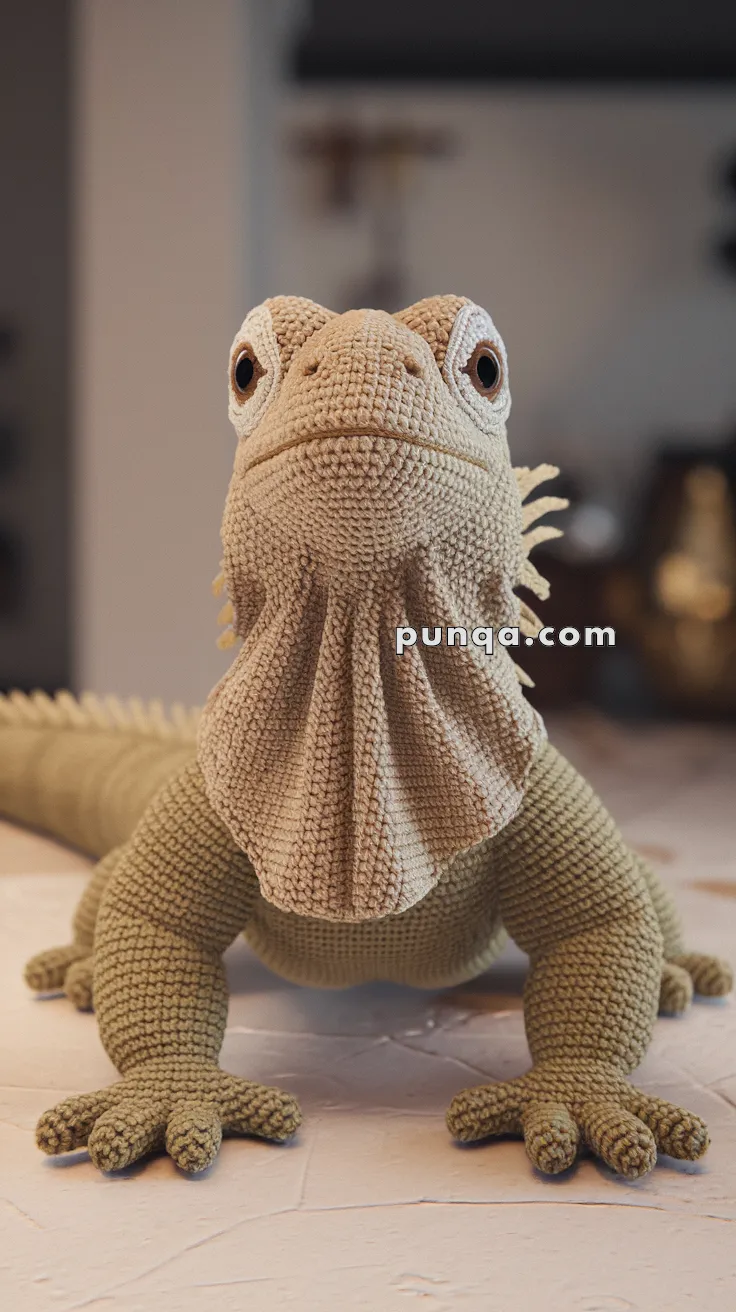
🦎 Amigurumi Iguana Crochet Pattern
Bring a touch of the exotic into your crochet world with this impressively detailed iguana pattern! Featuring a broad, sculpted head, raised eyes, textured dewlap, and perfectly posed limbs, this piece makes a stunning display for reptile lovers and advanced amigurumi enthusiasts.
✨ Skill Level
Advanced – involves shaping, short rows, structural assembly, and fine detailing.
📏 Finished Size
Approximately 16–20 inches (40–50 cm) from snout to tail when made with DK-weight yarn and a 2.75–3.0 mm hook.
🧶 Materials
-
Olive Green Yarn – 90–100 g (head, body, limbs, tail)
-
Beige or Tan Yarn – 35–40 g (dewlap, lower jaw, underside)
-
Dark Olive or Brown Yarn – 8 g (dorsal spines and shading)
-
12–14 mm brown or amber safety eyes
-
Crochet Hook: 2.75–3.0 mm
-
Polyester fiberfill stuffing
-
Tapestry needle & stitch markers
-
Optional: pipe cleaner or floral wire for shaping the tail
-
Embroidery thread (black and white) for nostrils and eye details
-
Optional: felt or polymer clay tips for claws
🧵 Abbreviations (US Terms)
MR – Magic Ring
sc – Single Crochet
inc – Increase (2 sc in same stitch)
dec – Decrease (sc2tog)
ch – Chain
sl st – Slip Stitch
FLO – Front Loop Only
BLO – Back Loop Only
FO – Fasten Off
🦎 Head (Broad Triangular Shape)
We’ll start with an oval base to achieve the wide, flat iguana head shape, with extra increases for the cheek area and short rows to flatten the crown.
With Olive Green:
-
Ch 10
R1: sc in 2nd ch from hook, sc 7, 3 sc in last ch, rotate, sc 7, inc (20)
-
R2: inc, sc 7, inc x3, sc 7, inc x2 (26)
-
R3: inc, sc 9, (sc, inc) x3, sc 9, (sc, inc) x2 (32)
4–7. Continue increasing 2 sts each side (at cheek markers) → end with 46 sts
-
R8: (sc 5, inc) ×2 at cheeks only; add 2 front increases → 50
-
R9: sc around (50)
-
R10: (sc 6, inc) at both cheeks → 52
-
R11: sc around (52)
Crown shaping (short rows):
-
R12 (FLO): sc 36, turn (leave 16 unworked)
-
SR1: ch 1, sc 36, turn
-
SR2: ch 1, sc 32, turn
-
SR3: ch 1, sc 28, turn
-
SR4: ch 1, sc 24; sl st to next st, do not turn. Resume in both loops.
Neck taper:
-
(5 sc, dec) ×6 (46)
-
(4 sc, dec) ×6 (40)
Lightly stuff and keep the top flat with wide sides.
👀 Eye Turrets (Make 2)
Each raised eye structure is made separately and sewn high on the head sides.
With Olive Green:
-
MR, 6 sc (6)
-
inc ×6 (12)
-
(sc, inc) ×6 (18)
4–6. sc around (18)
-
(2 sc, dec) ×4 + sc 2 (14)
FO, stuff lightly.
Attach eyes on top. Sew turrets high and wide, angled slightly outward.
🐽 Snout (Separate Piece)
With Olive Green:
-
MR, 6 sc
-
inc ×6 (12)
-
(sc, inc) ×6 (18)
-
(2 sc, inc) ×6 (24)
5–6. sc around (24)
-
(2 sc, dec) ×6 (18)
FO, stuff firmly.
Sew to lower front of face so it projects forward.
Embroider two small nostrils and a light mouth line beneath.
🧔 Dewlap (Large Neck Fan)
With Beige/Tan:
-
Ch 2, 3 sc in 2nd ch (3)
-
Continue increasing at both ends until 65 sts wide (approx. 24 rows).
-
Work 4 short rows across center 50 sts, then 2 short rows across center 36 sts for a curved lower edge.
-
Sc evenly around the edge.
Ribbing: Add 7–9 vertical surface slip stitches or front-post single crochets from top to bottom for pleats.
Sew directly under the jaw, overlapping slightly so it flows wide and downward.
🐊 Body (Stocky Torso)
With Olive Green:
-
MR, 6 sc
-
inc ×6 (12)
-
(sc, inc) ×6 (18)
-
(2 sc, inc) ×6 (24)
-
(3 sc, inc) ×6 (30)
-
(4 sc, inc) ×6 (36)
-
(5 sc, inc) ×6 (42)
8–15. sc around (42)
-
(5 sc, dec) ×6 (36)
-
(4 sc, dec) ×6 (30)
-
(3 sc, dec) ×6 (24)
Stuff firmly, FO.
🌀 Tail (Tapered)
With Olive Green:
-
MR, 6 sc
2–5. sc around (6)
-
(2 sc, inc) ×2 (8)
7–10. sc (8)
-
(3 sc, inc) ×2 (10)
12–18. sc (10)
-
(4 sc, inc) ×2 (12)
20–30. sc (12)
-
(3 sc, dec) ×3 (9)
32–45. sc (9)
Stuff lightly; insert wire if desired. FO and sew curved to one side.
🦴 Limbs (4 total – thick and jointed)
Front Legs (Make 2)
-
MR, 6 sc
-
(sc, inc) ×6 (18)
3–5. sc (18)
-
(2 sc, dec) ×4 + sc 2 (14)
7–9. sc (14)
-
(sc, dec) ×4 + sc 2 (10)
FO, stuff, bend slightly at R6.
Back Legs (Make 2)
-
MR, 6 sc
-
(sc, inc) ×6 (18)
3–6. sc (18)
-
(2 sc, dec) ×4 + sc 2 (14)
8–10. sc (14)
-
(sc, dec) ×4 + sc 2 (10)
FO, stuff, bend at R7.
🐾 Toes (5 per foot)
-
MR, 7 sc (7)
2–6. sc around (7)
FO, lightly stuff.
Sew 5 toes in a wide fan per foot.
Add claws using dark yarn, felt, or polymer clay.
🔱 Dorsal Spines (Short and Uniform)
Using dark olive yarn:
Work along the back midline—(sl st, ch 3, sl st in 1st ch, sl st in next st) repeat.
Alternate lengths slightly for a natural ridge.
🪡 Assembly
-
Sew snout to head; embroider nostrils and mouth.
-
Attach eye turrets on the sides of the head; insert eyes.
-
Join head to body, slightly tilted upward.
-
Sew dewlap under the jawline.
-
Attach front and back legs low and wide, with elbows and knees bent.
-
Sew tail, curving gently to one side.
-
Add dorsal spines.
-
Finish with embroidered nostrils, subtle white eye highlights, and optional scale embroidery using V-stitches.
🌿 Finishing Touches
Lightly brush the surface for texture or use gentle embroidery to suggest small scales. Pose the iguana with legs splayed and dewlap open for a dynamic, lifelike stance.
🧶 Result
Your finished iguana stands out as a realistic showpiece — broad-headed, expressive, and full of sculptural detail. With its textured dewlap, strong limbs, and elegant spines, this crochet iguana brings a slice of the tropics straight to your home.


AUN ASI ES DE LOS AMIGURUMIS MAS BELLOS QUE HE VISTO. FELICITACIONES.