Welcome to the adventurous and graceful world of amigurumi! 🏇✨ Today, I’m excited to share my free crochet pattern for a Horse and Rider—a dynamic and charming duo perfect for equestrian lovers, storytelling projects, or anyone who enjoys crafting expressive and detailed figures! Whether you love stitching up majestic animals, creating playful character designs, or simply want to add a spirited horse and rider to your handmade collection, this pattern will guide you through crafting a beautifully sculpted plush set with flowing manes, tiny saddles, and a touch of equestrian elegance! 🤎
This design embraces strong shapes, earthy tones, and intricate details to bring a sense of adventure and companionship to your crochet creations! 🧶🌿 I’ve carefully outlined each step to ensure your Amigurumi Horse and Rider turn out just right—ready to gallop into your collection or become a treasured handmade gift! 🎁 So grab your hooks, pick out deep browns, soft creams, and vibrant outfit colors, and let’s stitch up a fearless equestrian duo! ✨
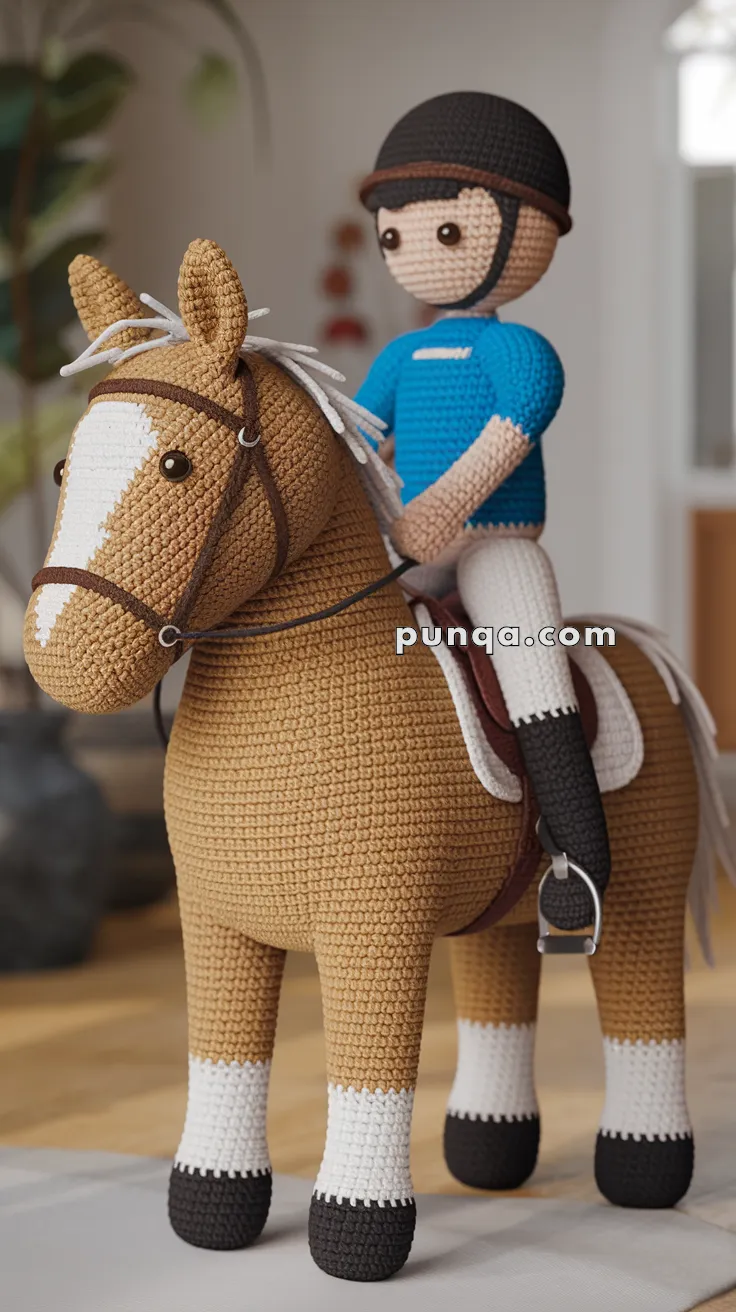
🐴 Amigurumi Horse and Rider – Free Crochet Pattern
Giddy up! This adorable amigurumi duo brings together a brave equestrian and their trusty steed in one detailed and dynamic project. Whether you’re a horse lover, a toy maker, or looking for your next crochet challenge, this charming set is a galloping good time! 🧵🐎
From the rider’s helmet to the horse’s saddle and reins, this project includes lots of shaping and assembling—but the final result is a stunning showpiece or heartfelt handmade gift. 🥇
🧵 Skill Level
Advanced – This pattern includes color changes, structural shaping, and multiple detailed parts (saddle, helmet, stirrups, reins, etc.).
📏 Finished Sizes
-
Horse: Approximately 35 cm (13.5 inches) tall from hoof to ear when using worsted-weight yarn and a 2.5 mm hook.
-
Rider: Approximately 23 cm (9 inches) seated on the horse.
✂️ Materials Needed
-
Worsted weight yarn in the following colors:
-
Tan, White, and Black (Horse)
-
Brown (Horse Mane and Bridle)
-
Blue, White, Skin tone, Black, and Brown (Rider)
-
-
2.5 mm crochet hook
-
Stitch marker
-
Safety eyes (10mm for horse, 8mm for rider)
-
Fiberfill stuffing
-
Yarn needle
-
Scissors
-
Optional: small metal rings for stirrups, buttons for reins
🧶 Abbreviations (US Terms)
-
MR – Magic Ring
-
SC – Single Crochet
-
INC – Increase
-
DEC – Decrease
-
BLO – Back Loops Only
-
FLO – Front Loops Only
-
CH – Chain
-
SL ST – Slip Stitch
-
DC – Double Crochet
-
HDC – Half Double Crochet
-
FO – Fasten Off
🐎 Horse Pattern
Head (Tan)
-
MR, 6 SC
-
INC x6 (12)
-
(SC, INC) x6 (18)
-
(2 SC, INC) x6 (24)
5-12. SC around (24) -
(3 SC, INC) x6 (30)
14-20. SC around (30) -
DEC x6, SC in rest (24)
-
SC around (24)
FO, stuff well.
Ears (make 2)
-
MR, 6 SC
-
(SC, INC) x3 (9)
3-5. SC around
Flatten and sew to head.
Muzzle (White)
-
MR, 6 SC
-
INC x6 (12)
3-4. SC around
FO, lightly stuff and sew to front of head.
Mane
Cut multiple strands of brown yarn and loop them across the top of the head with a latch-hook style (or sew individually).
Body
Repeat same technique as the head with additional rounds to elongate the torso and add four legs (see “Legs”).
Legs (Make 4 – Start with Black for hooves, then White and Tan)
-
MR, 6 SC
-
INC x6 (12)
-
SC around
Switch to white
4-5. SC
Switch to tan
6-12. SC around
FO, stuff and sew to body.
Tail
Use the same yarn as the mane. Cut and knot strands, then attach to the back.
Saddle (Brown)
Work an oval base using SC increases, then create small straps with chains and slip stitches. Sew to back.
Reins & Bridle
Use thin brown yarn. Create lines with chains and attach carefully to either side of the muzzle and over the head.
🧍 Rider Pattern
Head (Skin Tone)
-
MR, 6 SC
-
INC x6 (12)
-
(SC, INC) x6 (18)
-
(2 SC, INC) x6 (24)
5-10. SC around -
(2 SC, DEC) x6 (18)
-
SC around
FO, stuff.
Helmet
Repeat same pattern as the head, but finish 2 rows earlier. Add small ear straps and sew onto the head.
Hair
Use black or brown yarn, chain loops or short spirals, sew to edges under the helmet.
Body (Blue Shirt)
-
MR, 6 SC
-
INC x6 (12)
-
(SC, INC) x6 (18)
4-10. SC
11-12. SC with white yarn
FO.
Legs (Make 2 – Black pants to white socks)
-
MR, 6 SC
-
(SC, INC) x3 (9)
3-7. SC
FO, attach to body.
Arms (Make 2 – Blue to skin tone hands)
-
MR, 6 SC in skin
2-3. SC
Switch to blue
4-8. SC
FO and attach.
Assembly
-
Sew head to body.
-
Attach arms and legs.
-
Use a thin black yarn to embroider mouth and eyebrows.
-
Add safety eyes to both characters.
-
Position rider seated atop the horse and secure legs lightly to the saddle using yarn or glue.
-
Embroider or attach name tag if desired.
And there you have it—your very own crocheted rider and horse duo! 🐎✨
Let this pair ride proudly into your next display, market, or heartfelt gift set.
Happy stitching and see you on the trail! 🌾🏇