Celebrate the season with double the charm in the Amigurumi Holiday Gnome Couple, a crochet project that’s as festive as it is heartwarming! 🧶✨ These two cheerful gnomes are dressed in cozy holiday style, complete with whimsical details that make them perfect for adding personality to your Christmas décor. Their playful pairing brings a sense of warmth and togetherness, making them a delightful handmade addition to any holiday display.
Whether perched on a mantel, tucked under the tree, or gifted to someone special, this gnome duo is sure to spread joy and smiles. Quick to make yet full of character, the Amigurumi Holiday Gnome Couple is a joyful way to crochet celebration, coziness, and a sprinkle of handmade magic—one loop at a time! 🎄🧵❤️
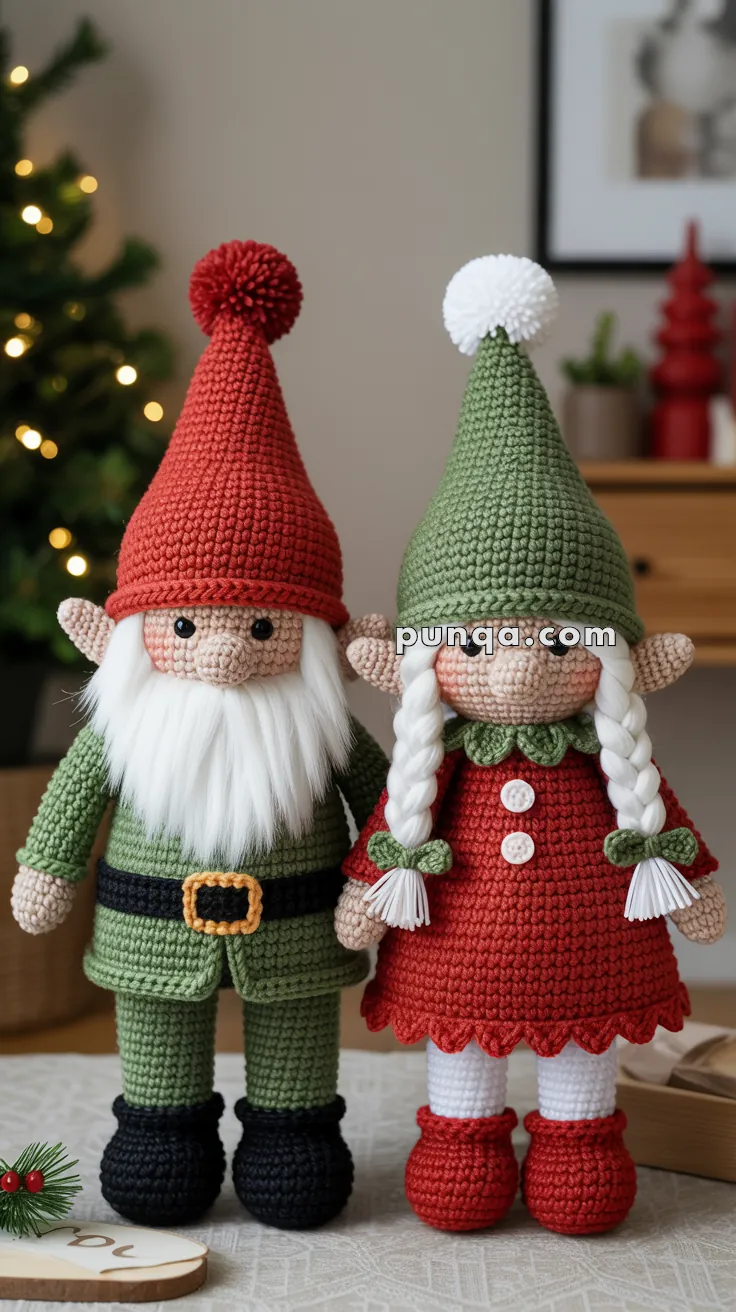
🎄Amigurumi Holiday Gnome Couple Crochet Pattern
Meet the sweetest pair of holiday gnomes — two quiet winter companions wrapped in warm colors, soft textures, and classic handmade charm. When both are completed and placed side by side, they look like gentle storybook characters standing in the calm glow of winter — friendly, heartfelt, and beautifully handmade.
Whether they decorate a holiday shelf, add warmth to your entryway, or sit quietly under twinkling lights, this festive couple brings a spirit of comfort and joy to any winter scene.
✨ Skill Level
Intermediate – requires shaping, structured garment building, raised stitch trims, and clean finishing.
🧶 Materials
Worsted Weight Yarn
- Beige (skin)
- Deep Brick Red (girl dress, sleeves, shoes)
- Forest Green (girl hat, collar petals, braid bows)
- White (girl hair, boy beard, girl hat pompom)
- Light Olive Green (boy tunic)
- Deep Olive Green (boy pants)
- Deep Red (boy hat & pompom)
- Black (boots on both, boy belt)
- Mustard Gold (belt buckle)
Tools
- 3.0 mm and 3.5 mm crochet hooks
- 10–12 mm black safety eyes
- Fiberfill
- Yarn needle
- Stitch markers
- Small comb (optional, to neaten beard strands)
📏 Finished Size
Each doll measures approximately 28–30 cm (11–12″) tall when completed, depending on yarn tension and stuffing density.
🪡 Abbreviations (US Terms)
MR – magic ring
sc – single crochet
inc – increase (2 sc in same st)
dec – invisible decrease
sl st – slip stitch
BLO – back loop only
dc – double crochet
hdc – half double crochet
ch – chain
FO – fasten off
🧔♂️ Boy Gnome Pattern
Head & Face
Head (Beige)
Hook: 3.5 mm
- MR, 6 sc
- inc x6 (12)
- (sc, inc) x6 (18)
- (2 sc, inc) x6 (24)
- (3 sc, inc) x6 (30)
6–12. sc around (30) - (4 sc, inc) x6 (36)
14–22. sc around (36)
Safety eyes placement:
Between rows 11–12, spaced 7 stitches apart.
- (4 sc, dec) x6 (30)
- (3 sc, dec) x6 (24)
Stuff firmly - (2 sc, dec) x6 (18)
- (sc, dec) x6 (12)
- dec x6 (6)
FO.
Ears (Make 2 – Beige)
- MR, 6 sc
- (sc, inc) x3 (9)
3–4. sc (9)
Flatten and sew level with the eyes, centered on the head’s side.
Nose (Beige)
- MR, 6 sc
- (sc, inc) x3 (9)
3–5. sc around (9)
Attach centered between eyes, slightly lower than midpoint.
Beard
Straight Full Beard (White)
Cut ~55 strands, each 12–13 cm long.
Latch densely across face, spanning from ear to ear just below nose line.
Key details:
- Beard width should reach fully across the face
- Beard length must fall to upper torso
- Keep strands smooth and straight
No brushing: beard must not be fuzzy.
Hat
Tall Cone Hat (Deep Red)
- MR, 6 sc
- sc (6)
- (sc, inc) x3 (9)
4–5. sc (9) - (2 sc, inc) x3 (12)
7–10. sc (12) - (3 sc, inc) x3 (15)
Continue increasing every 3–4 rounds until reaching 60 stitches.
Work straight until you achieve the tall pointed silhouette seen in the photo.
Brim Ridge
Work 1 full round of sc in BLO to create the structured ridge line.
Raised Edge Trim
Surface slip stitch completely around brim’s edge.
This trim must be visible and slightly elevated.
Lightly stuff hat tip.
Sew hat to head slightly angled forward.
Body
Torso (Light Olive Green)
- MR, 6 sc
- inc x6 (12)
- (sc, inc) x6 (18)
- (2 sc, inc) x6 (24)
- (3 sc, inc) x6 (30)
6–24. sc (30)
Stuff firmly as you progress.
Tunic Hem Raised Trim
Work a single clean round of surface slip stitches around the tunic hem.
Trim is clear and defined in the photo — do not skip.
Clothing
Tunic (Light Olive Green)
Already formed from body.
Tunic should appear as a continuous olive top down to belt line.
Belt, Buckle & Loops
Belt (Black)
Rounds 25–27: sc around (30)
Buckle (Mustard Gold)
- Ch 12
- Rows 1–3: sc across
- Work sc around all outer edges to thicken shape
- Sew centered against belt front
Belt Loops (Light Olive Green – Make 2)
- Ch 6
- Row 1: sc across
- FO
Attach one loop on each side of buckle, over the belt width, matching their position in the photo.
Pants (Deep Olive Green)
Switch yarn:
Rounds 28–40: sc (30)
Pants are smooth from tunic hem to boots — no extra trim mid-leg.
Arms
Arms (Beige → Light Olive at cuffs)
Start in Beige (skin), switch to Light Olive only on cuff round.
- MR, 6 sc
- (sc, inc) x3 (9)
3–8. sc (9)
Cuff (Light Olive Green)
9. Switch yarn, sc around (9)
10. sc around (9)
FO.
Raised Cuff Trim
Surface slip stitch completely around the cuff base.
Trim is visible, thin, and slightly lifted.
Attach arms slightly forward on torso, aligned to tunic width.
Legs
Upper Legs (Deep Olive Green)
Start from where torso ends:
1–14. sc around (30)
Legs continue straight with no shaping bulge — matches photo’s smooth silhouette.
At round 15, split for two legs:
- Separate stitches equally
- Work each leg individually
Leg Tube (each leg)
1–18. sc around (15)
FO last round of each.
Stuff firmly but evenly.
Boots
Boot Shape (Black)
- MR, 6 sc
- inc x6 (12)
- (sc, inc) x6 (18)
4–8. sc (18) - (sc, dec) x6 (12)
10–13. sc (12)
This shape creates the slightly rounded boots seen in the photo.
Raised Boot Trim
Surface slip stitch neatly around the ankle line — this trim is visible on the photographed boy.
FO, sew boots to leg ends.
🧝♀️ Girl Gnome Pattern
Head & Face
Head (Beige)
Same construction as boy’s head from start to finish.
Ears (Beige – Make 2)
Same method as boy; position slightly lower than hat edge.
Nose (Beige)
Same nose shape and placement as boy.
Hair & Bows
Twin White Braids
Cut ~36 strands of white yarn, each 20–22 cm.
Split evenly into 2 groups and braid each one tightly.
Shape & Placement
- Braids emerge from under hat
- Lay smoothly down the front of the chest
- Ends reach mid-dress height
- No curls or splaying ends
Green Bows (Forest Green – Make 2)
Each bow must sit at braid ends.
- Ch 9
- Row 1: sc across
Fold into bow shape and wrap center with yarn several times.
Attach bow firmly to secure braid ends.
Hat
Tall Cone Hat with Pom Pom (Forest Green)
Identical shaping style to boy’s red hat.
Pompom (White)
Wrap white yarn, form a small spherical pom, and sew to tip.
Collar
Flower-Petal Collar (Forest Green)
This collar is VISIBLY present and must match the floral shape seen in the image.
Foundation:
- Join yarn around top of dress neckline
- Work alternating petals all around
Petal Formula (worked all along neckline):
( sl st, ch 2, dc, ch 2, sl st ) in same stitch
Repeat in every stitch around.
This creates multiple small petals — the exact detail visible in picture.
Dress
Dress Base (Deep Brick Red)
Start at neck and work downward as a bell shape.
- MR, 6 sc
- inc x6 (12)
- (sc, inc) x6 (18)
- (2 sc, inc) x6 (24)
- (3 sc, inc) x6 (30)
6–15. sc (30) - (4 sc, inc) x6 (36)
17–27. sc (36)
Dress falls smoothly without waves except on hem.
Stuff lightly beneath torso if needed to maintain shape.
Dress Hem Scallops
These are absolutely required: they are very clear in the photo and wrap the entire skirt hem.
Work one full round of:
( sl st, ch 3, dc, sl st ) in next stitch
Repeat all around hem.
Each scallop must face outward, neat and evenly spaced.
Sleeves
Long Sleeves (Deep Brick Red)
The sleeves are NOT green. They must be brick red — same color as dress body — and long to the wrist.
- MR, 6 sc
- (sc, inc) x3 (9)
3–12. sc (9)
Attach to dress armholes.
Skin Hands
Switch to Beige for last 2 rounds:
13–14. sc (9)
FO.
Hands are NOT gloved — skin color should be visible.
Buttons
Two White Buttons on Dress
These are very visible. Must be on chest center.
Each:
- MR, 5 sc
Flatten and sew vertically aligned on upper dress section.
Legs
Legs (Black)
Simple straight tubes under dress hem.
- MR, 6 sc
2–25. sc (6)
Keep legs narrow and slightly hidden by dress length.
Shoes
Shoes (Deep Brick Red)
Match dress and sleeves.
- MR, 6 sc
- inc x6 (12)
3–6. sc (12) - (sc, dec) x4 (8)
Stuff lightly
FO and sew.
Make shoes small and rounded — exactly as visible.
🧵 Assembly
Boy
- Place hat slightly forward
- Beard spans ear-to-ear
- Belt buckle centered
- Loops on both buckle sides
- Boots below olive pants
- Raised trims visible on cuffs and boot ankles
Girl
- Hat centered with white pom
- Braids placed front-side
- Green bows tied at braid tips
- Dress scallops fully around hem
- Two white buttons aligned
- Sleeves long and red
- Hands beige
- Shoes brick red
❤️ Final Notes
Your finished gnomes should look exactly like the photographed pair — matching contours, colors, trims, braids, scallops, and accessories. The boy must read rugged and pine-toned, while the girl looks warm and berry-soft, with tiny floral touches on her collar and bows.
Display them together near candles, ornaments, or a winter wreath — and they immediately become the cozy centerpiece of the entire room.