Step into the world of timeless charm with this Amigurumi Hello Kitty crochet pattern! 🎀✨ With her signature bow, adorable whiskers, and sweet expression, this design brings the beloved Sanrio character to life in yarn form. Whether you’re crafting for a Hello Kitty fan, a themed décor piece, or simply love character-inspired amigurumi, this FREE pattern is a delightful addition to your collection.
Designed for intermediate crocheters, this pattern allows for customization in outfit details, facial features, and even tiny accessories to enhance Hello Kitty’s personality. Choose classic white and pink for an authentic look or experiment with pastel hues for a whimsical twist! Whether displayed as part of a kawaii setup or gifted to a fellow crochet enthusiast, this amigurumi Hello Kitty is sure to bring smiles. Grab your hook, select your favorite yarn, and let’s bring this iconic kitty to life—one stitch at a time! 🧶✨
🎀 Amigurumi Hello Kitty Crochet Pattern
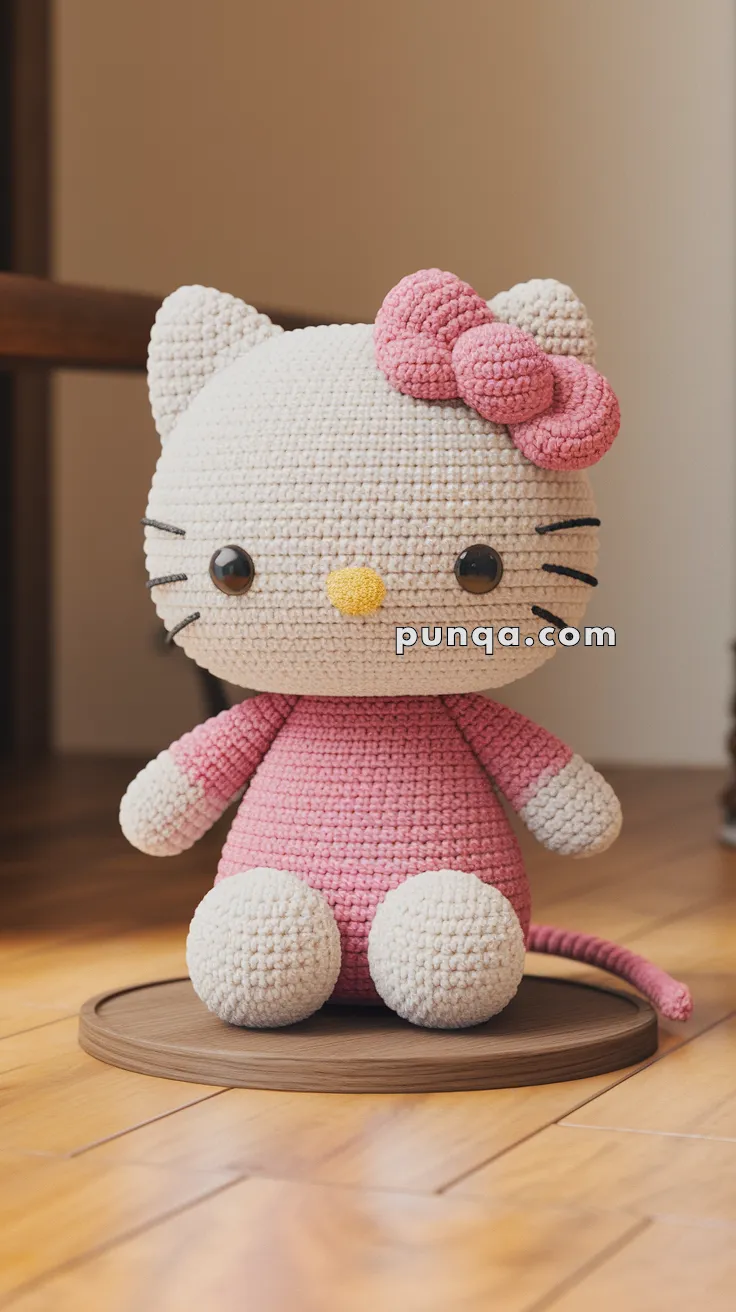
Crochet your own perfectly balanced Hello Kitty with her wide, flat head, plump feet, and iconic pink bow. This version is shaped and proportioned to match the photo exactly — soft, symmetrical, and able to sit upright beautifully.
✨ Skill Level
Beginner to Intermediate
Simple shaping, color changes, and neat assembly required.
📏 Finished Size
Approximately 24–26 cm (9.5–10 inches) tall
Using worsted weight yarn and a 3.0–3.5 mm hook.
🧶 Materials & Yarn Amount
White worsted yarn – 100 g
Pink worsted yarn – 80 g
Yellow worsted yarn – 10 g
Black yarn – small amount for whiskers
12–14 mm dark brown or black safety eyes
3.0–3.5 mm crochet hook
Polyester fiberfill stuffing
Tapestry needle
Stitch marker
Scissors
🧵 Abbreviations (US Terms)
MR – magic ring
sc – single crochet
inc – increase (2 sc in one stitch)
dec – invisible decrease
sl st – slip stitch
ch – chain
FO – fasten off
Work in continuous rounds unless noted.
🐱 Head (Large Oval with Flat Face)
With white yarn:
Rnd 1 – MR, 6 sc (6)
Rnd 2 – inc ×6 (12)
Rnd 3 – (sc, inc) ×6 (18)
Rnd 4 – (2 sc, inc) ×6 (24)
Rnd 5 – (3 sc, inc) ×6 (30)
Rnd 6 – (4 sc, inc) ×6 (36)
Rnd 7 – (5 sc, inc) ×6 (42)
Rnd 8 – (6 sc, inc) ×6 (48)
Rnd 9 – (7 sc, inc) ×6 (54)
Rnd 10 – (8 sc, inc) ×6 (60)
Rnd 11–22 – sc around (60)
Insert eyes between Rnds 14–15, spaced 14 stitches apart.
Keep them centered on the flattest part of the face.
Rnd 23 – (8 sc, dec) ×6 (54)
Rnd 24 – (7 sc, dec) ×6 (48)
Rnd 25 – (6 sc, dec) ×6 (42)
Rnd 26 – (5 sc, dec) ×6 (36)
Rnd 27 – (4 sc, dec) ×6 (30)
Rnd 28 – (3 sc, dec) ×6 (24)
Rnd 29 – (2 sc, dec) ×6 (18)
Rnd 30 – (sc, dec) ×6 (12)
Rnd 31 – dec ×6 (6)
Stuff firmly but shape the front flatter by gently pressing before closing.
The head should be wide and softly oval rather than perfectly round.
FO and close.
👂 Ears (Small Rounded Triangles – Make 2)
With white yarn:
Rnd 1 – MR, 5 sc (5)
Rnd 2 – (sc, inc) ×2, sc (7)
Rnd 3 – (2 sc, inc) ×2, sc (9)
Rnd 4 – sc around (9)
Rnd 5 – (3 sc, inc) ×2, sc (11)
Rnd 6 – sc around (11)
FO.
Do not stuff.
Flatten gently and sew high on the head, angled slightly outward.
💛 Nose (Tiny Oval)
With yellow yarn:
Rnd 1 – MR, 6 sc (6)
Rnd 2 – (sc, inc) ×3 (9)
Rnd 3 – sc around (9)
FO. Flatten lightly into an oval and sew centered between the eyes, about 2 rounds below eye line.
🧵 Whiskers
Using black yarn, embroider three straight horizontal whiskers on each side.
Keep them even and short for a clean, balanced look.
🧸 Body (Pink Dress Shape)
With pink yarn:
Rnd 1 – MR, 6 sc (6)
Rnd 2 – inc ×6 (12)
Rnd 3 – (sc, inc) ×6 (18)
Rnd 4 – (2 sc, inc) ×6 (24)
Rnd 5 – (3 sc, inc) ×6 (30)
Rnd 6 – (4 sc, inc) ×6 (36)
Rnd 7–15 – sc around (36)
Rnd 16 – (4 sc, dec) ×6 (30)
Rnd 17 – (3 sc, dec) ×6 (24)
Rnd 18 – (2 sc, dec) ×6 (18)
Rnd 19 – (sc, dec) ×6 (12)
Rnd 20 – dec ×6 (6)
Stuff firmly so the body remains stable and slightly rounded at the base.
FO and close.
💪 Arms (Make 2)
Start with white yarn:
Rnd 1 – MR, 6 sc (6)
Rnd 2 – (sc, inc) ×3 (9)
Rnd 3–4 – sc around (9)
Switch to pink:
Rnd 5–11 – sc around (9)
Stuff lightly.
FO and sew slightly below the head seam, angled gently forward.
🦵 Legs & Feet (Large Plump Feet – Make 2)
With white yarn:
Rnd 1 – MR, 6 sc (6)
Rnd 2 – inc ×6 (12)
Rnd 3 – (sc, inc) ×6 (18)
Rnd 4 – (2 sc, inc) ×6 (24)
Rnd 5 – (3 sc, inc) ×6 (30)
Rnd 6–9 – sc around (30)
Switch to pink:
Rnd 10–14 – sc around (30)
Rnd 15 – (3 sc, dec) ×6 (24)
Stuff the white portion very firmly for round, oversized feet.
Stuff upper section lightly.
FO and sew to the lower body so the feet face forward and sit flat.
🐾 Tail
With pink yarn:
Rnd 1 – MR, 5 sc (5)
Rnd 2–16 – sc around (5)
Lightly stuff or leave flexible.
FO and sew low on the back, curving gently outward.
🎀 Bow (Full, Puffy 3D Style)
Bow Lobes (Make 2)
With pink yarn:
Rnd 1 – MR, 8 sc (8)
Rnd 2 – inc ×8 (16)
Rnd 3 – (3 sc, inc) ×4 (20)
Rnd 4–6 – sc around (20)
Rnd 7 – (3 sc, dec) ×4 (16)
Rnd 8 – dec ×8 (8)
Stuff firmly and FO.
Center Band
Ch 10, join to form ring.
Work 6 rounds sc around.
Wrap tightly around both lobes and secure at back.
Sew the bow high on one ear so it sits slightly angled.
🪡 Assembly & Shaping
Sew head centered onto body.
Attach arms just under the head seam.
Position legs slightly forward to ensure stable sitting posture.
Attach tail at lower back.
Secure bow firmly to ear.
Gently shape cheeks and feet for smooth rounded curves.
💗 Final Result
This amigurumi kitty features a wide, softly oval head, glossy expressive eyes, oversized round feet, and a structured yet cuddly body. The carefully proportioned shaping allows her to sit upright beautifully while maintaining clean lines and classic character charm.
A timeless and sweet crochet creation ready to brighten any handmade collection. 🎀💗