Turn up the fun with this Amigurumi Headphones with Smiley Faces crochet pattern! Inspired by the joy of music and cheerful expressions, this playful design combines cozy headphones with adorable smiley faces, making every stitch a celebration of happiness. With bright colors, soft textures, and a whimsical touch, this crochet creation is perfect for adding a lively and upbeat accent to your handmade collection. Whether you’re crafting for music lovers, creating a cute decor piece, or simply enjoy making expressive amigurumi designs, this pattern lets you stitch up a delightful set bursting with personality! 🎧😊✨
Designed for customization, this pattern allows you to experiment with different color combinations, embroidered details, or even tiny accessories like miniature musical notes or glittery accents for extra flair. Craft a classic headphone set with vibrant hues, create a pastel version for a dreamy aesthetic, or even stitch up a full set of music-inspired amigurumi for a dazzling display! Whether gifted as a cheerful keepsake, displayed as a happy accent, or made simply for the joy of crafting, this Amigurumi Headphones with Smiley Faces is a fun and creative project—perfect for bringing a touch of handmade musical magic to every stitch! 🧶💖
🎧 Amigurumi Headphones with Smiley Faces Crochet Pattern
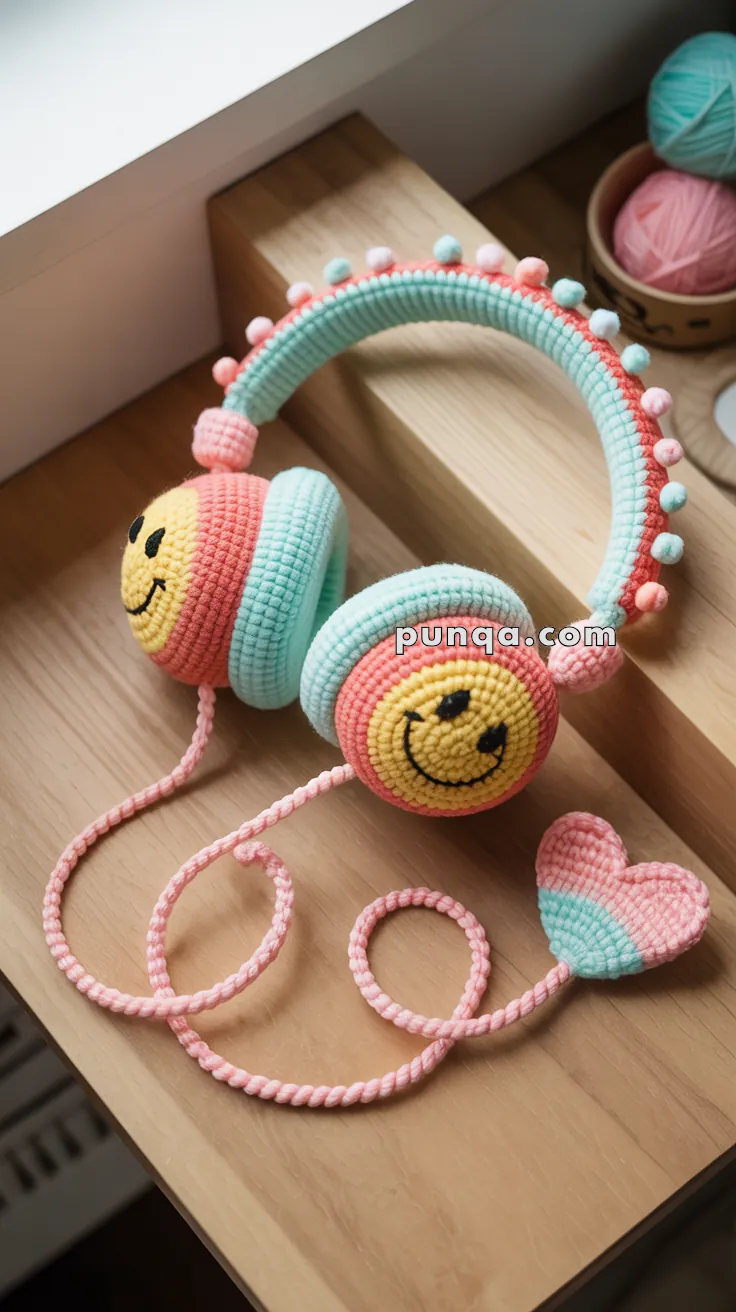
Turn up the joy with this whimsical crochet project! These pastel amigurumi headphones bring a cheerful vibe to any space, featuring smiley face ear pads, a minty wired headband with pom-poms, and a pink-and-blue heart plug. Perfect as a handmade gift or cute display piece for music lovers, this project blends creativity, color, and pure happiness. 💖🎵
✨ Skill Level
Intermediate – You’ll need to know how to work in rounds, change colors, sew parts together, and safely insert a flexible wire for shaping.
📏 Finished Size
Approximately 20–25 cm (8–10 inches) tall, including cord and heart plug.
The exact height may vary depending on wire curvature and stuffing density.
🧶 Materials Needed
- Yarn (DK or light worsted weight, cotton or soft acrylic):
- Yellow – 10 g (for smiley faces)
- Coral Pink – 20 g (for outer rims and connectors)
- Mint/Turquoise – 30 g (for cushions and headband)
- Baby Pink – 15 g (for cord and pom-poms)
- Aqua – 5 g (for half of heart plug)
- Black embroidery thread – small amount (for eyes and smiles)
- Crochet Hook: 2.5 mm or 3.0 mm
- Stuffing: Polyester fiberfill
- Flexible Wire: 1–2 mm aluminum or floral wire, approx. 65–70 cm long
- Electrical or floral tape: to cover sharp wire ends
- Tapestry needle, scissors, stitch markers, optional hot glue gun
🧵 Abbreviations (US Terms)
MR – Magic Ring
sc – Single Crochet
inc – Increase (2 sc in same stitch)
dec – Decrease (sc 2 together)
sl st – Slip Stitch
ch – Chain
BLO – Back Loop Only
FO – Fasten Off
🎧 Pattern Instructions
Ear Pads (Make 2)
Front (Smiley Face + Coral Rim)
- Start with Yellow yarn.
- MR, 6 sc.
- inc around (12).
- (sc, inc) x6 (18).
- (2 sc, inc) x6 (24).
- (3 sc, inc) x6 (30).
- (4 sc, inc) x6 (36).
- (5 sc, inc) x6 (42).
9–10. sc around (42). - Switch to Coral Pink and sc around (42) for 2 rounds.
- FO and weave in end.
Embroider the Face:
Using black thread, stitch two oval eyes and a wide curved smile.
Optional: small black felt ovals can be stitched instead for extra definition.
Back (Mint Cushion)
- Start with Mint yarn.
- MR, 6 sc.
- inc around (12).
- (sc, inc) x6 (18).
- (2 sc, inc) x6 (24).
- (3 sc, inc) x6 (30).
- (4 sc, inc) x6 (36).
8–9. sc around. FO, leaving a long tail for sewing.
Assembly:
Lightly stuff both pieces.
Sew the mint pad onto the back of the smiley face, leaving a small gap at the top if you plan to insert the wire through later.
Headband Cover
Mint Yarn
- Chain 41 (adjust length to fit desired arc).
- Rows 1–6: sc across (6 stitches per row).
- FO, leaving a long tail.
- Wrap this strip around the pre-bent wire and sew edges together to form a tube.
- Insert the wire before closing the ends completely.
Side Connectors (x2)
Coral Pink Yarn
- MR, 6 sc.
- inc around (12).
- sc around (12) for 3–4 rounds.
- FO and stuff lightly.
- Sew each connector between the headband end and ear pad.
If using wire, thread it through the connector and into the ear pad before sealing.
🌈 Pom-Pom Trim
Alternate Baby Pink and Mint yarns.
- MR, 5 sc, FO leaving a long tail.
- Make 12–14 small pom-poms total.
- Sew them evenly along the outer edge of the headband for the cute dotted effect seen in the photo.
🎵 Cord
Baby Pink Yarn
- Chain about 70 stitches.
- sl st back through each chain to create a twisted cord effect.
- FO and weave in ends.
- Attach one end to the base of a side connector or ear pad.
(Optional: Thread a thin craft wire through the cord if you want it to hold a posed shape, like the swirl shown in the image.)
💗 Heart Plug
Pink and Mint Yarns
- With Pink yarn, MR, 6 sc.
- inc around (12).
- (sc, inc) x6 (18).
- (2 sc, inc) x6 (24).
- sl st 6, ch 1, (dc, 3 tr, dc) in next st, sl st 2, (dc, 3 tr, dc) in next st, sl st 6.
- Switch to Mint halfway through for a two-tone effect.
- FO and weave in ends.
- Sew or glue the end of the pink cord to the bottom center of the heart securely.
🧷 Wire Insertion & Shaping
- Use bendable aluminum or floral wire, about 65–70 cm long.
- Wrap both ends with electrical or floral tape to cover any sharp tips.
- Insert the wire through the headband tube first.
- Leave 3–4 cm at each end, threading them down into the side connectors and into each ear pad for stability.
- Secure the wire inside the ear pads with stuffing tension or a small dab of hot glue.
- Adjust the curve of the band gently until balanced.
✅ Final Assembly Checklist
✔ Sew both ear pads to the headband ends.
✔ Embroider smiles and eyes if not done already.
✔ Attach the pom-poms along the headband top.
✔ Secure the pink cord to one ear pad.
✔ Add the two-toned heart plug to the other end of the cord.
✔ Gently bend and pose the headphones into their final rounded shape.
🪄 Finishing & Care Tips
- Wire safety: Always double-wrap wire ends with electrical or floral tape before inserting them. If gifting this to a child, skip the wire and make a fully soft version for safety.
- Cleaning: Spot clean gently with a damp cloth. Avoid machine washing, as moisture can loosen embroidery and wire support.
- Reshape after cleaning: If the wire shifts, simply bend the headband back into place.
- Storage: Keep flat or gently hung to preserve the rounded ear pad shape.
- Personalization: You can swap smiley faces for stars, hearts, or initials — or even embroider tiny music notes!
🎉 All Done!
You’ve just created a joyful, photo-perfect pair of Amigurumi Headphones with Smiley Faces!
Soft, pastel, and full of personality — they’re guaranteed to make anyone smile. Whether displayed on a desk, used as a photo prop, or gifted to a music lover, these happy headphones are pure crochet charm. 🎧💗