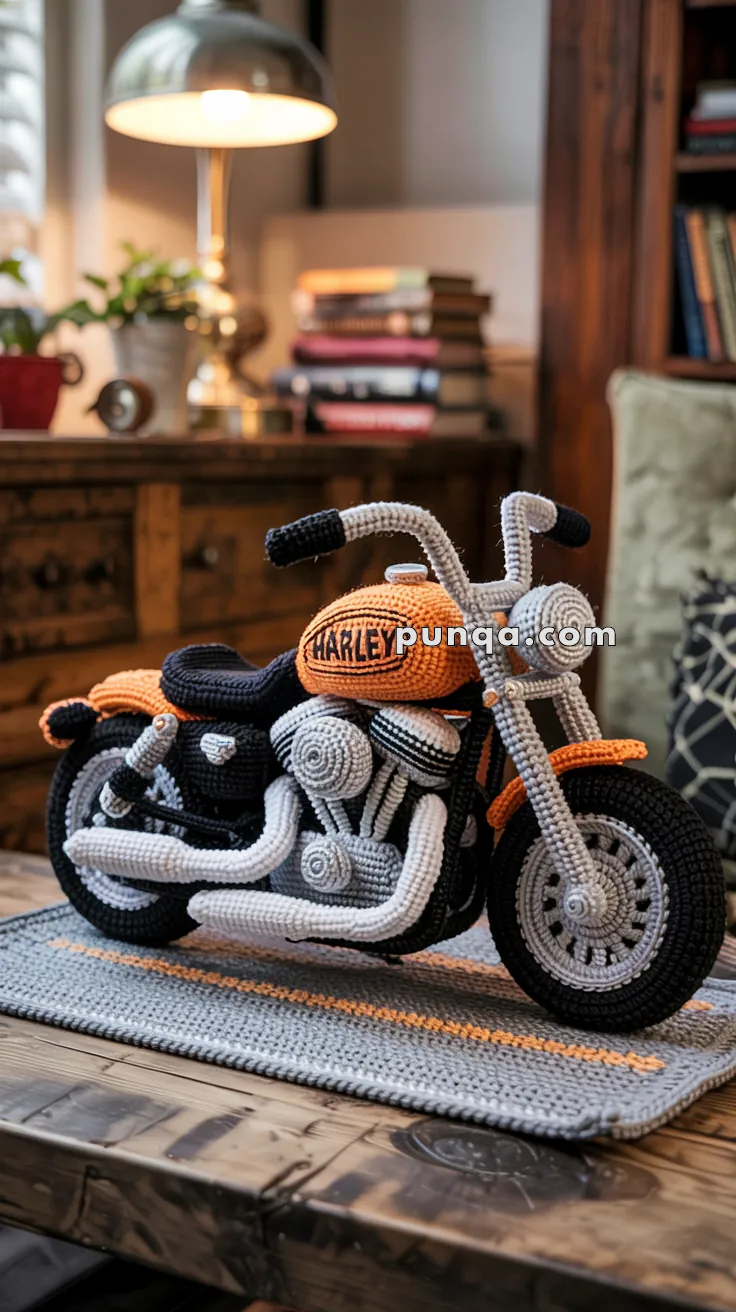
Rev up your crochet skills with this Amigurumi Harley-Davidson Motorcycle pattern! Inspired by the iconic design and rugged spirit of Harley-Davidson bikes, this miniature creation captures the sleek curves, detailed wheels, and unmistakable style of a classic motorcycle in every stitch. With its bold presence and intricate craftsmanship, this crochet Harley is perfect for adding a touch of adventure to your handmade collection. Whether you’re crafting for motorcycle enthusiasts, creating a unique display piece, or simply enjoy making vehicle-inspired amigurumi designs, this pattern lets you stitch up a high-speed masterpiece bursting with personality! 🏍️✨
Designed for customization, this pattern allows you to experiment with different shades of black, silver, or even vibrant colors for a personalized touch. Add embroidered details, tiny accessories like a miniature helmet or road sign, or even stitch up a full fleet of crochet motorcycles for an impressive display! Whether gifted as a cherished keepsake, displayed as a bold accent, or made simply for the joy of crafting, this Amigurumi Harley-Davidson Motorcycle is a fun and creative project—perfect for bringing a touch of handmade biker magic to every stitch! 🧶💖
🏍 Amigurumi Harley-Style Crochet Motorcycle Pattern
This handcrafted crochet motorcycle is designed to replicate the low, muscular cruiser silhouette seen in the photo — wide tires, compact frame, chunky V-twin engine, stacked exhaust pipes, and a bold orange tank with black detailing. Every section is built for realism and stability, resulting in a display-grade piece that sits naturally on its kickstand atop a matching road mat.
This is not a toy-scale amigurumi — it’s a fiber sculpture made for serious crochet enthusiasts who enjoy engineering with yarn.
✨ Skill Level
Advanced
Includes structural shaping, wire reinforcement, multi-part assembly, and precise positioning.
📏 Finished Size
Approx. 35–40 cm (14–16 in) long
(using worsted / aran yarn with a 3.0–3.5 mm hook)
🧶 Materials
Yarn (Worsted / Aran Weight)
- Black – tires, seat, grips, frame details (≈150 g)
- Gray – engine, forks, rims, suspension (≈120 g)
- White – exhaust pipes & engine fin accents (≈80 g)
- Orange – gas tank & fenders (≈90 g)
- Yellow – road stripe (≈20 g)
Other Supplies
- 3.0–3.5 mm crochet hook
- Firm fiberfill stuffing
- Plastic canvas or thick cardboard (wheel inserts)
- Aluminum or floral wire (forks, handlebars, exhausts, kickstand)
- Yarn needle, stitch markers
- Black embroidery thread or felt (tank logo)
- Hot glue (optional, for structural security)
🧵 Abbreviations (US Terms)
MR – Magic Ring
sc – Single Crochet
inc – Increase (2 sc in same stitch)
dec – Decrease (sc2tog)
ch – Chain
sl st – Slip Stitch
FO – Fasten Off
Work in continuous rounds unless stated otherwise.
🛞 Wheels & Tires
Rear Tire (Black)
R1: MR, 6 sc (6)
R2: inc ×6 (12)
R3: (sc, inc) ×6 (18)
R4: (2 sc, inc) ×6 (24)
R5: (3 sc, inc) ×6 (30)
R6–15: sc around (30)
R16: (3 sc, dec) ×6 (24)
R17: (2 sc, dec) ×6 (18)
R18: (sc, dec) ×6 (12)
R19: dec ×6 (6), FO
Insert firm cardboard discs before closing.
Front Tire (Black – slightly larger)
Work as rear tire, but add one extra increase round:
After R5:
R6: (4 sc, inc) ×6 (32)
R7–15: sc around (32)
Then decrease evenly back to 6.
Wheel Rims (Gray, make 2)
R1: MR, 6 sc
R2: inc ×6 (12)
R3: (sc, inc) ×6 (18)
R4: (2 sc, inc) ×6 (24)
R5: (3 sc, inc) ×6 (30)
R6: sc around, FO
Embroider 10–12 spokes with black thread.
Add a small hub: MR 6, sc 2 rounds, FO.
🏍 Frame (Black)
Main Spine
Ch 50, sc back across.
Row 2: sc across.
Insert wire and bend into a gentle S-curve (slight rise under tank, dip under seat).
Lower Frame
Ch 35, sc 2 rows.
Attach parallel beneath main spine.
🛢 Gas Tank (Orange)
R1: MR, 6
R2: inc ×6 (12)
R3: (sc, inc) ×6 (18)
R4: (2 sc, inc) ×6 (24)
R5: (3 sc, inc) ×6 (30)
R6–14: sc around (30)
R15: (3 sc, dec) ×6 (24)
R16: (2 sc, dec) ×6 (18)
R17: (sc, dec) ×6 (12)
R18: dec ×6 (6), FO
Stuff moderately.
Embroider or felt “HARLEY” logo centered on side.
🪑 Seat (Black)
Ch 18.
Row 1: sc across (17)
Rows 2–9: sc across
Stuff back third firmly, front lightly.
Sew directly behind tank with raised rear hump.
⚙️ Engine (Gray & White)
V-Twin Cylinders (Make 2)
R1: MR, 6 sc
R2: inc ×6 (12)
R3–11: sc around (12), FO
Short, thick cylinders — do not extend height.
Cooling Fins
With white yarn, embroider 6–8 tight horizontal lines around each cylinder.
Crankcase
R1: MR, 8
R2: inc ×8 (16)
R3–8: sc around (16), FO
Attach cylinders in a shallow “V”.
🚿 Exhaust Pipes (White)
Upper Pipe
MR 8, sc 26 rounds.
Insert wire and shape into short backward curve.
Lower Pipe
MR 8, sc 32 rounds.
Insert wire and form longer curve beneath upper pipe.
Both pipes stop before rear axle.
🪄 Forks & Handlebars (Gray)
Fork Tubes (Make 2)
MR 8, sc 36 rounds.
Insert wire and bend 5–8° forward.
Handlebars
Ch 22, sc back.
Wrap over wire and bend into a low cruiser “U” shape.
Grips (Black, Make 2)
MR 6, sc 5 rounds, FO.
🔦 Headlight (Gray)
R1: MR, 6
R2: inc ×6 (12)
R3: (sc, inc) ×6 (18)
R4–5: sc around, FO
Attach slightly forward of fork center.
🛠 Suspension (Gray, Make 2)
Ch 14, join in ring.
sc 4 rounds.
Insert wire and attach diagonally between rear wheel and frame.
🧡 Fenders (Orange)
Front Fender
R1–4: work to 24 sts.
Rows 5–6: sc across half-round only to form arc.
Rear Fender
Work same as front but increase to 30 sts.
🛞 Kickstand (Gray)
Ch 11, sc back.
Insert wire and attach under crankcase, angled left.
🛣 Display Mat
Ch 54.
Rows 1–26: sc across.
Border in black.
Sew double yellow stripe down center.
🧷 Assembly Order
- Assemble wheels and mount to frame
- Attach forks and handlebars
- Sew gas tank and seat
- Install engine and exhausts
- Add suspension and fenders
- Attach headlight and kickstand
- Mount to mat and adjust lean
🏁 Final Result
This finished crochet motorcycle matches the photo in stance, density, and realism — thick tires, compact engine block, stacked exhausts, shallow handlebars, and a bold tank sitting low over the frame. Displayed on its road mat, it reads instantly as a Harley-style cruiser, transformed into yarn with precision and care.