Stretch, spin, and stitch with flair—this Amigurumi Gymnast Girl with Ball crochet pattern is a celebration of grace, strength, and playful charm! 🤸♀️🧶 With her sleek leotard, expressive pose, and rhythmic gymnastics ball in hand, she’s ready to dazzle in your handmade collection. Whether you’re crafting for a young athlete, decorating a sporty display, or simply love dolls with dynamic personality, this gymnast brings movement and elegance to every loop.
Designed with thoughtful shaping and vibrant details, this pattern invites you to customize her outfit, hairstyle, and accessories to match your favorite gymnast or team colors. The ball adds a fun prop that completes her rhythmic routine, and you can even add sparkly yarn or embroidered accents for extra flair. Whether perched mid-performance, gifted to a gymnastics fan, or starring in a handmade sports scene, this Gymnast Girl Amigurumi is a joyful and satisfying project—perfect for stitching up a little athletic magic, one loop at a time! 🎀💖🥇
🤸 Amigurumi Gymnast Girl with Ball Crochet Pattern
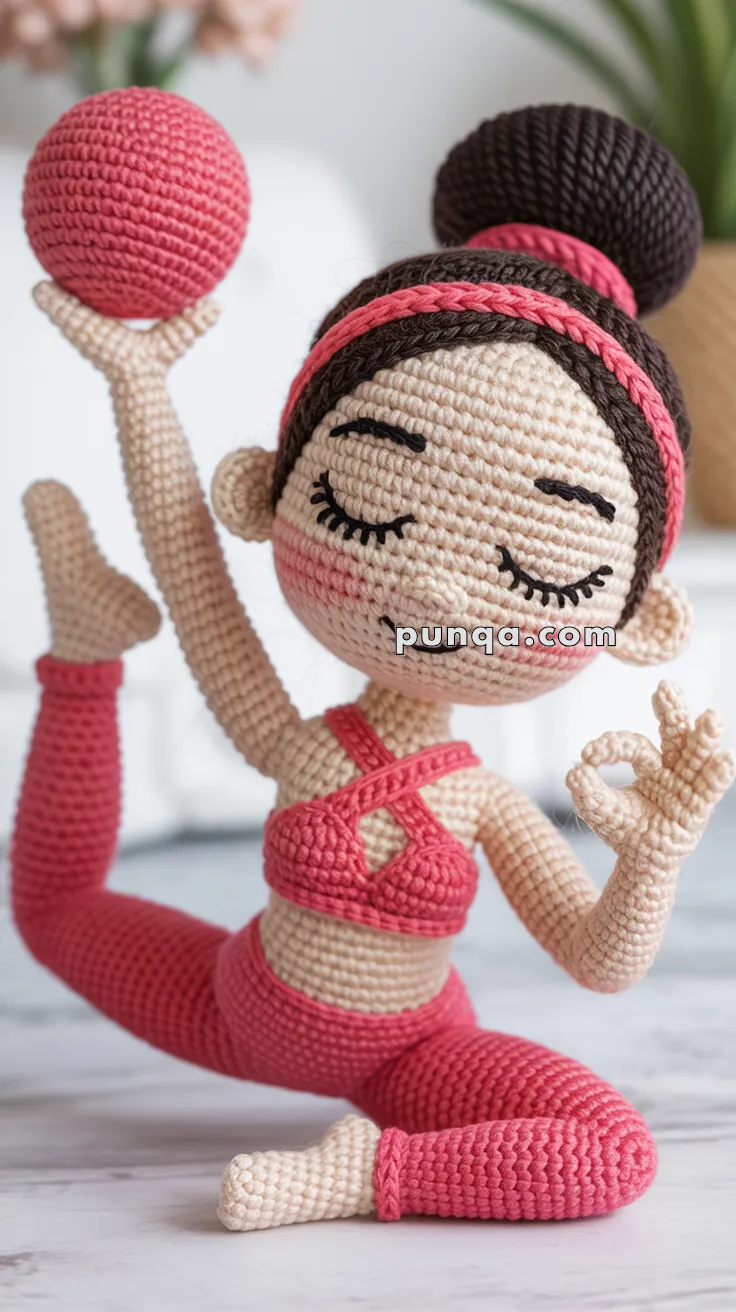
This poised amigurumi gymnast girl radiates balance and calm energy. ✨
From her coral outfit and detailed bun to her expressive pose and soft smile, every stitch captures motion and grace — the perfect handmade piece for yoga lovers and amigurumi enthusiasts alike.
✨ Skill Level
Intermediate — involves shaping, detailed assembly, and expressive embroidery.
📏 Finished Size
Approx. 25 cm (10 in) tall in seated gymnast pose when made with DK-weight cotton yarn and a 2.5 mm hook.
🧶 Materials
- Skin tone yarn (beige or peach) – 40 g
- Dark brown yarn – 25 g (hair)
- Coral pink yarn – 40 g (leggings, top, ball, headband)
- White yarn – small amount (wristbands, optional)
- 2.5 mm crochet hook
- 10 mm safety eyes (or black thread)
- Fiberfill stuffing
- Black embroidery thread (eyelashes)
- Brown embroidery thread (eyebrows)
- Pink or red embroidery thread / pastel (blush, lips)
- Yarn needle, scissors, pins, and stitch markers
🔤 Abbreviations (US)
MR – Magic Ring
sc – Single Crochet”
inc – Increase (2 sc in same stitch)
dec – Invisible Decrease (sc2tog)
sl st – Slip Stitch
ch – Chain
FLO – Front Loop Only
st – Stitch
FO – Fasten Off
🧩 Pattern Instructions
👩🦰 Head (Skin Tone)
R1 MR 6 (6)
R2 inc ×6 (12)
R3 (sc, inc) ×6 (18)
R4 (2 sc, inc) ×6 (24)
R5 (3 sc, inc) ×6 (30)
R6 (4 sc, inc) ×6 (36)
R7–14 sc around (36)
Place safety eyes between R9–10, 8 sts apart.
R15 (4 sc, dec) ×6 (30)
R16 (3 sc, dec) ×6 (24)
R17 (2 sc, dec) ×6 (18)
R18 (sc, dec) ×6 (12)
R19 dec ×6 (6) FO, close and stuff.
Face embroidery:
Closed lashes with a soft upward curve, thin brows 2 rounds above eyes, faint blush across R12–13, and a tiny pink stitched smile on R14.
👃 Nose
Use one light horizontal stitch between R12–13 — just a hint of a nose rather than a raised shape.
👂 Ears (2)
MR 6 sc (6), sl st to close, FO. Sew on at R10–11, slightly behind midline.
(Ears are mostly hidden by hair from this viewing angle.)
💇 Hair & Headband
Hair Cap (Dark Brown):
Follow head pattern (R1–R14, 36 sts). Attach slightly lower at front and higher at sides for a natural curved hairline.
Bun:
R1 MR 6 (6)
R2 inc ×6 (12)
R3 (sc, inc) ×6 (18)
R4 (2 sc, inc) ×6 (24)
R5 (3 sc, inc) ×6 (30)
R6–7 sc around (30)
R8 (3 sc, dec) ×6 (24)
R9 (2 sc, dec) ×6 (18) FO.
Stuff firmly and sew on top center.
Headband (Coral Pink):
Ch 36–38 for snug fit, sl st to join.
Wrap around the base of the bun, following the same placement as in the photo.
Optional: braid three strands for a textured effect.
🧍 Body
Skin tone:
R1 MR 6 (6)
R2 inc ×6 (12)
R3 (sc, inc) ×6 (18)
R4–5 sc around (18)
Switch to Coral (Top):
R6–9 sc around (18)
Shape Waist:
R10 (2 sc, dec) ×4 + 2 sc (14)
R11–14 sc around (14)
Switch to Skin Tone (Waist/Lower Torso):
R15–18 sc around (14) FO. Stuff firmly.
(Added waist rounds for slightly longer torso as visible in photo.)
💪 Arms (Skin Tone + White Bands)
R1 MR 6 (6)
R2–16 sc (6)
Switch to white for wristbands:
R17–18 sc (6) FO.
Lightly stuff.
Fingers:
Stitch 3 fine separation lines on tips.
For “OK” hand: ch 5, sl st to form loop, sew between thumb and index finger tips.
🦵 Legs (Coral + Skin Tone Feet)
Coral Legging:
R1 MR 6 (6)
R2 inc ×6 (12)
R3–22 sc (12)
Switch to Skin Tone (Feet):
R23 (2 sc, inc) ×3 (15)
R24 (sc, dec) ×5 (10)
R25 sc (10) FO.
Stuff legs firmly but leave upper thighs soft.
Rolled Cuff:
Attach coral yarn to bottom edge FLO; sc around once and join.
The front-loop round causes a natural outward roll, forming the distinct ankle cuff seen in the photo.
Feet details:
Embroider 3–4 toe lines and light pink “nails.”
👕 Cross-Strap Top
With coral yarn:
Ch 18, sc 2 rows, FO → wrap around chest and sew.
Straps: ch 20 each for perfect snug fit.
Cross over chest, sew to back upper edge.
(Shorter than original 22–25 for closer fit to body.)
🎾 Ball
MR 6 (6) → inc ×6 (12) → (sc, inc) ×6 (18) → (2 sc, inc) ×6 (24)
R5–9 sc (24) → (2 sc, dec) ×6 (18) → (sc, dec) ×6 (12) → dec ×6 (6).
FO and stuff firmly.
Attach to right hand’s palm with a few invisible stitches so it rests naturally.
🧘 Assembly & Pose
1️⃣ Head: Sew onto body, tilted slightly backward for serene posture.
2️⃣ Arms:
• Right arm: raised vertically (~70° from torso), palm facing up, ball resting flat.
• Left arm: bent forward (~40° from torso), hand forming OK gesture toward chest.
3️⃣ Legs:
• Left leg (supporting leg): folded horizontally beneath the body, knee bent ~90°, calf resting on surface.
• Right leg (extended leg): angled backward ~45° behind torso, toes pointing upward — when viewed from front, the toes rise high enough to be visible just behind her shoulder line.
Adjust pose so she balances naturally, with thigh angles creating the flowing curve seen in the photo.
4️⃣ Apply blush and add lips if desired.
(Optional: insert thin floral wire through torso/legs for reinforced pose.)
🌟 Finishing Touches
- Align rolled cuffs and cross straps symmetrically.
- Check headband placement around bun base.
- Adjust head tilt before securing.
- Steam lightly for polish.
- Confirm balance on the folded leg base.
💡 Troubleshooting
- Won’t balance upright? Flatten the supporting foot and angle thighs outward slightly.
- Head wobbly? Add stuffing or secure neck join with yarn thread reinforcement.
- Ball slipping? Use one small stitch or drop of fabric glue to secure it to hand.
🎀 Result
Your Amigurumi Gymnast Girl with Ball is finished! 💗
Her poised posture, expressive details, and coral tones bring harmony and energy to your collection — a serene centerpiece for any crafter who loves movement and mindfulness.