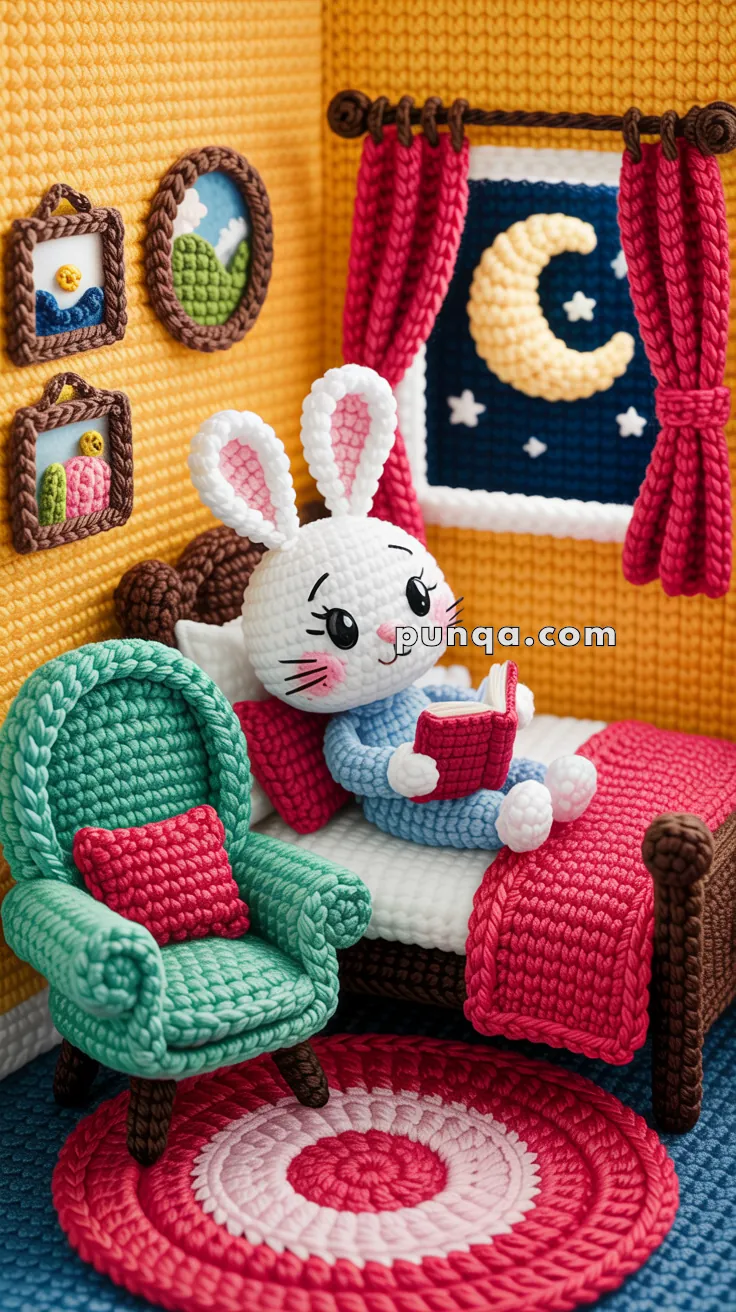
Tuck in your creativity with this dreamy Amigurumi Good Night Moon Scene crochet pattern! Inspired by the gentle charm of classic children’s storybooks, this enchanting bedtime set features a sleepy bunny nestled in a cozy room filled with handmade details. From the moonlit window and embroidered wall art to the tiny bed, blanket, pillow, chair, rug, and curtains, every piece is thoughtfully designed to evoke warmth, comfort, and a touch of nighttime magic. 🧶🐰🌙
Perfect for storytelling, nursery décor, or gifting to a little dreamer, this pattern invites you to stitch a peaceful world where bedtime becomes an adventure in softness and imagination. Customize the colors to match your favorite storybook palette, add tiny accessories like a plush toy or bedtime book, and arrange the scene to reflect your own cozy corner of the night. Whether displayed on a shelf or used as a gentle playset, this Good Night Moon Amigurumi Scene is a joyful and satisfying project—perfect for stitching up a little handmade serenity, one loop at a time. 💖✨🛏️
🌙 Goodnight Moon Amigurumi Scene – Complete Crochet Pattern
This enchanting bedtime diorama features a cozy bunny enjoying her favorite book in a warmly decorated room. Create every detail from the plush furniture to the starry window view in this comprehensive pattern guide.
✨ Skill Level
Intermediate – includes amigurumi shaping, miniature furniture construction, and decorative finishing techniques
📏 Finished Dimensions
- Bunny: 6 inches (15 cm) tall
- Bed: 5.5 inches long × 3 inches wide
- Armchair: 4.5 inches tall
- Nightstand: 2.5 inches tall
- Book: 1.5 inches
- Wall frames: 1–2 inches each
- Circular rug: 5 inches diameter
- Window panel: 3×3 inches
🧶 Materials Needed
Yarn Requirements (Worsted Weight #4)
- White: 100g (bunny, pillow, bed details)
- Pink: 50g (inner ears, nightstand, rug, blush details)
- Blue: 75g (pajamas, window background, rug)
- Red/Magenta: 100g (blanket, curtains, rug, cushion)
- Brown: 75g (bed frame, chair legs, frames, curtain rod)
- Yellow/Gold: 25g (moon, wall accents)
- Orange/Mustard: 150g (textured wall background)
- Green/Mint: 75g (armchair)
- Cream: 15g (book pages)
- Small amounts: Light pink (inner ears), light blue (stars)
Other Supplies
- 3.5mm crochet hook
- 9mm safety eyes (or black embroidery)
- Fiberfill stuffing
- Yarn needle
- Stitch markers
- Pink embroidery floss (nose, blush)
- Black embroidery floss (whiskers, lashes)
- Cardboard backing (8×10 inches)
- Fabric glue (optional)
🐰 Sleepy Bunny
Head (White)
Rnd 1: MR, 6 sc (6)
Rnd 2: inc in each st (12)
Rnd 3: (sc, inc) around (18)
Rnd 4: (2 sc, inc) around (24)
Rnd 5: (3 sc, inc) around (30)
Rnds 6-12: sc around (30)
Rnd 13: (3 sc, dec) around (24)
Rnd 14: (2 sc, dec) around (18)
Insert eyes between rnds 9-10, 6 sts apart
Stuff firmly
Rnd 15: (sc, dec) around (12)
Rnd 16: dec around (6)
FO, close gap
Ears (Make 2)
Outer Ear (White):
Rnd 1: MR, 6 sc (6)
Rnd 2: (sc, inc) around (9)
Rnd 3: (2 sc, inc) around (12)
Rnds 4-8: sc around (12)
Rnd 9: (2 sc, dec) around (9)
Rnds 10-11: sc around (9)
FO, leaving long tail. Do not stuff.
Inner Ear (Light Pink):
Rnd 1: MR, 4 sc (4)
Rnd 2: (sc, inc) around (6)
Rnds 3-6: sc around (6)
FO, leaving tail
Sew inner ear centered on outer ear. Pinch bottom and sew to head with slight curve.
Face Details
- Embroider black oval eyes with white highlight (or use safety eyes)
- Add 2-3 small lashes extending from outer corner
- Pink nose: Small triangle between eyes
- Pink blush: Light stitching on cheeks
- Black whiskers: 3 lines on each side
- Eyebrows: Thin curved lines above eyes
Body (Blue Pajamas)
Rnd 1: MR, 6 sc (6)
Rnd 2: inc around (12)
Rnd 3: (sc, inc) around (18)
Rnd 4: (2 sc, inc) around (24)
Rnds 5-10: sc around (24)
Rnd 11: (2 sc, dec) around (18)
Rnd 12: sc around (18)
Stuff firmly
FO, leaving long tail for sewing to head
Arms (Make 2 – Blue with White Paws)
Rnd 1: MR, 6 sc in white (6)
Rnd 2: inc around (12)
Rnds 3-4: sc around (12)
Switch to blue
Rnds 5-10: sc around (12)
Rnd 11: (sc, dec) around (8)
Stuff lightly (leaving top unstuffed for posing)
FO, leaving tail
Legs (Make 2 – Blue with White Feet)
Rnd 1: MR, 6 sc in white (6)
Rnd 2: inc around (12)
Rnd 3: (sc, inc) around (18)
Rnds 4-5: sc around (18)
Rnd 6: (sc, dec) around (12)
Switch to blue
Rnds 7-12: sc around (12)
Stuff firmly
FO, leaving tail
Assembly: Sew head to body. Attach legs to bottom of body. Position arms slightly raised (one will hold book, one rests on bed).
📖 Open Book
Pages (Cream)
Piece 1:
Ch 8
Rows 1-6: sc in 2nd ch from hook and across (7), ch 1, turn
FO
Piece 2: Repeat
Cover (Red/Magenta)
Ch 10
Rows 1-7: sc in 2nd ch from hook and across (9), ch 1, turn
FO
Assembly:
- Place two page pieces together with one edge aligned (spine)
- Wrap red cover around pages
- Stitch cover along spine
- Gently bend pages to create “open book” effect
- Tack into bunny’s hands/lap
🛏️ Cozy Bed
Mattress (White)
Ch 20
Rows 1-8: sc in 2nd ch from hook and across (19), ch 1, turn
FO, leaving long tail
Make second piece identical.
Sew together around edges, stuffing before closing. Shape into rectangular mattress.
Bed Frame Base (Brown)
Ch 22
Rows 1-10: sc in 2nd ch from hook and across (21), ch 1, turn
FO
Headboard (Brown)
Ch 14
Rows 1-6: sc in 2nd ch from hook and across (13), ch 1, turn
Row 7: sl st 2, sc 2, hdc 2, dc 3, hdc 2, sc 2, sl st 2
FO
Footboard (Brown)
Ch 14
Rows 1-4: sc in 2nd ch from hook and across (13), ch 1, turn
Row 5: sl st 2, sc 2, hdc 2, dc 3, hdc 2, sc 2, sl st 2
FO
Side Rails (Brown, Make 2)
Ch 8
Rows 1-20: sc in 2nd ch from hook and across (7), ch 1, turn
FO
Assembly:
- Sew headboard to one short end of base
- Sew footboard to opposite end
- Attach side rails connecting headboard to footboard
- Place mattress inside frame
Blanket (Red/Magenta)
Ch 20
Rows 1-12: sc in 2nd ch from hook and across (19), ch 1, turn
FO
Fold edges under for tailored look. Position over bed with edges tucked.
Pillow (White)
Ch 10
Rows 1-6: sc in 2nd ch from hook and across (9), ch 1, turn
FO
Make second piece. Sew together, stuff lightly. Place at head of bed.
💖 Pink Nightstand
Top Surface (Pink)
Ch 10
Rows 1-7: sc in 2nd ch from hook and across (9), ch 1, turn
FO
Make second piece. Sew together with light stuffing to create solid top.
Legs (Brown, Make 4)
Rnd 1: MR, 5 sc (5)
Rnds 2-4: sc around (5)
FO, leaving tail
Sew one leg to each corner of underside.
Optional Drawer Front (Pink)
Ch 6
Rows 1-3: sc in 2nd ch from hook and across (5), ch 1, turn
FO, sew to front center
🪑 Green Armchair
Seat Base (Green/Mint)
Rnd 1: MR, 6 sc (6)
Rnd 2: inc around (12)
Rnd 3: (sc, inc) around (18)
Rnd 4: (2 sc, inc) around (24)
Rnds 5-8: sc around (24)
FO, stuff firmly
Backrest (Green/Mint)
Ch 14
Rows 1-12: sc in 2nd ch from hook and across (13), ch 1, turn
Row 13: dec, sc 9, dec (11), ch 1, turn
Row 14: dec, sc 7, dec (9), ch 1, turn
Row 15: dec, sc 5, dec (7)
FO
Curve slightly and sew to back edge of seat.
Armrests (Green/Mint, Make 2)
Ch 8
Rows 1-6: sc in 2nd ch from hook and across (7), ch 1, turn
FO
Roll into tube shape and sew to sides of chair.
Chair Legs (Brown, Make 4)
Rnd 1: MR, 5 sc (5)
Rnds 2-5: sc around (5)
FO, leaving tail
Sew to underside corners.
Cushion (Red/Magenta)
Ch 8
Rows 1-5: sc in 2nd ch from hook and across (7), ch 1, turn
FO
Make second piece. Sew together with minimal stuffing. Place on seat.
🎨 Circular Rug
Rnd 1: MR, 6 sc in red (6)
Rnd 2: inc around in red (12)
Rnd 3: (sc, inc) around in pink (18)
Rnd 4: (2 sc, inc) around in white (24)
Rnd 5: (3 sc, inc) around in pink (30)
Rnd 6: (4 sc, inc) around in red (36)
Rnd 7: (5 sc, inc) around in pink (42)
Rnd 8: (6 sc, inc) around in white (48)
Rnd 9: (7 sc, inc) around in red (54)
FO, weave in ends
🖼️ Wall Frames and Pictures
Oval Frame (Brown)
Rnd 1: Ch 14, working in rounds: sc 12, 3 sc in last ch, working on opposite side of chain: sc 11, 2 sc in last ch, sl st to first sc (30)
Rnd 2: sc around, inc at curves as needed to maintain oval shape (36)
Rnd 3: sc around (36)
FO
Inner Picture:
Create smaller oval with light blue for sky. Embroider green cactus in center. Sew to frame backing.
Rectangular Frame (Brown)
Ch 10
Rows 1-8: sc in 2nd ch from hook and across (9), ch 1, turn
FO
Border: Work 1 round of sc around entire rectangle edge.
Inner Picture:
Create small rectangle with yellow sun and green/brown mountains. Sew inside frame.
Round Frame (Brown)
Rnd 1: MR, 6 sc (6)
Rnd 2: inc around (12)
Rnd 3: (sc, inc) around (18)
Rnd 4: sc around (18)
FO
Inner Picture:
Create smaller circle (stop at rnd 2 or 3) with sky blue background. Embroider small landscape details.
🌙 Window Scene
Sky Panel (Dark Blue)
Ch 16
Rows 1-16: sc in 2nd ch from hook and across (15), ch 1, turn
FO
Crescent Moon (Yellow/Gold)
Rnd 1: MR, 6 sc (6)
Rnd 2: inc around (12)
Rnd 3: (sc, inc) around (18)
Rnd 4: (2 sc, inc) around (24)
FO
Shape into crescent by pinching one side and stitching to create curved edge. Sew to upper right of sky panel.
Stars (White or Light Blue)
Embroider small 4-pointed stars using cross-stitches scattered around moon (4-5 stars of varying sizes)
Curtain Rod (Brown)
Ch 28
Row 1: sc in 2nd ch from hook and across (27)
FO, leaving tails
Decorative Finials (Make 2):
Rnd 1: MR, 6 sc (6)
Rnd 2: inc around (12)
Rnd 3: dec around (6)
Stuff lightly, FO, leaving tail
Sew one finial to each end of rod.
Curtains (Red/Magenta, Make 2)
Ch 16
Rows 1-14: dc in 3rd ch from hook and across (14), ch 2, turn
FO
Gather top edge with running stitch and cinch. Sew gathered edge to curtain rod. Position curtains on either side of window panel.
🏠 Textured Wall Background
Using orange/mustard yarn and 3.5mm hook:
Ch 60 (or width needed for your backing board – adjust to fit 8-10 inches)
Row 1: sc in 2nd ch from hook and across (59), ch 1, turn
Row 2: Working in BLO, sc across (59), ch 1, turn
Repeat Row 2 for approximately 50 rows (or until height reaches 8-10 inches)
This creates the distinctive horizontal ribbed texture seen in the image.
🎯 Assembly Instructions
Wall Setup
- Cut cardboard backing to 8×10 inches (or desired size)
- Stretch and attach textured wall background to cardboard using glue or stitching
- Position and sew/glue window panel to upper right area
- Attach curtain rod above window with curtains framing both sides
- Arrange and attach three frames to left side of wall in pleasing arrangement
Floor and Furniture
- Center circular rug on base/floor area (can attach to separate base board or directly to display surface)
- Position bed at slight angle on rug
- Place pink nightstand next to bed on right side
- Position green chair to the left side
- Secure all pieces with stitching through rug or fabric glue
Final Bunny Positioning
- Sit bunny upright with back leaning against side of bed
- Position legs extended forward on rug
- Place open book in lap/hands
- One arm holds book edge, other rests on bed frame
- Secure bunny in place with hidden stitches through body to bed/rug
💡 Finishing Tips
- Steam or gently block rug to lay completely flat
- Add subtle embroidery details to furniture (wood grain, texture lines)
- Use fabric stiffener on frames if they need more structure
- Ensure bunny is securely positioned but appears natural and relaxed
- Consider backing entire piece with felt for clean professional finish
- Optional: Add tiny details like embroidered book title or light switch on wall
🎁 Display Suggestions
This enchanting scene works beautifully as:
- Nursery wall art or shelf decoration
- Children’s room storytelling corner centerpiece
- Gift for book lovers and bunny enthusiasts
- Photography prop for baby announcements
- Keepsake shadow box display
- Bedtime routine visual aid
Sweet dreams and happy crocheting! 🐇📚✨