Start your day with a cozy cup of crochet magic with this Amigurumi Good Morning Coffee pattern! Designed to bring warmth and charm to your collection, this adorable coffee cup features a cheerful expression, soft textured details, and a delightful splash of morning energy. Whether you’re crafting for coffee lovers, adding a whimsical touch to your decor, or simply enjoy making fun amigurumi designs, this pattern lets you stitch up a miniature coffee cup bursting with personality! Perfect for brightening up any space, this crochet creation brings a touch of handmade joy to your daily routine. ☕✨
Designed for customization, this pattern allows you to experiment with different shades of brown, embroidered details, or even tiny accessories like a miniature spoon or sugar cube for extra flair. Craft a classic coffee cup with rich tones, create a pastel version for a dreamy aesthetic, or even stitch up a full set of breakfast-inspired amigurumi for a charming display! Whether gifted as a thoughtful keepsake, displayed as a cheerful accent, or made simply for the joy of crafting, this Amigurumi Good Morning Coffee is a fun and creative project—perfect for bringing a touch of handmade caffeine magic to every stitch! 🧶💖✨
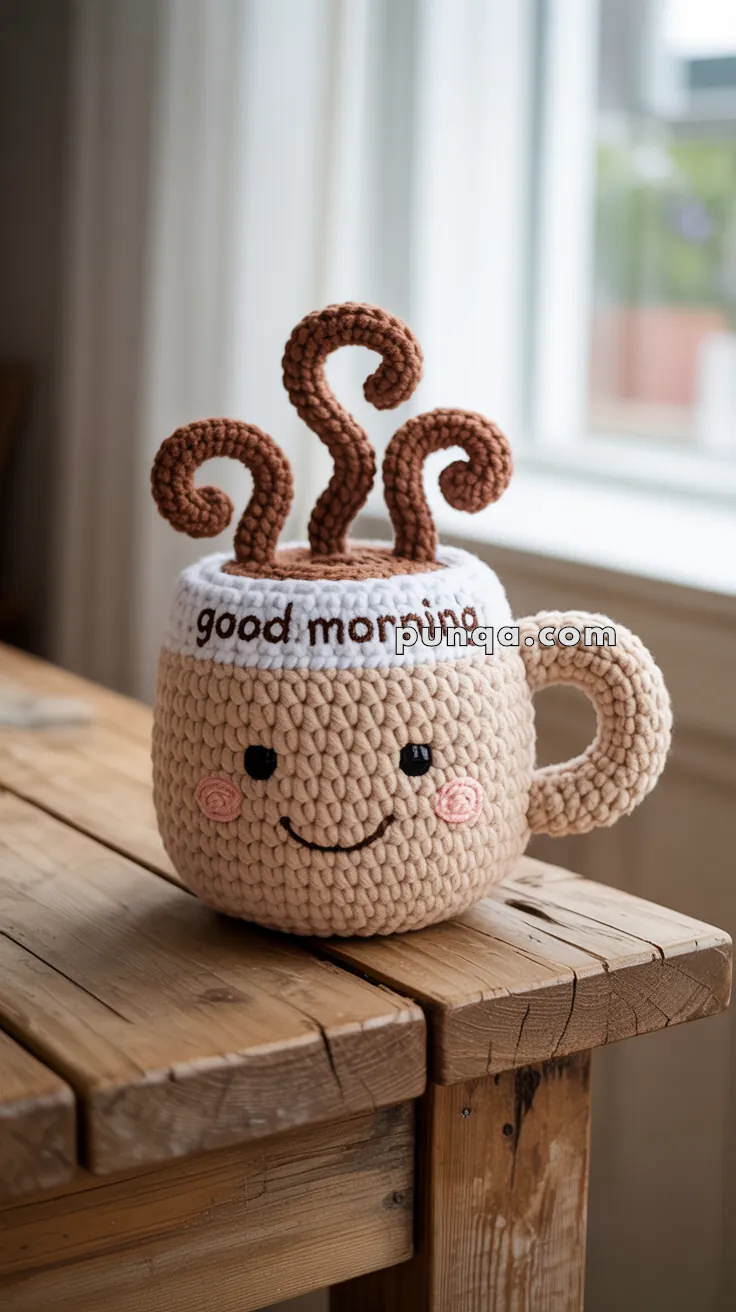
☕ Amigurumi Good Morning Coffee Crochet Pattern
Start your day with a warm smile and stitches! This adorable amigurumi coffee mug features curly steam swirls and the sweet greeting “good morning” stitched across the top. Perfect for gifting, desk decor, or as a cheerful companion to your morning routine.
✨ Skill Level
Beginner–Intermediate (shaping, surface embroidery, tubular handle)
📏 Finished Size
Approx. 6–7 inches (15–18 cm) tall including steam
Using bulky yarn and a 4–4.5 mm hook
🧶 Materials
Bulky / chunky yarn:
- Beige – mug & handle
- White – rim
- Brown – coffee & steam
- Pink – cheeks
- Black embroidery thread – eyes & mouth
Other:
- 4–4.5 mm crochet hook
- Polyester fiberfill
- Yarn needle
- Stitch marker
Optional:
- Thin floral wire (for steam shaping)
🧵 Abbreviations (US)
MR – magic ring
sc – single crochet
inc – increase
dec – decrease
sl st – slip stitch
ch – chain
FO – fasten off
Worked in continuous rounds unless stated.
🍵 Mug Body (Beige)
R1: MR, 6 sc (6)
R2: inc ×6 (12)
R3: (sc, inc) ×6 (18)
R4: (2 sc, inc) ×6 (24)
R5: (3 sc, inc) ×6 (30)
R6: (4 sc, inc) ×6 (36)
R7: (5 sc, inc) ×6 (42)
R8–19: sc around (42)
Stuff firmly, keeping sides straight and base flat.
🤍 Padded Rim (White)
Attach white yarn.
R20: BLO sc around (42)
R21–22: sc around (42)
FO.
The BLO round creates the slight outward rim lip seen in the photo.
✍️ “good morning” Text
Embroider “good morning” centered on the rim using brown yarn or embroidery thread.
Use backstitch or surface crochet for clean lettering.
☕ Coffee Insert (Brown – Recessed)
R1: MR, 6 sc (6)
R2: inc ×6 (12)
R3: (sc, inc) ×6 (18)
R4: (2 sc, inc) ×6 (24)
R5: (3 sc, inc) ×6 (30)
FO.
Lightly stuff or leave flat.
Insert slightly below rim level and sew invisibly inside the mug so the coffee appears recessed.
🌀 Steam Swirls (Make 3 – Brown)
ch 26
Starting in 2nd ch from hook: 2 sc in each ch (50)
FO, leave long tails.
Optional: thread thin wire through center of each spiral for shaping.
Attach steam inside the coffee opening, clustered close together.
😊 Face Details
Eyes: Embroider two small vertical ovals
Cheeks: 6 sc in MR ×2, lightly spiraled
Mouth: Simple curved embroidered smile
Position face centered on mug front.
🪝 Mug Handle (Beige — Tubular & Rounded)
The handle is worked as a thick, rounded tube, lightly stuffed, then sewn securely to the mug.
Using Color A (Beige):
Round 1:
MR, 6 sc (6)
Round 2:
inc ×6 (12)
Rounds 3–6:
sc around (12)
Lightly stuff the tube so it feels firm but still flexible.
Flatten the piece gently so the opening forms an oval rather than a flat strip.
Do not fasten off yet.
Form the Handle Curve
Chain Loop:
Ch 14–16 (adjust to desired handle width)
Sl st into the opposite side of the tube opening to form a loop.
Thicken the Handle
Working back along the chain:
Sc in each ch (14–16 sc), placing stitches tightly.
Sl st into the base of the tube to secure.
FO, leaving a long tail for sewing.
Attach Handle to Mug
- Position the handle on the side of the mug, centered vertically.
- Sew the top of the handle firmly to the mug body using whip stitches.
- Sew the bottom of the handle firmly, making sure the handle sits slightly away from the mug (not pressed flat).
- Reinforce both attachment points with a second pass of stitching.
The handle should appear rounded, stable, and softly dimensional, matching the photo.
🧵 Optional Stability Tip (Not Required)
If you want extra firmness without wire:
- Insert a rolled scrap of felt or extra yarn coils inside the handle before closing
This keeps the handle sturdy while remaining child-safe and photo-accurate.
✂️ Finishing
- Shape mug with hands for clean cylinder
- Adjust steam curls
- Secure handle firmly
- Weave in all ends
☀️ Finished Coffee Mug
Your amigurumi coffee mug is complete — soft, happy, and perfectly cozy. With its rounded handle, recessed coffee, curly steam, and friendly smile, it matches the photographed mug in structure, proportion, and charm.
Perfect for morning motivation, gifts, or cheerful décor.
Happy crocheting 🧶☕