Add a sprinkle of whimsy to your bathroom with the Amigurumi Gnome Toilet Paper Holder, a delightfully quirky crochet project that’s equal parts functional and fun! 🧙♂️🧻 With his pointy hat, fluffy beard, and cozy round body, this charming gnome is ready to guard your toilet paper with style. Whether perched on a shelf or tucked beside the sink, he brings a cheerful touch to a space that’s often overlooked—and he’s guaranteed to make guests smile.
This pattern is perfect for crocheters who love playful home décor and imaginative designs. You can customize your gnome with seasonal colors, add buttons or bows, or even give him a festive twist for holidays. Whether you’re crafting a conversation starter, gifting a laugh, or simply adding personality to your powder room, the Gnome Toilet Paper Holder is a magical way to stitch up joy—one roll at a time! 🧶✨
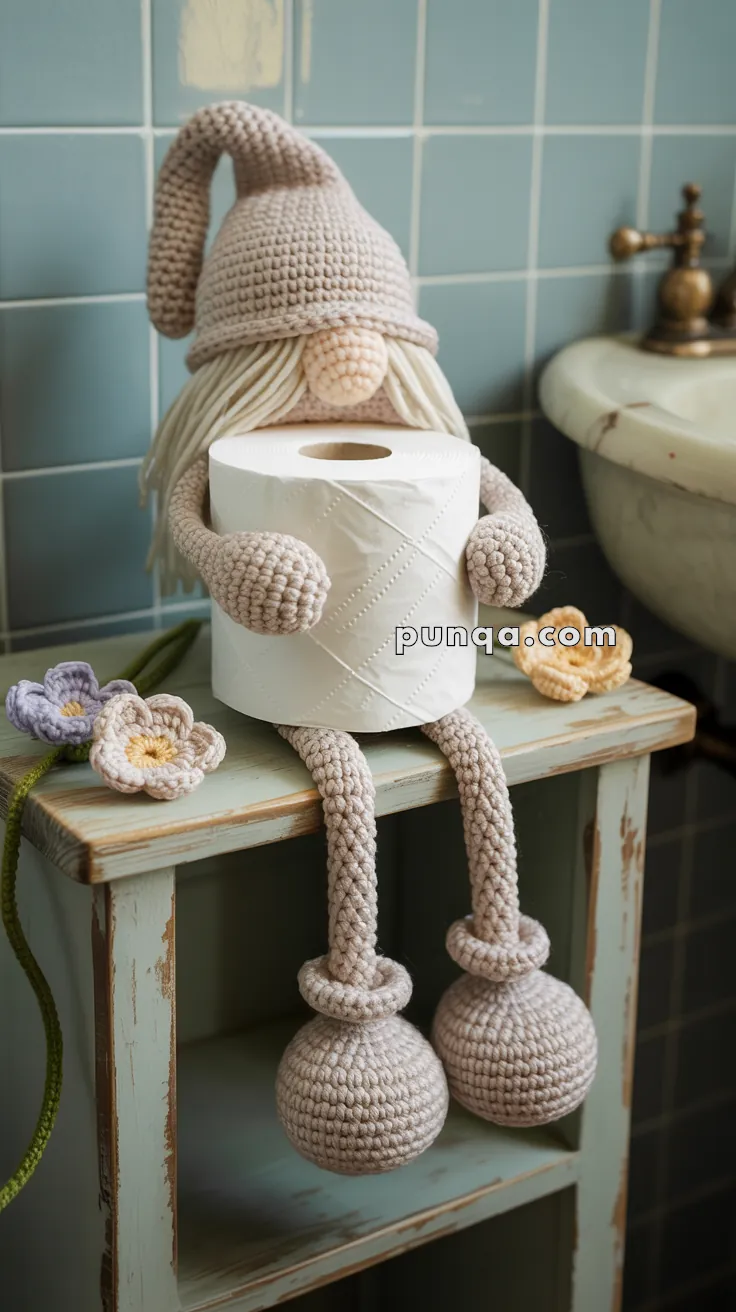
🧻 Amigurumi Gnome Toilet Paper Holder Crochet Pattern
Add a touch of whimsy and charm to your bathroom with this adorable Gnome Toilet Paper Holder! Featuring a long floppy hat, fluffy triangular beard, rope-textured arms and legs, and oversized round feet, this functional décor piece will bring smiles to everyone who visits. Perfect for bathrooms, powder rooms, or as a unique housewarming gift! 🏠✨
✨ Skill Level
Intermediate – requires shaping, rope texture technique, strand attachment, and structural assembly.
📏 Finished Size
Approx. 14–16 inches (35–40 cm) tall when seated with legs dangling. Body is approximately 5 inches (12 cm) in diameter.
🛒 Materials Needed
🧶 Yarn (Worsted Weight Cotton/Acrylic)
- Beige/Taupe/Natural: 220g for body, hat, arms, legs, and feet
- Cream/Off-white: 45g for beard
- Beige/Tan (lighter shade): 20g for nose and hands
- Optional: Small amount of pink for cheek blush
🧰 Other Supplies
- Crochet Hook: 4.0 mm (US size G/6)
- Polyester fiberfill stuffing (approx. 250g)
- Tapestry needle 🪡
- Yarn needle for beard attachment
- Stitch markers
- Scissors ✂️
- Poly pellets or rice (100-150g) for weighted feet
- Small fabric pouches or pantyhose (to contain pellets in feet)
- Cardboard circle (approx. 4 inches diameter) for stable body base
- Optional: Pink blush or colored pencil for cheeks
- Brush or wide-tooth comb for fluffing beard
📝 Abbreviations (US Terms)
- MR – Magic ring
- ch – Chain
- sc – Single crochet
- hdc – Half double crochet
- dc – Double crochet
- inc – Increase (2 sc in one stitch)
- dec – Decrease (invisible decrease/sc2tog)
- sl st – Slip stitch
- BLO – Back loop only
- FLO – Front loop only
- (…) x# – Repeat instructions # times
- [#] – Total stitch count at end of round
- FO – Fasten off
🎨 Special Technique: Rope Texture
To achieve the distinctive twisted rope texture seen in the hat, arms, and legs:
Method: Work in BLO (back loop only) for every round. This creates a spiral ridge effect that looks like twisted rope or cord.
The consistent BLO work makes the piece naturally spiral and creates visible horizontal ridges that mimic rope construction.
🧍 Gnome Body Pattern
🎀 Main Body Sphere (Beige/Taupe Yarn)
This creates a rounded ball that sits on the surface with the toilet paper roll positioned in front.
Round 1: MR, 6 sc [6]
Round 2: (inc) x6 [12]
Round 3: (sc, inc) x6 [18]
Round 4: (2 sc, inc) x6 [24]
Round 5: (3 sc, inc) x6 [30]
Round 6: (4 sc, inc) x6 [36]
Round 7: (5 sc, inc) x6 [42]
Round 8: (6 sc, inc) x6 [48]
Round 9: (7 sc, inc) x6 [54]
Round 10: (8 sc, inc) x6 [60]
Round 11: (9 sc, inc) x6 [66]
Rounds 12-28: 66 sc (17 rounds) – creates substantial round body
Round 29: (9 sc, dec) x6 [60]
Round 30: (8 sc, dec) x6 [54]
Round 31: (7 sc, dec) x6 [48]
Round 32: (6 sc, dec) x6 [42]
Round 33: (5 sc, dec) x6 [36]
Stuff body very firmly to maintain round shape. 💪
Optional but recommended: Insert cardboard circle at bottom before closing for flat, stable base that won’t tip.
Round 34: (4 sc, dec) x6 [30]
Round 35: (3 sc, dec) x6 [24]
Round 36: (2 sc, dec) x6 [18]
Round 37: (sc, dec) x6 [12]
Round 38: (dec) x6 [6]
FO, weave through remaining stitches and pull tight to close.
👃 Nose (Light Beige/Tan Yarn)
Round 1: MR, 6 sc [6]
Round 2: (inc) x6 [12]
Round 3: (sc, inc) x6 [18]
Round 4: (2 sc, inc) x6 [24]
Round 5: (3 sc, inc) x6 [30]
Rounds 6-8: 30 sc (3 rounds)
Round 9: (3 sc, dec) x6 [24]
Round 10: (2 sc, dec) x6 [18]
Round 11: (sc, dec) x6 [12]
Stuff very firmly, maintaining prominent round ball shape.
FO, leaving long tail for sewing. Set aside – this will be a prominent feature on the beard.
🎩 Long Floppy Hat (Beige/Taupe Yarn)
🧢 Hat Crown with Rope Texture
Work in BLO throughout for rope texture effect:
Round 1: MR, 6 sc [6]
Round 2: BLO: (inc) x6 [12]
Round 3: BLO: (sc, inc) x6 [18]
Round 4: BLO: (2 sc, inc) x6 [24]
Round 5: BLO: (3 sc, inc) x6 [30]
Round 6: BLO: (4 sc, inc) x6 [36]
Round 7: BLO: (5 sc, inc) x6 [42]
Round 8: BLO: (6 sc, inc) x6 [48]
Round 9: BLO: (7 sc, inc) x6 [54]
Round 10: BLO: (8 sc, inc) x6 [60]
Rounds 11-45: BLO: 60 sc (35 rounds) – creates very long, dramatic floppy cone
This creates a tall hat (approximately 10-11 inches) that will naturally flop over due to its length and hollow construction.
🎀 Hat Brim/Band
Switch to regular sc (both loops) to create distinct brim:
Round 46: 60 sc [60]
Round 47: 60 sc [60]
Round 48: FLO: 60 sc [60] – creates fold line
Rounds 49-51: 60 sc (3 rounds) – brim band that will fold up
FO, leaving very long tail for sewing.
Do not stuff hat – it must remain hollow and lightweight to flop naturally. The long rope-textured cone will drape to one side when worn.
🦵 Long Rope-Textured Legs (Beige/Taupe Yarn)
Make 2.
Work in BLO throughout for rope texture:
Round 1: MR, 6 sc [6]
Round 2: BLO: (inc) x6 [12]
Round 3: BLO: (sc, inc) x6 [18]
Rounds 4-55: BLO: 18 sc (52 rounds) – creates very long rope-like leg (approximately 11-13 inches)
Stuff lightly and evenly throughout, but keep legs somewhat flexible and poseable (not rigid or overstuffed).
FO, leaving long tail for sewing. Legs should have enough body to hold shape while still being able to dangle naturally.
👞 Large Weighted Feet (Beige/Taupe Yarn)
Make 2.
Round 1: MR, 6 sc [6]
Round 2: (inc) x6 [12]
Round 3: (sc, inc) x6 [18]
Round 4: (2 sc, inc) x6 [24]
Round 5: (3 sc, inc) x6 [30]
Round 6: (4 sc, inc) x6 [36]
Round 7: (5 sc, inc) x6 [42]
Rounds 8-14: 42 sc (7 rounds) – creates large round ball
Add weight: Place 50-75g of poly pellets or rice in a small fabric pouch (cut pantyhose work well). This weight is crucial for stability and the dangling leg effect.
Position weight pouch in center bottom of foot. Continue stuffing fiberfill around the weight to fill out the sphere completely.
Round 15: (5 sc, dec) x6 [36]
Round 16: (4 sc, dec) x6 [30]
Round 17: (3 sc, dec) x6 [24]
Round 18: (2 sc, dec) x6 [18]
Round 19: (sc, dec) x6 [12]
Round 20: (dec) x6 [6]
FO, close opening very tightly and securely. Feet should be substantial, heavy spheres.
Sew one foot securely to the bottom of each leg, ensuring weight is at the very bottom of foot.
💪 Long Rope-Textured Arms (Beige/Taupe Yarn)
Make 2.
Work in BLO throughout for rope texture:
Round 1: MR, 6 sc [6]
Round 2: BLO: (inc) x6 [12]
Round 3: BLO: (sc, inc) x6 [18]
Rounds 4-40: BLO: 18 sc (37 rounds) – creates long rope-like arm (approximately 9-10 inches)
Stuff moderately throughout – not too soft, not too firm. Arms should be poseable and able to hold position when arranged.
FO, leaving long tail for sewing. Arms need to be long enough to wrap from the back sides of the body around to the front.
🤲 Hands (Light Beige/Tan Yarn)
Make 2.
Round 1: MR, 6 sc [6]
Round 2: (inc) x6 [12]
Round 3: (sc, inc) x6 [18]
Round 4: (2 sc, inc) x6 [24]
Rounds 5-7: 24 sc (3 rounds)
Round 8: (2 sc, dec) x6 [18]
Round 9: (sc, dec) x6 [12]
Stuff very firmly to create plump, rounded ball-like hands.
Round 10: (dec) x6 [6]
FO, close opening tightly. Sew one hand securely to the end of each arm.
Hands should be substantial rounded balls, not flat mittens.
🧔 Fluffy Cream Beard
📏 Beard Strand Preparation
Cut 50-60 strands of cream/off-white yarn, each approximately 13-16 cm (5-6.5 inches) long for dramatic draping.
🪡 Beard Attachment Method
Latch-hook/loop method:
- Fold one strand in half
- Insert hook from front to back through body where beard should attach
- Pull folded loop through to front
- Pull both ends through the loop and tighten snugly
Attachment area: Attach beard strands around the entire front portion of the body sphere, starting just below where the hat brim will sit. Coverage should extend from approximately round 10 down to round 25-28 from the top of body.
Strand distribution:
- Start at round 10-12 from top of body
- Attach approximately 10-12 strands evenly spaced around front half of body (180 degrees)
- Continue working downward, round by round
- Attach strands for approximately 15-18 rows down the front
- Create denser coverage in the center front for maximum fullness
- Slightly less dense at the extreme sides where beard tapers
✂️ Beard Trimming and Shaping
Once all strands are attached:
- Gently brush or comb all strands downward with wide-tooth comb
- Separate strands for fluffy, cloudy texture
- Trim into a very long, narrow triangular/pointed shape
- The beard should extend down to cover most of the body sphere’s front
- Create a dramatic pointed bottom that extends well below the body
- Taper sides gradually from full at top to narrow point at bottom
- The finished beard should be very full at top, narrowing dramatically to a point
- Beard should be approximately 6-7 inches long when trimmed
- The triangular shape should be quite narrow and elongated, not wide
🎨 Assembly Instructions
Step 1: Prepare and Weight Body
- Ensure body is stuffed very firmly with cardboard circle at base
- Body should sit stably on flat surface without rocking
- The body will remain stationary while other parts are attached
Step 2: Attach Legs and Weighted Feet
- Position legs at the bottom-back of the body sphere (approximately rounds 32-35 from top)
- Legs should attach close together (about 1-2 inches apart), both on the back side of body
- Sew very securely with multiple passes of strong thread – weighted feet will stress these connections
- Legs should point downward and slightly forward
- When gnome is positioned, legs should dangle freely down the front or sides
- The weight in the feet counterbalances the body and keeps gnome from tipping
Step 3: Attach Beard and Nose
- Attach all 50-60 beard strands to front-upper body in organized rows
- Brush and fluff beard thoroughly for maximum volume
- Trim into very long, narrow triangular shape that tapers to a dramatic point
- Beard should drape down covering most of the visible front of body
- Position large nose prominently on top of/emerging from the beard in the upper-center area
- Nose should be quite visible and prominent – a key focal point
- Sew nose very securely through beard strands
- Optional: Add tiny pink blush to create “cheeks” on sides of nose 💗
- Arrange beard strands around nose for natural framing
Step 4: Attach Hat with Folded Brim
- Position hat on top of body sphere
- The brim band (rounds 49-51) should sit around the top of the body
- Fold the brim up using the FLO fold line (round 48) to create a visible rolled/cuffed brim
- The brim should stand up slightly, creating a band around the base of the hat
- Sew brim band securely all around to top of body
- Allow the long floppy rope-textured portion of hat to drape naturally to one side or forward
- The hat tip should curve or bend due to its length and weight
- Adjust position of floppy portion for desired whimsical character
Step 5: Attach Arms and Hands
- Position arms at upper-back sides of body (approximately rounds 12-16 from top)
- Arms should attach on the back/sides of the body, one on each side
- Sew arm bases very securely to body with multiple stitches
- Bring arms forward around the sides of the body
- Position arms so they extend toward the front where toilet paper will be placed
- Hands (with arms) should reach forward and can rest near where toilet paper sits
- You may tack hands in position, or allow them to rest freely
- Arms should wrap around in a gentle arc from back to front
Step 6: Position with Toilet Paper Roll
- Place completed gnome on a flat surface (bathroom shelf, toilet tank, counter)
- Position a standard toilet paper roll directly in front of the gnome body
- The body sits behind the roll
- Arms extend forward from the back/sides with hands positioned near/resting on the roll
- The beard drapes down in front of the body, partially visible around the toilet paper
- The nose is visible above the toilet paper
- Hat flops to one side for personality and charm
- Weighted feet dangle down the front, visible below the shelf edge
💡 Finishing Tips
- Critical understanding: The toilet paper sits in front of the gnome body, not through it or inside it 🧻
- The gnome does NOT hold the toilet paper – it sits behind it with arms reaching forward
- Weighted feet are essential – they create the signature dangling leg look and prevent tipping
- Work BLO consistently for arms, legs, and hat to achieve the rope/cord texture
- The hat must be hollow and unstuffed – weight would prevent the floppy drape
- Test arm length by wrapping around your body sphere before attaching – they must reach the front
- Stuff body very firmly – it supports all the weight of attached parts
- Beard length and narrow triangular shape are key to matching the photo aesthetic
- The prominent large nose is a focal point – don’t make it too small
- Hat brim fold creates visual interest and matches the photo detail
- Position legs close together, not splayed apart
- Moderate arm stuffing allows posing while maintaining shape
🏠 Display and Usage Tips
📍 Ideal Placement
- Bathroom shelf with toilet paper in front ✨
- Back of toilet tank
- Bathroom counter or vanity
- Powder room decorative shelf
- Storage shelves in bathroom or laundry room
🔄 Changing Toilet Paper
- Simply remove the roll from in front of the gnome when needed
- Replace with new roll in same position in front of body
- Gnome remains stationary – no need to move it
- Arms create visual suggestion of “holding” without mechanical grip
- Easy access design for practical functionality
🎭 Styling Your Gnome
- Adjust hat flop to left, right, or forward for different personalities
- Position arms closer or farther from toilet paper as desired
- Arrange dangling legs to hang straight or slightly angled
- Fluff beard regularly to maintain volume
- Rotate gnome slightly for different viewing angles
🌸 Customization Ideas
🎨 Color Variations
- Christmas Santa Gnome: Red body/hat with white beard and green accents 🎅
- Fall Gnome: Orange, brown, rust tones
- Spring Gnome: Pastel pink, lavender, mint green
- Winter Gnome: Icy blue, silver, white
- Patriotic Gnome: Red, white, and blue
- Halloween Gnome: Orange and black with grey beard 🎃
🎀 Decorative Additions
- Tiny crochet flowers on hat
- Small belt around body waist
- Miniature gardening tools in hands
- Seasonal accessories (pumpkins, hearts, eggs)
- Embroidered or safety eyes peeking from beard
- Rosy cheeks with pink blush or embroidery
- Small buttons down the front
- Jingle bells on hat tip 🔔
👥 Family Collections
- Make multiple gnomes in graduating sizes
- Create boy and girl gnome pairs
- Different beard colors (grey, brown, black) for variety
- Seasonal gnome rotation throughout the year
- Gift sets of matching bathroom gnomes
🎁 Gift Ideas
Perfect for:
- Housewarming presents 🏡
- Bathroom renovation celebrations
- White elephant exchanges
- Gnome collectors and enthusiasts
- Anyone who appreciates whimsical functional décor
- Secret Santa gifts
- Teacher appreciation gifts
- Hostess gifts
- Mother’s Day for moms with sense of humor
- “Just because” friendship gifts
🧼 Care Instructions
Spot clean only. Do not machine wash or submerge in water – beard strands will mat and rope texture may be damaged. Dust regularly with soft, dry cloth or gentle brush. If beard becomes flattened over time, carefully brush and fluff with wide-tooth comb or pet brush. Keep away from excessive moisture and humidity. Display piece for decorative use – not a toy for children. Poly pellet filled feet should not get wet. ⚠️
🎉 Congratulations!
You’ve created an absolutely delightful and functional Gnome Toilet Paper Holder! This charming fellow will bring personality, whimsy, and smiles to your bathroom while cleverly organizing your toilet paper in the most enchanting way possible. 🧙✨
The combination of practical function and adorable design makes this project truly special. The rope-textured limbs add sophisticated detail, the dramatic floppy hat creates irresistible character, the long triangular beard provides classic gnome charm, and the weighted dangling feet complete the whimsical look.
Key Success Features:
- Rope texture (BLO technique) for visual interest ✨
- Prominent nose for personality 👃
- Very long, narrow triangular beard for classic gnome look 🧔
- Weighted feet for stability and authentic dangling effect 👞
- Long floppy hat for maximum whimsy 🎩
- Long arms that wrap around for the “holding” illusion 💪
Display your gnome proudly and prepare for the delighted reactions from everyone who encounters this unique bathroom companion! This project combines your crochet skills with creative problem-solving to make something truly special and conversation-worthy.
Happy crocheting and may your bathroom always have a touch of magic and whimsy! 🧻🧶💕✨