Creating an amigurumi genie is like weaving a little magic into the palm of your hand! 🧞♂️ The appeal of these adorable crochet creations lies in their ability to transform a simple ball of yarn into whimsical, enchanting characters. When I decide to make an amigurumi genie, my imagination runs wild with possibilities. The process involves selecting vibrant yarn colors that capture the mystical allure of genies, from shimmering blues to rich purples. With each stitch, I feel like I’m drawing closer to bringing my mini-magical friend to life, complete with tiny accessories like a turban or a miniature magic lamp.
The process of crafting an amigurumi genie involves a delightful balance of creativity and technique. 🧵 Starting with the basic shapes—like the body, arms, and legs—each piece is created using simple crochet stitches that gradually take form in my hands. As I add details like a curly beard or sparkling eyes, I can’t help but smile at the character’s personality shining through. The art of assembling the pieces and watching them transform into a cohesive, spirited figure is incredibly satisfying. The real magic, however, is watching others’ faces light up when they see the finished genie, ready to grant a wish or two! 🎉

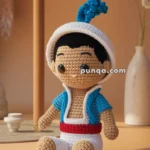
🧞 Amigurumi Genie Crochet Pattern
Add a little magic to your crochet collection with this chubby genie straight from the lamp! With royal gold accents, a magical topknot, and a golden belt, this whimsical figure is a fun project for intermediate crocheters.
🧵 Skill Level
Intermediate
📏 Finished Size
Approximately 8–9 inches (20–23 cm) tall
🧶 Materials
-
Worsted weight yarn in:
-
Beige or light skin tone (face, hands)
-
Dark blue or purple (hat, ears, pants)
-
Light blue or teal (torso/sleeves)
-
Gold/yellow (belt, collar, topknot band)
-
Brown (mustache, eyebrows)
-
-
Crochet hook (2.5–3.5 mm depending on yarn weight)
-
8 mm safety eyes
-
Fiberfill stuffing
-
Stitch markers
-
Tapestry needle
-
Optional: mini golden lamp prop
✨ Abbreviations (US Terms)
-
MR – Magic ring
-
sc – Single crochet
-
inc – Increase
-
dec – Decrease
-
ch – Chain
-
sl st – Slip stitch
-
FO – Fasten off
👤 Head (Beige)
-
MR, 6 sc
-
inc x6 (12)
-
(1 sc, inc) x6 (18)
-
(2 sc, inc) x6 (24)
-
(3 sc, inc) x6 (30)
-
(4 sc, inc) x6 (36)
7–13. sc around (36) -
(4 sc, dec) x6 (30)
-
(3 sc, dec) x6 (24)
– Insert safety eyes between R9–R10
– Stuff firmly -
(2 sc, dec) x6 (18)
-
(1 sc, dec) x6 (12)
-
dec x6 (6)
– FO and close
🧢 Hat + Topknot (Dark Blue + Gold)
-
MR, 6 sc
-
inc x6 (12)
3–5. sc around -
sl st around in gold for topknot band
7–8. continue sc in dark blue
– Stuff lightly
– FO and attach to head center
👂 Ears (Make 2 – Dark Blue + Beige Lining)
-
With dark blue: MR, 6 sc
-
inc x6 (12)
-
(1 sc, inc) x6 (18)
-
sc around
-
Fold and flatten, sc across
– Create inner beige crescent and sew in
– Attach to sides of head
🧔 Mustache + Brows (Brown)
-
Chain 8, sc in each to make mustache side
-
Sew in curve shape below nose
-
Use same technique to embroider thick eyebrows above eyes
👕 Torso (Light Blue)
-
MR, 6 sc
-
inc x6 (12)
-
(1 sc, inc) x6 (18)
-
(2 sc, inc) x6 (24)
5–9. sc around (24)
– Switch to gold -
sc around to form waist trim
– FO and stuff
👖 Pants (Dark Blue)
-
MR, 6 sc
-
inc x6 (12)
-
(1 sc, inc) x6 (18)
4–6. sc around
– Make 2 legs
– Join both with ch 3, continue sc around both legs and chain (42 total)
– Continue 4–5 more rows
– FO and sew to torso
✋ Arms (Make 2 – Light Blue to Beige)
-
With beige: MR, 5 sc
-
inc x5 (10)
3–4. sc around -
Switch to light blue, sc around for sleeve
6–8. sc around
– FO, stuff lightly, attach to body sides
🪙 Belt + Ornament (Gold)
-
Chain to wrap around torso
-
Sl st into each
-
Optional: ch 5, sl st back for central ornamental loop
-
Sew around lower torso above pants
🧷 Assembly
-
Sew head to torso
-
Attach hat and ears
-
Embroider mouth or use felt
-
Attach arms at shoulder
-
Wrap and secure belt
-
Add eyebrows and mustache
-
Place prop lamp in hand or glue in place
✨ Final Touches
-
Blush cheeks with pink yarn or makeup
-
Use fabric paint or felt for mouth and detailing
-
Add a sparkle in the eyes with white thread or paint dot