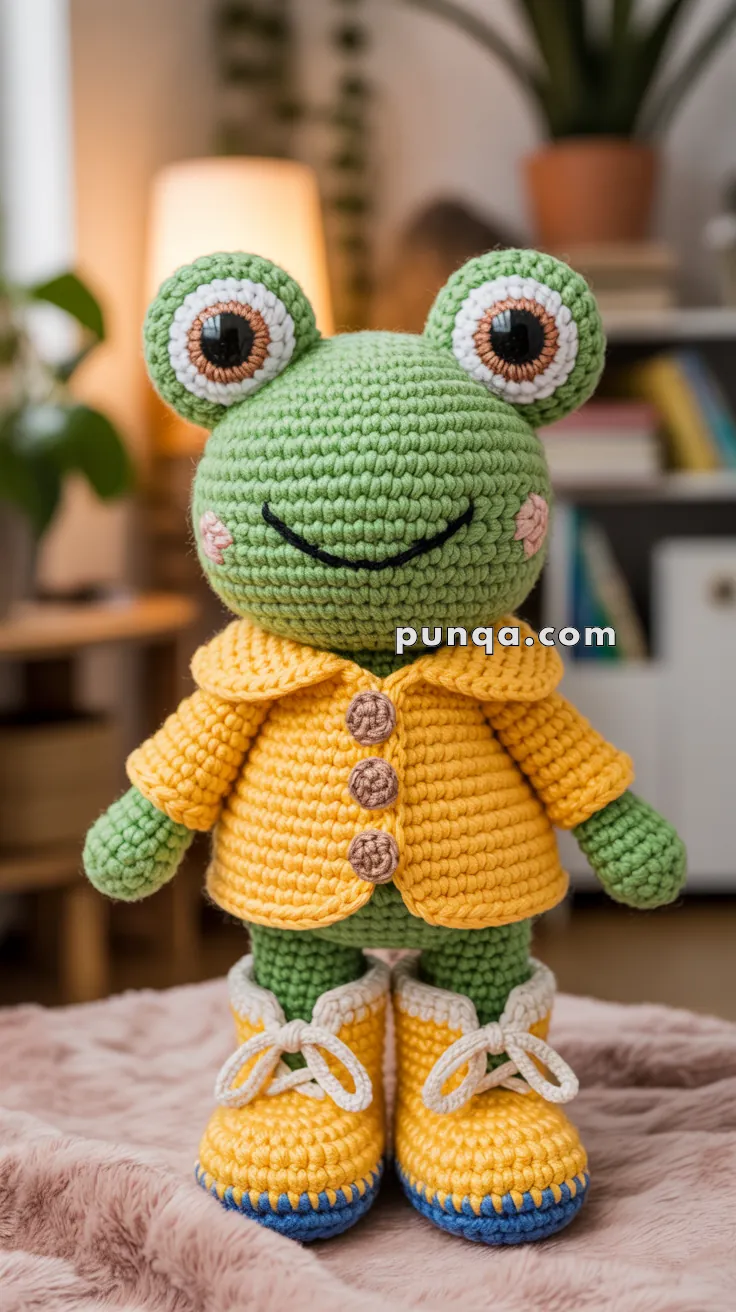
Rainy days just got a whole lot cuter with this Amigurumi Frog in Raincoat crochet pattern! 🐸🌧️ Wrapped in a cheerful little coat and ready to hop through puddles, this charming frog brings a splash of whimsy to your crochet lineup. With its wide smile, bright eyes, and cozy rainwear, it’s the perfect project to celebrate the magic of drizzly weather and the joy of handmade creatures. Whether you’re crafting for a child, a collector, or just your own rainy day display, this frog is sure to leap straight into hearts.
From the tiny buttons on the raincoat to the playful stance of your amphibious friend, every stitch is a chance to add personality and flair. You can customize the coat color, add rain boots, or even stitch up a little umbrella for extra fun. Ideal for intermediate crocheters who love expressive details, this pattern is a delightful mix of charm and challenge. So grab your yarn and let’s make a frog who’s not afraid to dance in the rain! ☔💚🧶
🐸 Amigurumi Frog in Raincoat Crochet Pattern
Bring charm to your handmade collection with this cheerful frog dressed in a sunny yellow raincoat and matching boots. With large expressive eyes, a wide stitched smile, and cozy apparel, this frog is perfect for gifting or displaying on a nursery shelf!
✨ Skill Level
Intermediate to Advanced – Requires 3D eye shaping, garment construction, and precise assembly.
📏 Finished Size
Approximately 25-27 cm (10-10.5″) tall when made with worsted weight yarn and 2.75mm hook.
🧶 Materials
Yarn (Worsted Weight/4):
- Light green – 100g (body, head, arms, legs, eye bases)
- Bright yellow – 80g (raincoat, boots)
- Navy/dark blue – 20g (boot soles)
- White or off-white/light gray – 20g (eye whites, sock cuffs, laces)
- Brown – 15g (eye irises, buttons)
- Black – 10g (pupils, mouth embroidery)
- Light pink – 10g (cheeks)
Other Supplies:
- 2.75mm (C) crochet hook (main work)
- 3.0mm (D) crochet hook (coat, boots)
- Polyester fiberfill stuffing
- Yarn needle (blunt tip)
- Embroidery needle (sharp)
- Stitch markers
- Pins for assembly
- Black embroidery thread (mouth details)
🔤 Abbreviations (US Terms)
- MR = Magic Ring
- sc = single crochet
- inc = increase (2 sc in same st)
- dec = invisible decrease (sc2tog)
- hdc = half double crochet
- dc = double crochet
- sl st = slip stitch
- ch = chain
- BLO = back loops only
- FLO = front loops only
- st(s) = stitch(es)
- R = Round
- FO = fasten off
🟢 HEAD
With light green yarn and 2.75mm hook:
- R1: MR, 6 sc (6)
- R2: inc × 6 (12)
- R3: (sc, inc) × 6 (18)
- R4: (2 sc, inc) × 6 (24)
- R5: (3 sc, inc) × 6 (30)
- R6: (4 sc, inc) × 6 (36)
- R7: (5 sc, inc) × 6 (42)
- R8: (6 sc, inc) × 6 (48)
- R9-18: sc around (48) – 10 rounds
- R19: (6 sc, dec) × 6 (42)
- R20: (5 sc, dec) × 6 (36)
- R21: (4 sc, dec) × 6 (30)
- R22: (3 sc, dec) × 6 (24)
- Stuff head very firmly
- R23: (2 sc, dec) × 6 (18)
- R24: (sc, dec) × 6 (12)
- R25: dec × 6 (6)
- FO, close opening with needle.
Shaping Note: Gently squeeze and shape head to be slightly wider and flatter on top to accommodate side-mounted eyes.
👁️ 3D BULGING EYES (Make 2)
These create the authentic protruding frog eyes!
Green Eye Base (Outer Sphere):
With light green yarn and 2.75mm hook:
- R1: MR, 6 sc (6)
- R2: inc × 6 (12)
- R3: (sc, inc) × 6 (18)
- R4: (2 sc, inc) × 6 (24)
- R5: (3 sc, inc) × 6 (30)
- R6: BLO sc around (30) – creates attachment ridge
- R7-10: sc around (30) – 4 rounds
- R11: (3 sc, dec) × 6 (24)
- R12: (2 sc, dec) × 6 (18)
- Stuff firmly to create dome
- R13: (sc, dec) × 6 (12)
- R14: dec × 6 (6)
- FO, close opening.
White Eye Part (Middle Sphere):
With white/off-white yarn:
- R1: MR, 6 sc (6)
- R2: inc × 6 (12)
- R3: (sc, inc) × 6 (18)
- R4: (2 sc, inc) × 6 (24)
- R5: BLO sc around (24) – creates ridge
- R6-8: sc around (24) – 3 rounds
- R9: (2 sc, dec) × 6 (18)
- R10: (sc, dec) × 6 (12)
- Stuff firmly
- R11: dec × 6 (6)
- FO, close opening.
Brown Iris (Small Dome):
With brown yarn:
- R1: MR, 6 sc (6)
- R2: inc × 6 (12)
- R3: (sc, inc) × 6 (18)
- R4: BLO sc around (18)
- R5-6: sc around (18)
- R7: (sc, dec) × 6 (12)
- Stuff firmly
- R8: dec × 6 (6)
- FO, close opening.
Black Pupil (Tiny Dome):
With black yarn:
- R1: MR, 6 sc (6)
- R2: inc × 6 (12)
- R3: BLO sc around (12)
- R4-5: sc around (12)
- R6: dec × 6 (6)
- Stuff lightly
- FO, close opening.
Eye Assembly:
- Center and sew black pupil onto brown iris
- Center and sew brown iris (with pupil) onto white sphere
- Center and sew white sphere (with iris and pupil) onto green base
- Result: Layered 3D eye with concentric circles
Attachment to Head:
- Position eyes on sides of head at R12-16
- Eyes should protrude outward, not sit flat
- Space eyes approximately 8-10 stitches apart (measuring around head)
- Angle eyes slightly upward and forward
- Sew securely using the BLO ridge created in R6 of green base
😊 FACE DETAILS
Pink Cheeks (Make 2):
With light pink yarn:
- R1: MR, 6 sc (6)
- R2: inc × 6 (12)
- R3: (sc, inc) × 6 (18)
- FO, leaving long tail
Stuff very lightly for slight padding. Sew onto head below and slightly forward of each eye (around R18-20).
Smile:
With black embroidery thread or yarn:
Position at R21-22, centered on face between cheeks.
- Create wide curved smile (approximately 10-12 stitches wide)
- Use back stitch or stem stitch for thick line
- Make gentle U-shape curve
- Keep smile centered and symmetrical
🟢 BODY
With light green yarn and 2.75mm hook:
- R1: MR, 6 sc (6)
- R2: inc × 6 (12)
- R3: (sc, inc) × 6 (18)
- R4: (2 sc, inc) × 6 (24)
- R5: (3 sc, inc) × 6 (30)
- R6: (4 sc, inc) × 6 (36)
- R7-16: sc around (36) – 10 rounds (creates fuller body)
- R17: (4 sc, dec) × 6 (30)
- R18-20: sc around (30) – 3 rounds
- R21: (3 sc, dec) × 6 (24)
- R22: sc around (24)
- Stuff body firmly
- R23: (2 sc, dec) × 6 (18)
- R24: (sc, dec) × 6 (12)
- R25: dec × 6 (6)
- FO, close opening.
🟢 ARMS (Make 2)
With light green yarn and 2.75mm hook:
- R1: MR, 6 sc (6)
- R2: inc × 6 (12)
- R3: (sc, inc) × 6 (18)
- R4-5: sc around (18) – hand section
- R6: (sc, dec) × 6 (12)
- R7-16: sc around (12) – 10 rounds (arm length)
- Stuff lightly (keep arms soft and poseable)
- R17: dec × 6 (6)
- FO, leaving long tail for sewing.
Don’t flatten – keep arms rounded and tubular.
🟢 LEGS (Make 2)
With light green yarn and 2.75mm hook:
- R1: MR, 6 sc (6)
- R2: inc × 6 (12)
- R3: (sc, inc) × 6 (18)
- R4-6: sc around (18) – 3 rounds (foot section)
- R7: (sc, dec) × 6 (12)
- R8: (2 sc, dec) × 3 (9) – tapers toward ankle
- R9-18: sc around (9) – 10 rounds (leg length)
- Stuff legs firmly
- FO, leaving long tail for sewing.
🟨 YELLOW RAINCOAT
Worked in the round from bottom up, then armholes created:
With bright yellow yarn and 3.0mm hook:
Body:
- Ch 32, join with sl st to form ring (don’t twist)
- R1-4: sc around (32) – 4 rounds
- R5: (7 sc, inc) × 4 (36)
- R6-8: sc around (36) – 3 rounds
- R9: (8 sc, inc) × 4 (40)
- R10-12: sc around (40) – 3 rounds
- R13: (9 sc, inc) × 4 (44)
- R14-18: sc around (44) – 5 rounds (coat should reach mid-thigh)
Creating Armholes:
- R19: sc 10, ch 5, skip 8 sts (armhole), sc 14, ch 5, skip 8 sts (armhole), sc 4, sl st to first sc (30 sc + 10 ch = 40)
- R20-22: sc around (40) – 3 rounds (yoke section)
- FO, leaving long tail.
Sleeves (Make 2):
Join yellow yarn at armhole opening:
- R1: sc around armhole, working into skipped sts and ch sts (13-14 sts total)
- R2: sc around, dec 1-2 times evenly to reach (12)
- R3-8: sc around (12) – 6 rounds
- R9: (2 sc, dec) × 3 (9) – tapers at wrist
- FO
Stuff sleeves lightly for shape.
Collar:
Join yellow yarn at neck opening (R22):
- R1: Working in FLO, (hdc, inc-hdc) around evenly – approximately 45-48 sts
- R2: (hdc 2, inc-hdc) around – approximately 60-64 sts
- R3: (hdc 3, inc-hdc) around – approximately 75-80 sts (creates full ruffled collar)
- R4: hdc around for stability
- FO
Collar should stand up and fold over slightly. Shape and block if needed.
Buttons (Make 3):
With brown yarn:
Option 1 – Crocheted Dome Buttons:
- R1: MR, 6 sc (6)
- R2: inc × 6 (12)
- R3: sc around (12)
- R4: dec × 6 (6)
- Stuff lightly, FO, close opening
Option 2 – Flat Buttons:
- R1: MR, 6 sc (6)
- R2: (sc, inc) × 3 (9)
- FO
Sew buttons vertically down center front of coat at R6, R10, and R14.
🟡 YELLOW BOOTS (Make 2)
These are tall boots with sock cuffs and laces:
Sole (Navy/Dark Blue):
With navy blue yarn and 3.0mm hook:
- Ch 8
- R1: sc in 2nd ch from hook, sc 5, 4 sc in last ch; working on opposite side: sc 5, 3 sc in last st (18)
- R2: inc, sc 5, inc × 4, sc 5, inc × 3 (26)
- R3: sc, inc, sc 5, (sc, inc) × 4, sc 5, (sc, inc) × 2, sc (34)
- R4: BLO sc around (34) – creates sole ridge
- R5-6: sc around (34) – 2 rounds
- FO, switch to yellow yarn
Boot Upper (Bright Yellow):
Join yellow yarn in BLO of R6:
- R7: BLO sc around (34) – creates color change line
- R8: sc around (34)
- R9: sc 10, (dec) × 7, sc 10 (27) – shapes toe
- R10: sc 8, (dec) × 5, sc 9 (22)
- R11: sc around (22)
- R12: (9 sc, dec) × 2 (20)
- R13-22: sc around (20) – 10 rounds (tall boot shaft)
Sock Cuff (Off-White/Light Gray):
Switch to off-white/light gray yarn:
- R23: FLO sc around (20) – creates fold line
- R24-25: sc around (20) – 2 rounds
- FO
Fold cuff outward to show off-white lining.
Laces (Make 2):
With white/off-white yarn:
- Ch 45-50
- FO, leaving tails
Lacing the Boots:
- Mark lace holes: Create 6-8 evenly spaced holes on front of boot (R14-20)
- Thread lace through holes in crisscross pattern
- Start at bottom, crisscross up to top
- Tie in bow at top of boot
- Trim and adjust bow size
🧵 ASSEMBLY
Order of Assembly:
- Attach legs to body:
- Sew legs to bottom front of body
- Position legs slightly angled outward for stable sitting position
- Legs should point forward
- Slide boots onto legs:
- Insert legs into boots
- Sew boots securely to leg ends
- Ensure boots are firmly attached
- Attach head to body:
- Center head on top of body
- Sew securely with whip stitch
- Ensure head is stable and can support eye weight
- Dress frog in raincoat:
- Slide raincoat over body
- Adjust so it sits properly
- Bottom edge should reach just above where legs attach
- Can tack coat to body in a few places for security
- Attach arms:
- Position arms at sides, emerging from sleeve openings
- Sew arms to body at shoulder level (R20-22 of body)
- Arms should hang naturally at sides
- Can tuck a few stitches of arm into sleeve for seamless look
- Final details:
- Shape collar to stand up and fold over
- Adjust laces and bows on boots
- Check all pieces are secure
- Weave in all remaining ends
💡 Tips for Success
Eye Construction:
- Stuff eyes very firmly for proper spherical shape
- Eyes should be hard, not squishy
- Use pins to position before sewing permanently
- Make sure eyes are level and symmetrical
Proportions:
- Head should be noticeably larger than body
- Eyes should dominate the face
- Legs should be long enough for sitting pose
Raincoat Fit:
- Coat should fit snugly but not too tight
- If coat is too loose, work fewer increase rounds
- If too tight, add increase rounds or use larger hook
Boot Fit:
- Legs should fit snugly into boots
- If boots are loose, add a few more decrease rounds in boot upper
- If too tight, skip some decrease rounds
Posing:
- Bend legs forward at “knee” (approximately R10 of leg)
- Adjust until frog sits stable without tipping
- Arms can be positioned slightly forward
📐 Size Adjustments
For Smaller Frog (20cm):
- Use 2.5mm hook throughout
- Reduce body rounds by 3-4
- Reduce leg rounds by 2-3
- Reduce coat rounds by 3-4
For Larger Frog (30cm):
- Use 3.5mm hook throughout
- Add 3-4 rounds to body
- Add 3-4 rounds to legs
- Add 4-5 rounds to coat length
🎨 Color Variations
- Red Raincoat & Boots: Classic rain gear look
- Green Boots: Monochromatic with body
- Orange Coat: Autumn version
- Rainbow Boots: Striped colorwork in boot shaft
- Pink Frog: Use pink for body instead of green
✨ Optional Accessories
Tiny Umbrella:
- Use wire frame covered with crocheted canopy
- Attach to hand
Hood:
- Add hood to back of raincoat collar
- Triangle shape with increases
Backpack:
- Small rectangle with straps
- Sew to back
🌟 Final Thoughts
Your frog in a sunshine-yellow raincoat and boots is complete! The short coat, ankle boots, and oversized eyes give it a perfectly playful look. This amigurumi is great for gifting, displaying, or customizing with extra accessories like an umbrella or backpack.