Keep your phone snug and stylish with this Amigurumi Fox Phone Holder crochet pattern! Designed to bring both functionality and charm to your space, this adorable fox features a sturdy base, soft textured details, and a playful expression that makes organizing fun. Whether you’re crafting for animal lovers, adding a whimsical touch to your desk, or simply enjoy making practical amigurumi designs, this pattern lets you stitch up a helpful little fox bursting with personality! Perfect for brightening up any workspace, this crochet creation adds a touch of handmade woodland magic to your daily routine. 🦊✨
Designed for customization, this pattern allows you to experiment with different shades of orange, embroidered details, or even tiny accessories like a miniature scarf or acorn for extra charm. Craft a classic fox with rich earthy tones, create a pastel version for a dreamy aesthetic, or even stitch up a full set of forest-inspired amigurumi for a delightful display! Whether gifted as a thoughtful keepsake, used as a practical desk accent, or made simply for the joy of crafting, this Amigurumi Fox Phone Holder is a fun and creative project—perfect for bringing a touch of handmade woodland magic to every stitch! 🧶💖✨
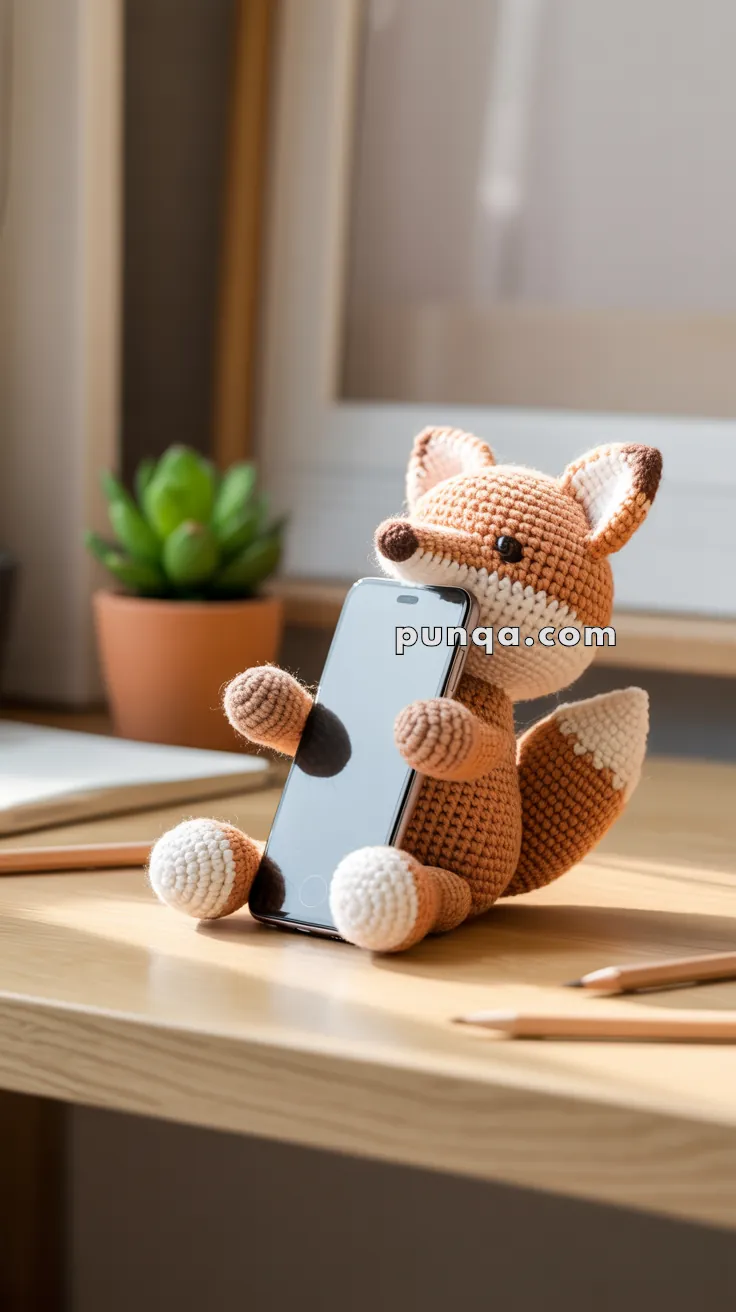
🦊 Amigurumi Fox Phone Holder – Free Crochet Pattern
Turn your desk into a cozy woodland nook with this charming fox phone holder! With an upright tail and gently curved arms, this amigurumi fox will hold your phone with both style and function. Its friendly expression and colorwork details make it a delightful handmade gift or workspace companion.
✨ Skill Level
Intermediate – Involves shaping, color changes, and a bit of stuffing strategy.
📏 Finished Size
Approx. 6–7 inches tall (15–18 cm), perfect for holding a smartphone upright.
🧶 Materials
- Yarn:
- Orange (main body)
- White (tail tip, snout, paws)
- Brown or dark orange (ears, nose)
- 2.5 mm crochet hook
- Fiberfill stuffing
- Black safety eyes (8 mm)
- Tapestry needle
- Stitch marker
- Small cardboard or plastic for base reinforcement (optional)
🔠 Abbreviations (US Terms)
- MR – Magic Ring
- ch – Chain
- sc – Single Crochet
- inc – Increase (2 sc in one st)
- dec – Decrease (sc two sts together)
- BLO – Back Loops Only
- FO – Fasten Off
- st/sts – Stitch/Stitches
🧡 Pattern Instructions
🧍♂️ Body
In orange yarn
- MR, 6 sc [6]
- inc x6 [12]
- (sc, inc) x6 [18]
- (2 sc, inc) x6 [24]
5–16. sc around [24] - (2 sc, dec) x6 [18]
- sc around [18]
Stuff firmly. - (sc, dec) x6 [12]
- dec x6 [6]
FO and close the hole.
🦊 Head
In orange yarn
- MR, 6 sc [6]
- inc x6 [12]
- (sc, inc) x6 [18]
- (2 sc, inc) x6 [24]
5–9. sc around [24] - (2 sc, dec) x6 [18]
Insert safety eyes between Rounds 6–7, approx. 5 stitches apart. - (sc, dec) x6 [12]
Stuff head. - dec x6 [6]
FO and sew to body.
🐽 Snout
In white yarn
- MR, 6 sc [6]
- sc around [6]
- (sc, inc) x3 [9]
4–5. sc around [9]
FO, stuff lightly, and sew to the front center of the head, slightly pointing outward.
🧵 Tip for shaping: Before sewing the snout to the head, use a small pinch of stuffing near the tip and push it into a slight cone shape. This helps it protrude naturally.
🖐️ Arms (Make 2 – Front Legs)
In white (paw) and orange (arm)
- With white: MR, 6 sc [6]
- inc x6 [12]
- sc around [12]
- switch to orange: sc in BLO [12]
5–7. sc around [12] - (2 sc, dec) x3 [9]
Stuff lightly.
9–10. sc around [9]
FO, do not sew flat – bend the arms slightly forward and sew angled to the sides of the body, so the paws can hold a phone between them.
🐾 Legs (Make 2 – Back Feet)
In white (paw) and orange (leg)
- MR, 6 sc [6]
- inc x6 [12]
- sc around [12]
- switch to orange: sc in BLO [12]
5–6. sc around [12]
Stuff well. - (sc, dec) x4 [8]
- sc around [8]
FO and sew to bottom sides of body.
🦊 Tail
In white to orange gradient (or color change)
- With white: MR, 6 sc [6]
- inc x6 [12]
- (sc, inc) x6 [18]
- switch to orange: sc around [18]
5–10. sc around [18] - (2 sc, dec) x4, 2 sc [14]
- sc around [14]
- dec x7 [7]
Stuff firmly and curve slightly before sewing to the back lower body to act as rear balance.
👂 Ears (Make 2)
In orange with white center option
- MR, 4 sc [4]
- (sc, inc) x2 [6]
- sc around [6]
- (2 sc, inc) x2 [8]
- sc around [8]
Pinch ear and sew to top of head with curve forward.
👃 Nose
In brown or dark yarn
- MR, 5 sc
- sc around for 1–2 rounds
FO and sew at the tip of the snout.
📱 How to Make It a Phone Holder
- Front arms should be positioned to curve slightly forward, like a hug. Light stuffing keeps them from flopping.
- Use a heavier stuffing or base inside the body, or insert a small cardboard circle at the base to support the phone’s weight.
- The tail should touch the table, acting as a third leg of support to avoid tipping.
🪡 Final Assembly
Position ears symmetrically and nose at the center tip of the snout.
Sew head to body firmly.
Position front legs angled forward and slightly open.
Attach rear legs flat and wide to stabilize.
Curve tail slightly and sew lower back to balance.
🎉 Finishing Touches
Congratulations — your adorable fox phone holder is ready to show off its charm and utility! 🦊📱 Take a moment to adjust the arms and tail so they cradle your phone securely. If needed, gently bend or reposition the limbs for better support.