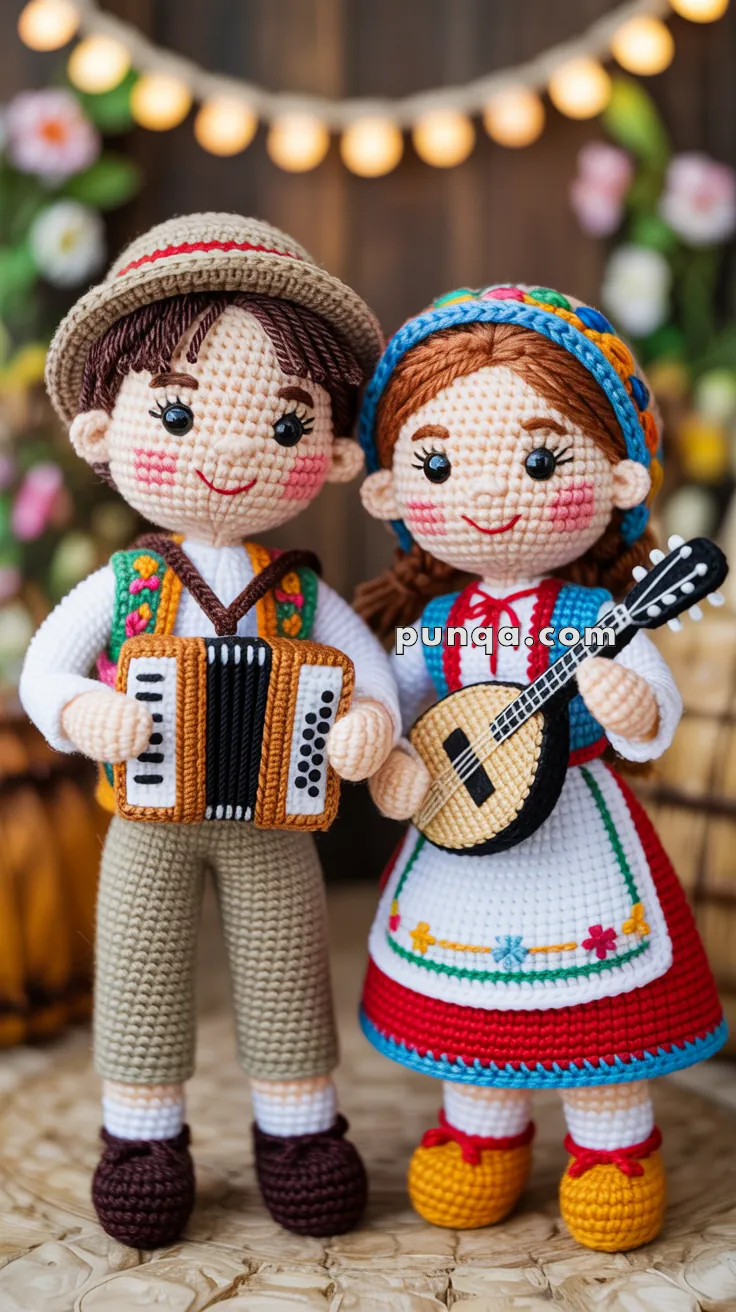
Celebrate love, culture, and handmade charm with this delightful Amigurumi Folk Festival Couple crochet pattern! 💃🧶🕺 Dressed in vibrant traditional outfits and full of joyful personality, this adorable duo brings the spirit of folk festivals to life in yarn form. Whether you’re crafting a tribute to your heritage, creating a heartfelt gift, or simply love stitching characters with flair, this couple is ready to dance their way into your amigurumi collection.
Designed with colorful details and expressive features, this pattern invites you to play with embroidery, layered textures, and festive accessories like flower crowns, hats, or musical instruments. You can customize their outfits to reflect different regional styles or create your own whimsical twist. Whether perched on a shelf, starring in a handmade celebration scene, or gifted to someone special, this Folk Festival Couple Amigurumi is a joyful and satisfying project—perfect for stitching up a little cultural magic, one loop at a time! 🎉❤️🌿
🎶 Amigurumi Folk Festival Couple Crochet Pattern
Bring the joy of traditional folk culture into your home with this adorable amigurumi couple! Dressed in vibrant traditional costumes and holding beautifully detailed musical instruments, these dolls capture every charming detail from authentic folk festival attire. Perfect for collectors, cultural celebrations, home décor, or as a heartfelt handmade gift.
Each doll stands approximately 25 cm (10 inches) tall and features intricate embroidered details, layered clothing, and realistic accessories that make them truly special.
✨ What Makes This Pattern Special
- Highly detailed construction – designed to closely match the dolls in the reference photo
- Detailed instruments – fully dimensional accordion and mandolin
- Authentic costume elements – layered skirts, embroidered vests, traditional accessories
- Complete facial features – expressive eyes, rosy cheeks, smiling faces
- Step-by-step guidance – clear instructions for advanced techniques
✨ Skill Level
Advanced Intermediate — includes layered clothing, multi-color embroidery, shaping, and assembling detailed accessories like the accordion and mandolin.
📏 Finished Size
Each completed doll measures approximately 25 cm (10 inches) tall when made with DK-weight cotton yarn and a 2.5–3.0 mm crochet hook.
🧶 Materials Needed
Yarn (DK Weight Cotton)
Shared Colors:
- Beige (skin tone): 35 g
- White (shirts, socks, apron): 40 g
- Black (details, instruments): 15 g
Boy Doll:
- Dark brown (hair, shoes): 20 g
- Khaki/tan (pants): 25 g
- Dark green (vest): 12 g
- Beige (hat): 15 g
- Red (hat stripe, embroidery): 8 g
- Golden yellow (accordion panels): 10 g
Girl Doll:
- Light brown (hair): 20 g
- Blue (vest, headband): 15 g
- Red (skirt, embroidery): 30 g
- Yellow (shoes, embroidery): 15 g
- Green (embroidery, apron trim): 10 g
Other Supplies
- 2.5–3.0 mm crochet hook
- 8 mm safety eyes (2 pairs)
- Polyester fiberfill
- Yarn needle
- Embroidery needle
- Stitch markers
- Scissors
- Pins (for assembly)
🔤 Abbreviations (US Terms)
- MR – Magic Ring
- sc – single crochet
- inc – increase (2 sc in same stitch)
- dec – invisible decrease
- ch – chain
- sl st – slip stitch
- BLO – back loop only
- FLO – front loop only
- FO – fasten off
- R – Round
🧑 Folk Festival Boy
Head (Beige)
The boy has a round, expressive head with lower-placed eyes for a sweet, childlike appearance.
R1: MR, 6 sc
R2: inc ×6 → 12
R3: (sc, inc) ×6 → 18
R4: (2 sc, inc) ×6 → 24
R5: (3 sc, inc) ×6 → 30
R6: (4 sc, inc) ×6 → 36
R7: (5 sc, inc) ×6 → 42
R8–17: sc around (42)
R18: (5 sc, dec) ×6 → 36
R19: (4 sc, dec) ×6 → 30
R20: (3 sc, dec) ×6 → 24
Stuff firmly.
R21: (2 sc, dec) ×6 → 18
R22: (sc, dec) ×6 → 12
R23: dec ×6 → 6
FO, close opening tightly.
Facial Features
- Eyes: Insert 8 mm safety eyes between R11–12, spaced 8 stitches apart.
- Eyebrows: Using dark brown yarn, embroider thin arched lines 1 stitch above each eye.
- Nose: Using beige or light brown yarn, make 2–3 horizontal stitches on R12–13, centered between eyes.
- Smile: Using red embroidery thread, stitch a gentle curved smile below the nose on R14–15.
- Cheeks: Using red or pink yarn, embroider wide circular blush marks spanning 2 rounds, positioned 1 stitch below and slightly outward from each eye.
Ears (Make 2)
R1: MR, 6 sc
R2–3: sc around (6)
FO, leaving a long tail. Flatten slightly and sew to sides of head at R11–12, aligned with eye level.
Hair (Dark Brown)
Hair Cap Base
R1: MR, 6 sc
R2: inc ×6 → 12
R3: (sc, inc) ×6 → 18
R4: (2 sc, inc) ×6 → 24
R5: (3 sc, inc) ×6 → 30
R6: (4 sc, inc) ×6 → 36
R7–9: sc around (36)
FO, leaving a long tail.
Adding Hair Strands
Cut 10–12 strands of dark brown yarn, each 6–7 cm long. Attach these strands across the front edge of the hair cap (forehead area) using a latch hook or by pulling through with your crochet hook. Style the bangs to sweep slightly to one side. Trim to desired length.
Sew the hair cap securely onto the head, covering R1–8.
Hat (Beige + Brown Brim + Red Stripe)
This traditional hat features three distinct color sections matching the folk costume style.
Using beige:
R1: MR, 6 sc
R2: inc ×6 → 12
R3: (sc, inc) ×6 → 18
R4: (2 sc, inc) ×6 → 24
Switch to dark brown (brim):
R5: BLO (3 sc, inc) ×6 → 30
R6: sc around (30)
Switch to beige:
R7–9: sc around (30)
Switch to red:
R10–11: sc around (30)
Switch to beige:
R12–14: sc around (30)
FO, leaving a long tail. Sew hat onto head, positioning it slightly tilted for a jaunty look.
Neck (Beige)
Create a small neck section to connect the head to the body smoothly.
R1: Starting with 18 sc around the base of the head
R2–3: sc around (18)
Do not FO; continue directly into the body.
Body/Shirt (White)
R1: (2 sc, inc) ×6 → 24
R2: (3 sc, inc) ×6 → 30
R3–14: sc around (30)
FO, leaving a long tail for attaching the head.
Shirt Detail
Using dark brown yarn, embroider a V-shaped neckline at the collar (R3–4 of body) with crossing straps, creating the traditional folk shirt appearance.
Folk Vest (Dark Green with Embroidery)
This vest is the signature piece of the boy’s costume, featuring intricate traditional embroidery.
Using dark green:
Ch 40, join with sl st to form a ring.
R1–6: sc around (40)
FO, leaving a long tail.
Cut the vest vertically down the center front (between stitches 1 and 40) to create the open vest style.
Vest Embroidery
Using the photo as reference, embroider the following symmetrical pattern on both front panels:
- Colors: Golden yellow, red, cyan/bright blue, green
- Pattern:
- 3 vertical yellow columns down each front panel
- Small red and cyan floral dots between yellow columns
- Green leaf/vine accents
- Dark brown or black edging around vest opening and armholes
Tip: Embroider the pattern before attaching the vest to the body for easier handling.
Sew the vest onto the body over the white shirt.
Arms (Beige – Make 2)
R1: MR, 6 sc
R2: (sc, inc) ×3 → 9
R3–12: sc around (9)
Stuff lightly, leaving the top 2 rounds unstuffed for easier attachment.
FO, leaving a long tail. Sew arms to sides of body at R12–13, angled slightly forward to hold the accordion.
Pants (Khaki)
Waist and Hips
R1: MR, 6 sc
R2: inc ×6 → 12
R3: (sc, inc) ×6 → 18
R4–18: sc around (18)
Splitting for Legs
Leg 1: Work sc around first 9 stitches only.
R1–6: sc around (9)
FO. Rejoin yarn to remaining 9 stitches for Leg 2.
Leg 2:
R1–6: sc around (9)
FO, leaving a tail. Stuff pants lightly and attach to bottom of shirt body.
Socks (White – Make 2)
Attach white yarn to the bottom opening of each pant leg.
R1–2: sc around (9)
FO.
Shoes (Dark Brown – Make 2)
R1: MR, 6 sc
R2: inc ×6 → 12
R3: (sc, inc) ×6 → 18
R4–7: sc around (18)
FO, leaving a long tail. Flatten the toe area slightly before stuffing. Stuff lightly and sew to the bottom of each sock.
Accordion (Black, Golden Yellow, White)
The accordion is the boy’s signature accessory and requires careful construction for an authentic look.
Bellows (Black)
Ch 14
Rows 1–12: sc across (13 sc per row), ch 1, turn
FO. Fold the rectangle accordion-style into pleats (like a fan), creating the characteristic bellows texture. Secure the pleats with a few stitches along the edges.
Side Panels (Golden Yellow – Make 2)
Ch 8
Rows 1–6: sc across (7 sc per row), ch 1, turn
FO. These are the decorative side panels. Sew one panel to each side of the pleated bellows.
Keyboard Panel (White with Black Keys)
Ch 8
Rows 1–5: sc across (7 sc per row), ch 1, turn
FO. Using black embroidery thread, stitch 7–8 vertical lines down the panel to create individual piano key divisions. Sew this keyboard panel to the left side of the accordion.
Button Panel (Black with White Buttons)
Using black yarn, create a small rectangle:
Ch 5
Rows 1–6: sc across (4 sc per row)
FO. Using white yarn, add 6–8 French knots or small dots to represent buttons. Sew this panel to the right side of the accordion.
Shoulder Straps (Dark Brown)
Cut two pieces of dark brown yarn, each approximately 15 cm long. Attach one end of each strap to the top corners of the accordion, and sew the other ends to the boy’s shoulders, creating cross-body straps as shown in the photo.
👧 Folk Festival Girl
Head (Beige)
Work exactly the same as the boy’s head pattern (R1–23).
Facial Features
- Eyes: Insert 8 mm safety eyes between R11–12, spaced 7–8 stitches apart.
- Eyelashes: Using black thread, embroider 3–4 individual lash strands extending upward from the outer edge of each eye.
- Eyebrows: Using light brown yarn, embroider thin arched lines 1 stitch above each eye.
- Nose: Using beige yarn, make 2 small horizontal stitches on R12–13.
- Smile: Using red embroidery thread, stitch a gentle curved smile below the nose on R14–15.
- Cheeks: Using pink or red yarn, embroider large circular blush marks spanning 2 rounds, positioned slightly below and outward from each eye.
Ears (Make 2)
Work exactly the same as the boy’s ears pattern.
Hair (Light Brown)
The girl has fuller, more voluminous hair pulled back into a traditional style.
Hair Application
Cut 35–40 strands of light brown yarn, each 10–12 cm long.
Using a latch hook or crochet hook method, attach strands all around the crown of the head (R3–8), creating full coverage. Focus more strands along the sides and back.
Part the hair in the center or side, and style by gathering the back strands loosely. You can create a low bun or simply let the hair flow down naturally. Leave some loose strands framing the face for a soft, natural look.
Trim bangs and length as desired to match the photo.
Multicolor Braided Headband
This distinctive accessory is a braided crown-style headband in traditional folk colors.
Create Four Colored Strips
- Blue Strip: Ch 35, Rows 1–2: sc across (34 sc per row). FO.
- Yellow Strip: Ch 35, Rows 1–2: sc across (34 sc per row). FO.
- Red Strip: Ch 35, Rows 1–2: sc across (34 sc per row). FO.
- Green Strip: Ch 35, Rows 1–2: sc across (34 sc per row). FO.
Assembling the Headband
- Lay all four strips side by side.
- Stitch them together at one end.
- Loosely twist or braid the four strips together (a simple four-strand braid or twisted rope style works well).
- When you reach the end, stitch the four strips together again.
- Join the two ends to create a circular headband.
- Try on the doll’s head and adjust size if needed.
- Sew the headband in place like a crown, sitting across the top of the head.
Neck (Beige)
Work exactly the same as the boy’s neck pattern.
Body/Shirt (White)
Work exactly the same as the boy’s body/shirt pattern (R1–14).
Folk Vest (Blue with Embroidery)
Using blue:
Ch 36, join with sl st to form a ring.
R1–5: sc around (36)
FO, leaving a long tail.
Cut the vest vertically down the center front to create the open vest style.
Vest Embroidery
Using traditional folk motifs, embroider:
- Red, yellow, and green floral vines along the edges
- Small flower clusters on each front panel
- Yellow and green leaf accents
Sew the vest onto the body over the white shirt.
Arms (Beige – Make 2)
Work exactly the same as the boy’s arms pattern. Position arms slightly forward when attaching to hold the mandolin.
Skirt (Multi-Layered: White, Red, Blue)
This traditional folk skirt features three distinct color layers for authentic appearance.
Layer 1: White Petticoat Base
R1: MR, 6 sc
R2: inc ×6 → 12
R3: (sc, inc) ×6 → 18
R4: (2 sc, inc) ×6 → 24
R5: (3 sc, inc) ×6 → 30
R6: (4 sc, inc) ×6 → 36
R7–10: sc around (36)
Layer 2: Red Main Skirt
Continue with red yarn:
R11–22: sc around (36)
Layer 3: Blue Decorative Trim
Continue with blue yarn:
R23: BLO sc around (36) – this creates a defined edge
R24: (5 sc, inc) ×6 → 42 – creates a slight ripple effect
FO, leaving a long tail. Stuff the top portion lightly and sew to the bottom of the white shirt body.
Apron (White with Floral Border)
Ch 20
Rows 1–14: sc across (19 sc per row), ch 1, turn
FO, leaving a long tail.
Apron Embroidery
Along the bottom edge (last 2–3 rows), embroider the following flower pattern from left to right:
- Golden yellow flower (lazy daisy stitch)
- Red flower (lazy daisy stitch)
- Blue flower (lazy daisy stitch)
- Red flower (lazy daisy stitch)
- Golden yellow flower (lazy daisy stitch)
Connect all flowers with a green vine (stem stitch or backstitch).
Add a green border around the entire apron edge using blanket stitch or single crochet edging.
Sew apron straps (thin chains or braided yarn) to the top corners. Attach apron to the front of the skirt, positioning it centered and allowing the red skirt to show on the sides.
Legs with Striped Socks (Make 2)
Leg Base (White)
R1: MR, 6 sc
R2: inc ×6 → 12
R3–4: sc around (12)
Striped Sock Detail
Continue with white, but embroider or crochet 2–3 thin horizontal red stripes around R3–4 to create the traditional folk sock pattern.
FO, leaving a tail for attaching shoes.
Shoes (Yellow – Make 2)
R1: MR, 6 sc
R2: inc ×6 → 12
R3: (sc, inc) ×6 → 18
R4–7: sc around (18)
FO, leaving a long tail. Flatten slightly at the toe.
Shoe Decoration
Using red yarn, embroider decorative stitching across the top of each shoe (a simple cross-stitch or bow pattern) to match the traditional folk shoe style.
Stuff lightly and sew to the bottom of each sock. Attach the complete legs to the bottom front of the skirt, positioning them straight down so the doll stands balanced.
Mandolin (Beige/Tan Body, Black Neck)
Mandolin Body (Beige/Tan)
R1: MR, 6 sc
R2: inc ×6 → 12
R3: (sc, inc) ×6 → 18
R4–7: sc around (18)
FO, leaving a tail. Stuff lightly to create a rounded body shape.
Sound Hole
Using black yarn, embroider an oval or circular sound hole in the center of the mandolin body.
Mandolin Neck (Black)
Ch 16
Rows 1–3: sc across (15 sc per row), ch 1, turn
FO, leaving a long tail.
Fret Details
Using white embroidery thread, stitch 4–5 evenly spaced horizontal lines across the black neck to represent frets.
Strings
Using white embroidery thread, stitch 4 vertical lines from the body up through the neck to represent strings.
Assembly
Sew the neck to the body at a slight angle (as shown in the photo). Position the mandolin in the girl’s hands, securing with a few stitches through her arms and the instrument.
🧩 Assembly Instructions
Connecting the Pieces
- Attach heads to bodies: Use ladder stitch for a secure, invisible seam. Make sure the white chest area aligns with the facial features.
- Neck definition: When attaching the head, stitch slightly inward at the base of the head to create a natural neck indentation.
- Position arms: Sew arms to the body at R12–13 (just below the shoulders). For the boy, angle arms forward to hold the accordion. For the girl, position one arm to support the mandolin neck and the other to rest on the body.
- Dress the boy:
- Attach pants to bottom of shirt
- Pull vest over the body
- Add hat to head
- Attach socks and shoes to pant legs
- Dress the girl:
- Attach skirt to bottom of shirt
- Pull vest over the body
- Tie apron around waist
- Position headband on head
- Attach socks and shoes to bottom of skirt
- Add instruments:
- Accordion: Position in boy’s arms with straps over shoulders
- Mandolin: Place in girl’s hands, securing with stitches
- Final positioning: Place both dolls standing side by side. They should be able to stand independently. If needed, adjust leg positioning or add small weights to the feet for stability.
🌟 Finishing Touches
- Shape the costumes by gently steaming or blocking the vests and skirt to help them hold their shape.
- Style the hair and trim as needed to frame faces naturally.
- Check embroidery so all details are secure and symmetrical.
- Add personality by slightly tweaking facial expressions if desired.
- Secure all loose ends and weave in tails thoroughly.
- Display the dolls together on a shelf, mantle, or as part of seasonal décor.
💡 Tips for Success
- Color selection: Choose vibrant, saturated colors that reflect traditional folk costume palettes. The contrast between colors is what makes these dolls so eye-catching.
- Embroidery skills: If you’re new to embroidery, practice the basic stitches (backstitch, lazy daisy, French knot) on a scrap piece first. The embroidered details truly bring these dolls to life.
- Stuffing: Stuff firmly enough to hold shape but not so tight that the fabric stretches. Heads should be very firm, while arms and legs can be slightly softer for posability.
- Instrument details: Take your time on the accordion and mandolin. These small details make a big impact on the overall appearance.
- Assembly order: Complete all embroidery before assembling pieces. It’s much easier to embroider flat pieces than assembled dolls.
🎉 Conclusion
Your Folk Festival Couple is complete! These charming dolls celebrate the beauty of traditional folk culture with their vibrant costumes, detailed accessories, and joyful presence. Whether you display them as a pair or gift them separately, they’re sure to bring smiles and admiration.
The time and care you put into each embroidered detail, each carefully placed color change, and each tiny accessory has created something truly special—a handmade treasure that honors cultural traditions and showcases your crochet artistry.
Happy crocheting, and may your Folk Festival Couple bring music, color, and joy to your home! 🎶🧵✨


Thank you very much for sharing the pattern for this Amigurumi Festival Couple Doll. Looking forward to more of your sharing.