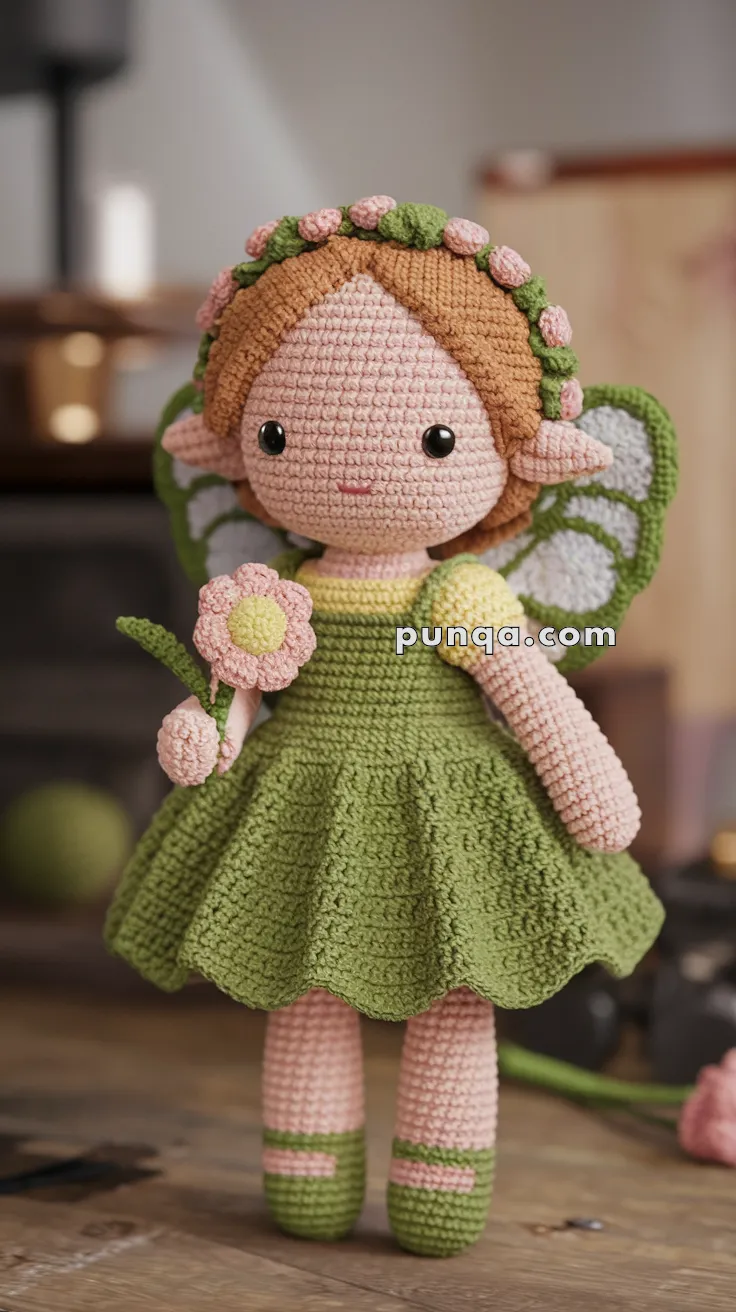
Bring a touch of enchantment to your crochet collection with the Amigurumi Flower Fairy Doll, a whimsical project that’s full of charm and magic! 🧚🧶 With her gentle smile, leafy wings, and blooming flower crown, she’s the perfect companion for fantasy displays, nature shelves, or as a heartfelt handmade gift. Her delicate details capture the beauty of the forest, making her a delightful piece to brighten any space.
Dressed in a layered green dress and holding a soft petal wand, this fairy is sure to melt hearts with her sweet and playful design. Whether you’re crafting her as a keepsake, adding her to a collection of magical dolls, or gifting her to someone who loves fantasy, the Amigurumi Flower Fairy Doll is a joyful way to crochet wonder, whimsy, and a sprinkle of handmade magic—one loop at a time! 🧵✨🌸
🌿 Amigurumi Flower Fairy Doll Crochet Pattern
This enchanting Flower Fairy brings woodland magic to life with her blooming flower crown, fluttery double-lobe wings, golden hair, and a petal dress full of delicate drape and texture. Her soft colors, gentle expression, and sweet flower stem make her perfect for fairy-garden décor, nursery displays, handmade gifts, or collectors who adore whimsical amigurumi.
This pattern is carefully written to match the photographed doll exactly — from the triangular hairline to the multi-petal flower crown and the full vertical-rib dress.
✨ Skill Level
Intermediate – Includes color changes, shaping, vertical-rib skirt texture, structured wings, and small pieces (flowers, ears, straps).
📏 Finished Size
10–12 inches (25–30 cm) tall when made with DK yarn and a 2.5–3.0 mm hook.
🧶 Materials
Yarn (DK weight):
-
Skin tone: light peach/pink
-
Warm brown: hair
-
Green (medium): dress, shoes, wings
-
Light yellow: bodice straps, wing details, flower centers
-
Soft pink: flower petals, sock stripe, shoe strap, small wand bud
-
White: wing inlay
-
Green (light): flower stem and leaf
Tools & Notions:
-
Crochet hook: 2.5–3.0 mm
-
Safety eyes 8–10 mm
-
Fiberfill stuffing
-
Tapestry needle
-
Stitch markers
-
Thin wire (optional for wand stem)
-
Scissors
-
Blush (optional)
🔤 Abbreviations (US Terms)
sc — single crochet
inc — increase (2 sc in one stitch)
dec — decrease
sl st — slip stitch
ch — chain
MR — magic ring
BLO — back loop only
FLO — front loop only
FO — fasten off
🧒 Head (Skin Tone)
R1 MR, 6 sc
R2 inc ×6 → 12
R3 (1 sc, inc) ×6 → 18
R4 (2 sc, inc) ×6 → 24
R5 (3 sc, inc) ×6 → 30
R6 (4 sc, inc) ×6 → 36
R7–14 sc around (36)
Insert safety eyes between R10–11, 6 stitches apart.
R15 (4 sc, dec) ×6 → 30
R16 (3 sc, dec) ×6 → 24
R17 (2 sc, dec) ×6 → 18
Begin stuffing firmly.
R18 (1 sc, dec) ×6 → 12
R19 dec ×6 → 6
FO, close opening.
Face Details:
-
No eyelashes (photo shows none).
-
Embroider a tiny curved smile using soft pink thread.
-
Light blush under eyes.
💇 Hair Cap + Triangular Hairline (Warm Brown)
Hair Cap:
R1 MR 6
R2 inc ×6 → 12
R3 (1 sc, inc) ×6 → 18
R4 (2 sc, inc) ×6 → 24
R5 (3 sc, inc) ×6 → 30
R6 (4 sc, inc) ×6 → 36
R7–11 sc around (36)
FO and sew to head.
Triangular Hairline (photo-accurate)
Using brown yarn, surface-slip-stitch:
-
Start at center top of forehead.
-
Work downward forming a wide V-shape, ending about 2 rows above the eyes.
-
Slip stitch back up the other side.
This creates the exact center-part hairline seen in the photo.
Add 2–3 slip stitch lines on each side of head to represent hair sections.
🌸 Flower Crown (Green Band + Pink Flowers)
Green Band
Ch 52–58 (measure to fit around head).
Row 1: sc across.
FO and sew ends to make a circle.
Pink Flowers (Make 8)
R1 MR, 5 sc
R2 (sl st, ch 2, 2 dc, ch 2, sl st) into each st → 5 petals
FO, leave tail.
Centers (Yellow, Make 8)
MR, 6 sc, FO.
Sew yellow centers into each flower.
Sew 8 flowers evenly around green band.
Place crown behind hairline, not on skin.
🧝♀️ Elf Ears (Make 2 – Skin Tone)
R1 MR, 5 sc
R2 (1 sc, inc) ×2, sc 1 → 7
R3 sc around
Fold slightly into a point.
Sew slightly behind eye level, angled outward and upward.
👗 Body & Bodice (Skin → Yellow → Green)
Neck – Skin Tone
R1 MR, 6
R2 inc ×6 → 12
R3 sc 12
Switch to light yellow.
Bodice Straps + Puff Tops (Yellow)
R4–R6 sc 12
FO.
You now have a small yellow tube.
Dress Attachment Prep
You will attach straps later — not yet.
✋ Arms (Make 2 – Skin + Yellow Caps)
Start with skin tone:
R1 MR, 6
R2–6 sc around (6)
Switch to yellow for tiny puff cap:
R7 (1 sc, inc) ×3 → 9
R8–10 sc 9
FO. Lightly stuff only the hand area.
Sew to body later, angled slightly downward.
🦵 Legs & Shoes (Make 2)
Shoes – Green
R1 MR, 6
R2 inc ×6 → 12
R3 (3 sc, inc) ×3 → 15
R4–5 sc 15
Switch to soft pink (sock band):
R6 BLO sc 15
Switch to skin tone:
R7–17 sc 15
FO, stuff firmly.
Shoe Strap (Pink)
Embroider a thin horizontal bar on the shoe top
(exactly as in photo).
Sew legs to underside of body after dress is finished.
🌿 Dress – Vertical Rib Texture (Green)
This is a separate piece sewn on later (photo accurate).
Attach yarn to the front loops left on Body R6.
R1 sc around (24)
R2 (2 sc, inc) ×8 → 32
R3 BLO sc around
R4 (3 sc, inc) ×8 → 40
R5 BLO sc around
R6 (4 sc, inc) ×8 → 48
R7–15 BLO sc around (creates long vertical ribbing)
Skirt Flare
R16 (5 sc, inc) ×8 → 56
R17 BLO sc around
R18 (6 sc, inc) ×8 → 64
R19–22 BLO sc around
Wavy Hemline (Photo Accurate)
(sl st, skip 1, 5 dc in next, skip 1, sl st) repeat around.
FO.
Sew gently along upper edge so the skirt sits under yellow straps.
🧚 Wings – Double Rounded Lobes (Green + White)
Green Outer Wings (Make 2)
This creates the classic fairy wing shape with two rounded sections.
Upper Lobe:
Ch 16
R1: sc back (15)
R2: inc in 1st, sc 13, inc in last → 17
R3: sc 17
FO.
Lower Lobe:
Ch 12
R1: sc back (11)
R2: inc, sc 9, inc → 13
R3: sc 13
FO.
Sew lower lobe to bottom of upper lobe to form a figure-8 wing.
White Wing Inlay (Crochet, Not Felt)
Repeat same shapes 2 stitches smaller:
Upper: ch 14
Lower: ch 10
Sew inside green outline.
Back Center Spine (Green)
Ch 18, sc back.
Sew between wings and attach as central anchor to fairy’s back.
🌸 Flower Stem with Bud (Photo Accurate)
Main Flower – Pink (5 petals)
Same as crown flowers but slightly larger:
R1 MR, 6 sc
R2 (sl st, ch 2, 2 dc, ch 2, sl st) into each st → 6 petals
FO.
Center – Yellow
MR 6, FO.
Sew to center of main flower.
Small Bud (Pink, 1 piece)
MR, 5 sc, FO.
Sew to stem just below main flower.
Stem (Green)
Ch 28–32
sc back
Insert thin wire if desired
Attach flower at top and bud along side.
Leaf (Green)
Ch 7
R1: sc, hdc, dc, dc, hdc, sc
FO and sew near bud.
Place stem in fairy’s right hand.
🧵 Assembly
1️⃣ Attach head to body
Center firmly. Add extra stitches so head doesn’t wobble.
2️⃣ Attach arms
Sew to sides, angled slightly downward.
3️⃣ Sew dress in place
Attach along waist and under straps.
Position straps over shoulders and sew.
4️⃣ Attach legs
Sew beneath skirt, straight and even.
5️⃣ Attach wings
Sew green spine vertically down back.
Sew wings to each side of spine.
6️⃣ Place flower crown
Set behind hairline, centered.
7️⃣ Give fairy her flower
Sew stem gently to hand or leave it removable.
8️⃣ Add blush and final shaping.
🌼 Final Touches
Your Flower Fairy is now complete — a soft, magical doll with forest charm and storybook sweetness. With her blossoming crown, fluttery wings, and gently textured skirt, she becomes a perfect display piece or heartfelt handmade gift. Whether perched in a child’s room, tucked into a seasonal mantle, or given to someone who loves woodland fantasy, she brings a warm sprinkle of enchantment to any space.