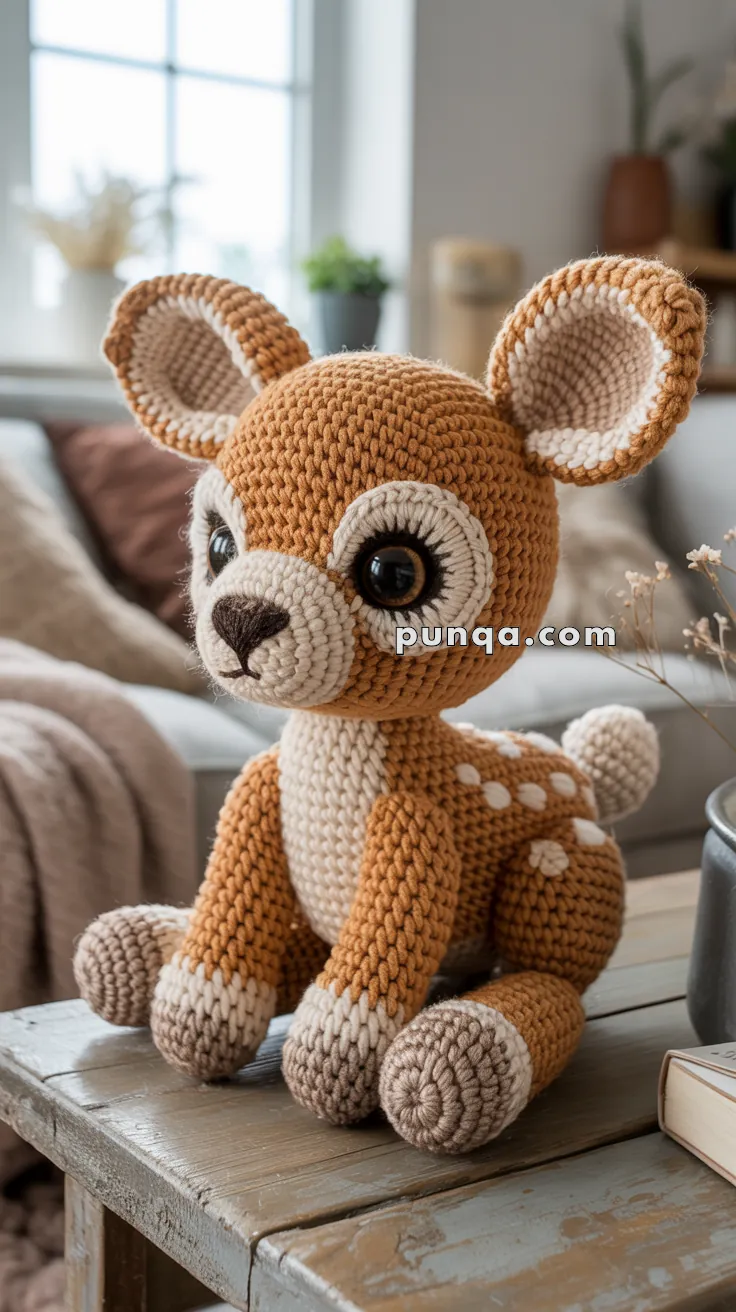
Step into a woodland wonderland with the Amigurumi Fawn Baby, a gentle crochet project that’s full of forest charm and snuggly sweetness! 🦌🧶 With its soft spots, floppy ears, and sweet little face, this baby deer is ready to prance into your heart and brighten any handmade collection. Whether you’re crafting for a nursery, a seasonal display, or a nature-loving friend, this fawn brings a touch of magic to every stitch.
Perfect for crocheters who adore soft textures and whimsical details, this pattern invites you to explore cozy shaping, earthy tones, and playful accents. Add a flower crown, a tiny scarf, or pair it with other woodland creatures for a full enchanted scene. The Amigurumi Fawn Baby is a heartwarming way to stitch up serenity, sweetness, and a sprinkle of forest fairy tale—one loop at a time! 🧵🍄
🦌 Amigurumi Baby Fawn Crochet Pattern
Meet the sweetest little forest friend — this baby fawn is soft, cuddly, and full of woodland charm. With her big eyes, delicate spots, and dainty hooves, she’s perfect for nurseries, woodland-themed decor, or as a magical handmade gift. Her long legs and sitting pose make her extra huggable and lifelike!
✨ Skill Level
Intermediate (simple shaping + sewing multiple parts neatly)
📏 Finished Size
Approx. 22–28 cm (9–11 in) tall sitting, depending on yarn + tension.
🧶 Materials
Super bulky chenille/velvet yarn (recommended for the same plush look):
- Tan / warm caramel (main)
- Cream / off-white (muzzle, belly, inner ears, cuffs, tail)
- Taupe / light brown (hoof tips/soles)
- Dark brown embroidery thread or thin yarn (nose + mouth)
- Black embroidery thread (lashes/eye outline)
Other:
- 5.0 mm crochet hook (adjust for tight stitches)
- 16–18 mm safety eyes (big, glossy look like the photo)
- Stuffing
- Stitch marker, yarn needle, scissors
🧵 Abbreviations (US Terms)
MR = magic ring
sc = single crochet
inc = 2 sc in same st
dec = invisible decrease (sc2tog)
sl st = slip stitch
ch = chain
BLO = back loop only
FLO = front loop only
st(s) = stitch(es)
✅ Notes for Photo Accuracy
- Use a smaller hook than the yarn suggests to keep stitches tight (stuffing won’t show).
- The fawn’s look comes from (1) big eyes + cream eye-rings + lashes, (2) large ears, and (3) cream muzzle shape.
- The “hoof” look is cream cuffs with taupe soles/tips.
- Spots are small raised ovals sewn along the back (not embroidered dots).
🧠 Head (Tan)
R1: MR 6 (6)
R2: inc x6 (12)
R3: (sc, inc) x6 (18)
R4: (2 sc, inc) x6 (24)
R5: (3 sc, inc) x6 (30)
R6: (4 sc, inc) x6 (36)
R7: (5 sc, inc) x6 (42)
R8–R14: sc around (42)
R15: (5 sc, dec) x6 (36)
R16: (4 sc, dec) x6 (30)
R17: (3 sc, dec) x6 (24)
Insert eyes later (after eye-rings are placed), so don’t close yet.
R18: (2 sc, dec) x6 (18)
R19: (sc, dec) x6 (12)
Stuff firmly, shape into a round “baby head.”
R20: dec x6 (6)
FO, close.
👀 Eye Rings (Cream) — make 2
R1: MR 6 (6)
R2: inc x6 (12)
R3: (sc, inc) x6 (18)
R4: sc around (18)
FO, leave a sewing tail.
Placement (Important!)
- Sew each ring to the head first.
- Then insert the safety eyes through the center of each ring and through the head.
- Position: centered on the face, slightly forward — about 8–10 sts apart (adjust visually to match the photo).
Lashes / outline
With black thread, stitch short straight lashes on the outer edges of the cream ring (like the photo), especially the top/outer side.
🐽 Muzzle (Cream) — separate piece (rounded, prominent)
R1: MR 6 (6)
R2: inc x6 (12)
R3: (sc, inc) x6 (18)
R4: (2 sc, inc) x6 (24)
R5–R6: sc around (24)
R7: (2 sc, dec) x6 (18)
FO, lightly stuff.
Sew muzzle to head
Center it under the eyes, slightly protruding.
Nose + mouth (Dark brown thread)
- Stitch a small triangle nose on the top-center of muzzle.
- Add a short vertical line down from nose.
- Add a tiny curved smile (very subtle like the photo).
👂 Ears (Tan + Cream) — make 2 (big and rounded)
Inner Ear (Cream)
R1: MR 6 (6)
R2: inc x6 (12)
R3: (sc, inc) x6 (18)
R4: sc around (18)
FO.
Outer Ear (Tan)
R1: MR 6 (6)
R2: inc x6 (12)
R3: (sc, inc) x6 (18)
R4: (2 sc, inc) x6 (24)
R5: sc around (24)
FO.
Assemble ears
- Lay the cream piece on top of tan piece.
- Sew around the edge to join.
- Lightly fold the base of ear to cup it.
Attach ears
Sew high on the head, angled outward like the photo (wide “fawn” ears).
🧍 Body (Tan) — chubby seated shape
R1: MR 6 (6)
R2: inc x6 (12)
R3: (sc, inc) x6 (18)
R4: (2 sc, inc) x6 (24)
R5: (3 sc, inc) x6 (30)
R6: (4 sc, inc) x6 (36)
R7: (5 sc, inc) x6 (42)
R8–R14: sc around (42)
R15: (5 sc, dec) x6 (36)
R16: (4 sc, dec) x6 (30)
R17: (3 sc, dec) x6 (24)
R18–R20: sc around (24)
Stuff firmly, keeping the belly rounded.
R21: (2 sc, dec) x6 (18)
R22: (sc, dec) x6 (12)
R23: dec x6 (6)
FO, close.
🤍 Belly Patch (Cream) — tall oval (front chest to belly)
R1: MR 6 (6)
R2: inc x6 (12)
R3: (sc, inc) x6 (18)
R4: (2 sc, inc) x6 (24)
R5–R8: sc around (24)
R9: (2 sc, dec) x6 (18)
R10: sc around (18)
FO, flatten.
Sew centered on the body front, running up toward the neck.
🦵 Front Legs (Tan) — make 2 (longer, slim)
R1: MR 6 (6)
R2: (sc, inc) x3 (9)
R3–R8: sc around (9)
Switch to Cream (cuff):
R9–R10: sc around (9)
Switch to Taupe (hoof tip):
R11: sc around (9)
R12: (sc, dec) x3 (6)
Stuff lightly, flatten slightly at top.
FO, leave tail for sewing.
🐾 Back Legs (Tan) — make 2 (chunkier, seated)
R1: MR 6 (6)
R2: inc x6 (12)
R3: (sc, inc) x6 (18)
R4–R6: sc around (18)
Switch to Cream (cuff):
R7–R8: sc around (18)
Switch to Taupe (sole/tip look):
R9: sc around (18)
R10: (sc, dec) x6 (12)
R11: sc around (12)
Stuff firmly to keep a chunky shape.
FO, leave tail.
Tip: When sewing, angle them so the fawn sits like the photo — legs forward with the hooves facing slightly outward.
🧡 Hoof “Soles” Detail (Optional)
If you want the visible “spiral bottom” look like the photo on the front-facing hooves:
- Make 2 small Taupe circles:
- MR 6
- inc x6 (12)
- (sc, inc) x6 (18)
FO and sew onto the bottom/front of each hoof.
🐰 Tail Puff (Cream)
R1: MR 6 (6)
R2: inc x6 (12)
R3: sc around (12)
R4: dec x6 (6)
Stuff lightly, FO, close.
Sew to back.
🤍 Back Spots (Cream) — make 7–9 (small raised ovals)
R1: MR 5 (5)
R2: inc x5 (10)
R3: sc around (10)
FO.
Sew in a cluster along the back like the photo (a line + a few offset).
🧷 Assembly (Pose matters!)
- Sew head to body (slightly forward so it looks “baby-ish”).
- Attach front legs low on the chest, angled forward.
- Attach back legs wide on the sides of the lower body to support the sit.
- Sew tail on the back.
- Sew spots along the back.
- Final shaping: squish the body slightly so it sits stable, and gently pinch the muzzle to keep it rounded.
🌿 Finishing Touches
- Add a tiny bit of blush to cheeks (optional).
- Make sure the eye-rings are centered and symmetrical — that’s the signature look.
- Lightly brush chenille fibers with your fingers to soften the shape without fuzzing the stitches.
💛 Outro
And that’s it — your baby fawn is ready for cozy shelves, nursery corners, and gift boxes that make people gasp in the best way. The oversized ears, big glossy eyes, and little cream spots give it that unmistakable “storybook” charm, while the seated pose keeps it looking calm and cuddly. If you make one, you’ll probably want a whole woodland family next. 🦌✨