Strut into style with this Amigurumi Fashion Doll crochet pattern! With her chic outfit, trendy accessories, and confident pose, this doll is a celebration of creativity and flair. Whether you’re crafting a mini runway star, a personalized gift, or a playful addition to your amigurumi collection, this pattern lets you stitch up a doll that’s as fashionable as she is fun. From head to toe, she’s designed to turn heads and spark smiles—perfect for anyone who loves a touch of handmade glamour. 🧶💃👜
Designed for detail and personality, this pattern invites you to mix bold colors, textured stitches, and stylish extras like a handbag, sunglasses, or even a tiny pair of heels. Customize her look with different hairstyles, outfits, or seasonal themes to match your own fashion vibe. Whether she’s perched on a shelf, tucked into a gift box, or starring in a crochet photo shoot, this Fashion Doll Amigurumi is a joyful and satisfying project—perfect for stitching up a little handmade couture, one loop at a time! 💖✨👗
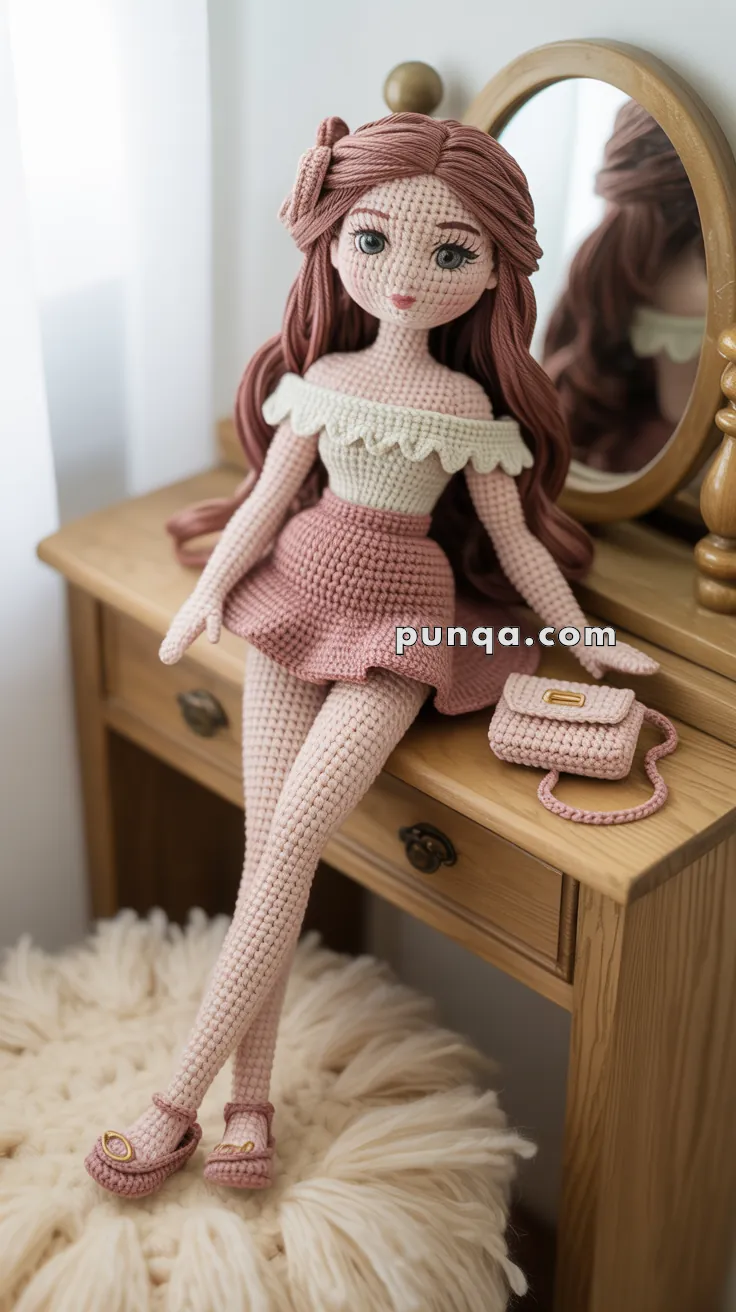
💃 Amigurumi Fashion Doll with Purse Crochet Pattern
Craft your own elegant amigurumi fashion doll! With long flowing hair, a stylish off-shoulder top, mini skirt, shoes with gold accents, and a matching handbag, this doll is a perfect showcase of handmade beauty. She’s ideal for display, dress-up, or thoughtful gifts.
✨ Skill Level
Advanced
(Fine shaping, limb proportion control, hair styling, facial embroidery, accessories)
📏 Finished Size
Approx. 30–33 cm (12–13 in) tall
(using DK cotton yarn and a 2.5 mm hook)
🧶 Materials
DK cotton yarn:
- Skin tone (pale peach / blush beige) – 90–110 g
- Hair (dusty rose / soft auburn) – 70–90 g
- Top (ivory / cream) – 25 g
- Skirt, shoes, purse (dusty rose) – 50–60 g
Notions & tools:
- Crochet hook: 2.5 mm
- Safety eyes: 6 mm
- Black embroidery floss (lashes, brows)
- Pink embroidery floss (lips, blush accents)
- Gold embroidery floss or thin metallic thread (shoe & purse detail)
- Polyester fiberfill
- Tapestry needle
- Stitch markers
- Optional: 1 mm jewelry wire for legs (recommended for seated pose)
- Small gold oval bead or embroidery for purse clasp
🧵 Abbreviations (US Terms)
MR – Magic Ring
sc – Single crochet
inc – Increase
dec – Decrease
sl st – Slip stitch
ch – Chain
BLO – Back loop only
FLO – Front loop only
🧍 Head (Skin Color)
The head is tall and oval, not round or chubby.
R1: MR 6 (6)
R2: inc ×6 (12)
R3: (sc, inc) ×6 (18)
R4: (2 sc, inc) ×6 (24)
R5: (3 sc, inc) ×6 (30)
R6: (4 sc, inc) ×6 (36)
R7–R15: sc around (36)
👉 Insert safety eyes between R9–10, 7–8 sts apart.
R16: (4 sc, dec) ×6 (30)
R17: (3 sc, dec) ×6 (24)
R18: (2 sc, dec) ×6 (18)
Stuff firmly but smoothly.
R19: (sc, dec) ×6 (12)
R20: dec ×6 (6)
FO and close.
💋 Facial Embroidery (As in Photo)
- Embroider long curved upper lashes extending outward
- Brows are thin, soft arches placed high
- Lips are small, closed, slightly heart-shaped
- Add minimal blush directly beneath eyes
👂 Ears (Make 2)
Small and subtle.
R1: MR 5
R2: sc around
FO, flatten slightly and sew between R10–11.
💇 Hair Cap (Dusty Rose)
Hair is smooth strands, side-parted, not curly.
R1: MR 6 (6)
R2: inc ×6 (12)
R3: (sc, inc) ×6 (18)
R4: (2 sc, inc) ×6 (24)
R5: (3 sc, inc) ×6 (30)
R6–R8: sc around (30)
FO and sew snugly to head.
💇 Hair Strands
Make 28–34 long strands.
Each strand:
ch 45–55, sl st in each chain
Attach densely along sides and back, leaving a clean center part.
Gently finger-comb and twist strands together.
🎀 Side Hair Bow
ch 12
sc across for 4 rows
Wrap center tightly and sew to hair near temple.
👗 Upper Torso (Skin → Top)
R1: MR 6 (6)
R2: inc ×6 (12)
R3–R6: sc around (12)
Switch to top color.
R7: BLO sc around (12)
R8–R11: sc around (12)
Stuff lightly.
R12: (sc, dec) ×4 (8)
FO, leave open, sew to head.
💪 Arms (Make 2)
Long and slim.
R1: MR 5
R2–R16: sc around (5)
Stuff lightly.
Hands remain simple (no fingers visible in photo).
Sew arms slightly angled back for relaxed pose.
🦵 Legs (Make 2 – Extra Long)
Legs are intentionally elongated.
R1: MR 6
R2: inc ×6 (12)
R3–R28: sc around (12)
Insert wire if using.
Stuff firmly but evenly.
FO, leave long tail.
👠 Shoes (Make 2)
Flat ballet-style shoes.
R1: MR 6
R2: inc ×6 (12)
R3–R4: sc around (12)
ch 7, sl st across front to form strap.
Embroider small gold oval on strap.
Sew directly to feet.
👚 Off-Shoulder Ruffled Top
Attach cream yarn around neckline.
ch 2, skip 1, sc around
In each ch-space: 2 dc
Creates soft scalloped ruffle.
FO.
👗 Skirt (Dusty Rose)
Fitted waist, soft flare.
ch 28, sl st to form ring
R1: sc around (28)
R2: (3 sc, inc) ×7 (35)
R3: sc around
R4: (4 sc, inc) ×7 (42)
R5–R8: sc around (42)
FO and sew to waist.
👜 Purse
Small and structured.
ch 11
sc across for 8 rows
Fold, sew sides.
Flap: ch 6, sc back.
Strap: ch 45, sl st back.
Sew to sides.
Add gold oval clasp front center.
✂️ Final Assembly & Pose
- Sew legs angled slightly forward
- Seat doll on edge (legs naturally extend)
- Lightly bend legs if wire is used
- Arrange hair over shoulders
- Place purse in hand or beside doll
This graceful amigurumi fashion doll is a wonderful showcase piece for any collection.💄👜👠


Me encantó el tuturial, muy bien explicado gracias 🙂