Creating an amigurumi donut keychain is such a delightful and satisfying journey! There’s something truly charming about turning a simple skein of yarn into an adorable little treat that you can carry everywhere. 🌈✨ The appeal lies in the vibrant colors and the miniature, huggable form, transforming an everyday item like a donut into a playful, tactile piece of art. The process of creating these little wonders is as comforting as the end product itself. It’s like crafting a piece of happiness, stitch by stitch, with each loop of yarn adding to the overall cuteness.
The process of creating an amigurumi donut keychain is relatively straightforward, making it perfect for both beginners and seasoned crafters alike. 🧶🎉 Starting with a simple magic ring, I gradually build up the donut shape by alternating between increases and decreases in my stitches. The joy truly comes alive when I get to choose from an array of colorful yarns for the icing and sprinkles, adding personality and flair to each piece. Attaching the keychain hardware at the end is the cherry on top, transforming this cute handmade treasure into a functional accessory that’s ready to accompany me wherever I go. 🎈❤️
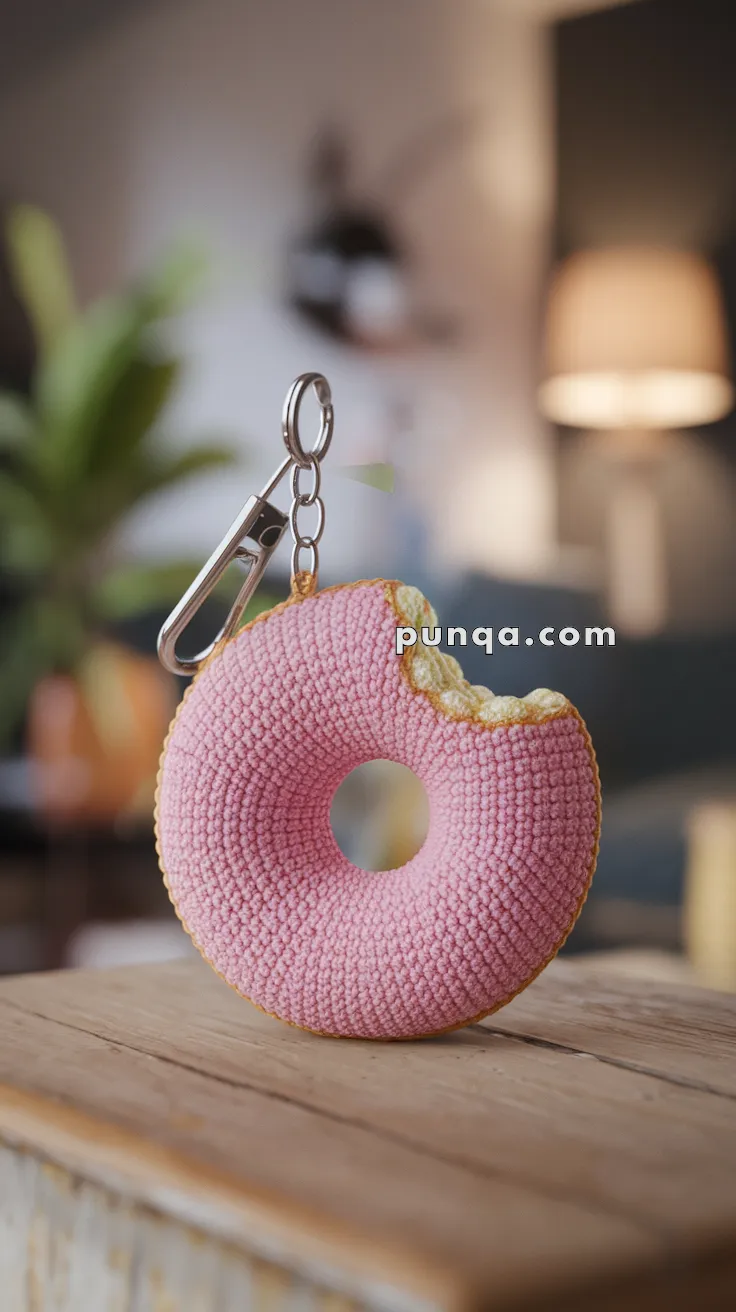
🍩 Amigurumi Donut Keychain – Free Crochet Pattern
(With Frosting & Bite Mark Detail)
✨ Skill Level
Beginner
📏 Finished Size
Approx. 7–9 cm (2.75–3.5 in) diameter using sport weight yarn and a 2.5 mm hook
✂️ Materials
-
Sport or DK weight yarn in:
-
Pink (frosting)
-
Yellow or beige (donut base)
-
White/cream (bite detail)
-
-
2.5 mm crochet hook
-
Fiberfill stuffing
-
Keyring + lobster clasp
-
Yarn needle
-
Stitch marker
-
Scissors
🧵 Abbreviations (US Terms)
-
MR – Magic Ring
-
sc – Single Crochet
-
inc – Increase (2 sc in same st)
-
dec – Decrease (sc2tog)
-
BLO – Back Loop Only
-
sl st – Slip Stitch
-
FO – Fasten Off
🍩 Donut Body (Make 2)
Start with yellow (base):
-
MR, 6 sc
-
inc x6 (12)
-
(sc, inc) x6 (18)
-
(2 sc, inc) x6 (24)
-
(3 sc, inc) x6 (30)
-
(4 sc, inc) x6 (36)
-
(5 sc, inc) x6 (42)
-
(6 sc, inc) x6 (48)
-
(7 sc, inc) x6 (54)
-
sc around (54)
FO first panel. Repeat to make second, do NOT fasten off second panel.
🍓 Frosting (On 1 Panel Only)
Switch to pink yarn:
-
Join pink yarn to FLO of Round 10.
-
sc around (54), then add a wavy/uneven edge by doing (sl st, 2 sc, inc, sc, dec, sc, 2 sc) and repeating loosely around.
Optional: Use white yarn to embroider a small bite detail by working curved stitches into the side (like your image).
🍴 Assembly
-
Place both donut panels back to back.
-
Continue working through both panels in yellow (54 sc total), stuffing as you go.
-
Once nearly joined, insert fiberfill to desired thickness.
-
Continue to sc closed. FO and weave in.
🔗 Attach Keychain
-
Sew a loop or use a metal jump ring at the top.
-
Insert a lobster clasp and keyring.
✅ Extra Tips:
-
You can lightly embroider sprinkle specks with colored thread for extra detail.
-
Use velvety yarn for a fluffier finish!