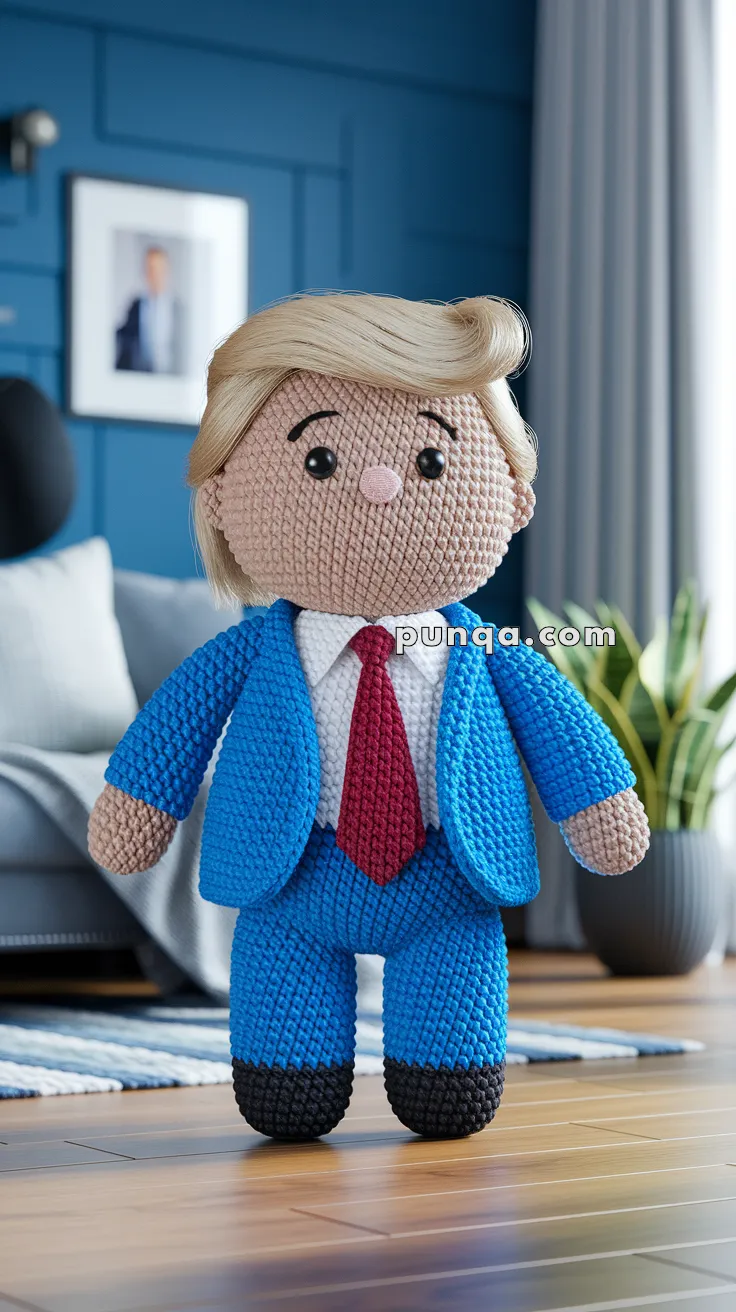
Add a bold twist to your crochet collection with the Amigurumi Donald Trump, a playful and expressive project that’s full of personality! 🧶🇺🇸 Dressed in a classic blue suit, crisp white shirt, and signature red tie, this tiny figure captures a recognizable look with a touch of handmade charm. The iconic blond swooped hairstyle and confident stance make it a standout piece—perfect as a quirky desk buddy, conversation starter, or collector’s keepsake.
Ideal for crocheters who enjoy character-inspired designs and detailed accessories, this pattern invites you to have fun with color, texture, and expression. Whether you’re crafting for novelty, gifting to a political enthusiast, or simply adding variety to your amigurumi lineup, the Amigurumi Donald Trump brings a unique flair to your stitches—one loop at a time! 🧵🎯
🧶 Amigurumi Donald Trump-Inspired Doll Crochet Pattern
Bring a touch of humor and charm to your crochet collection with this Donald Trump-inspired amigurumi doll! Dressed in his signature blue suit, crisp white shirt, bold red tie, and iconic blond swooped hairstyle, this project captures the recognizable look of a confident businessman in miniature crochet form.
This detailed pattern guides you through each step — from shaping the head and styling the hair to assembling the tailored suit — resulting in a characterful, expressive doll perfect for gifting, displaying, or simply sparking conversation! 💼✨
✨ Skill Level
Intermediate – involves shaping, color changes, assembling clothing, and layered yarn styling for hair.
📏 Finished Size
Approx. 23–25 cm (9–10 in) tall using DK yarn and a 2.75–3 mm crochet hook.
🧶 Materials & Yarn Amounts
- Beige / Light Peach (Skin) – 30 g
- Blue (Suit) – 60 g
- White (Shirt) – 20 g
- Red (Tie) – 10 g
- Black (Shoes) – 15 g
- Blond (Hair) – 40 g
- Polyester Stuffing – 70–80 g
- Safety Eyes (10–12 mm) – 1 pair
- Embroidery Thread (Black & Pink) – for brows, mouth, and nose
- Crochet Hook – 2.75–3.0 mm
- Tapestry Needle, Scissors, Stitch Markers
- Optional: Fabric glue or hair wax for shaping the swoop
🔤 Abbreviations (US Terms)
MR – Magic Ring
sc – Single Crochet
inc – Increase (2 sc in same stitch)
dec – Decrease (sc2tog)
ch – Chain
sl st – Slip Stitch
FLO – Front Loop Only
BLO – Back Loop Only
FO – Fasten Off
👤 Head (Skin Color)
Round 1: MR, 6 sc [6]
Round 2: (inc) ×6 [12]
Round 3: (sc, inc) ×6 [18]
Round 4: (2 sc, inc) ×6 [24]
Round 5: (3 sc, inc) ×6 [30]
Round 6: (4 sc, inc) ×6 [36]
Rounds 7–14: sc around [36]
Round 15: (4 sc, dec) ×6 [30]
Round 16: (3 sc, dec) ×6 [24]
Round 17: (2 sc, dec) ×6 [18]
Round 18: (sc, dec) ×6 [12]
Round 19: dec ×6 [6], FO.
Insert 10–12 mm safety eyes between rounds 10–11, spaced 8 stitches apart.
Embroider thin upward-slanted eyebrows and a small pink smile.
Add nose: MR, 5 sc, FO, and sew between eyes.
Stuff the head firmly and evenly.
💇 Hair (Blond)
Hair Cap
Round 1: MR, 6 sc [6]
Round 2: (inc) ×6 [12]
Round 3: (sc, inc) ×6 [18]
Round 4: (2 sc, inc) ×6 [24]
Round 5: (3 sc, inc) ×6 [30]
Round 6: (4 sc, inc) ×6 [36]
Rounds 7–9: sc around [36], FO.
Sew the cap to the head, positioning the front edge just above the eyebrows.
Hair Strands – Layered & Side-Swept
- Cut 50–60 strands of blond yarn, each about 18–20 cm long.
- Starting from the back of the head, use the latch-hook method to attach strands in horizontal rows.
- Work 4–5 rows across the back and 2–3 angled rows on the crown, slanting toward the right side for a natural part.
- Brush the strands gently forward and to the right to create the side swoop.
- Trim slightly shorter on the right side, keeping the front longer for the forehead sweep.
- Use small hidden stitches or a dab of fabric glue under the swoop to secure it.
💡 Optional: Steam gently (20–25 cm away) to help the hair fall naturally — never press or iron directly.
👔 Body (Shirt and Suit Base)
Shirt (White)
Round 1: MR, 6 sc [6]
Round 2: (inc) ×6 [12]
Round 3: (sc, inc) ×6 [18]
Round 4: (2 sc, inc) ×6 [24]
Round 5: (3 sc, inc) ×6 [30]
Rounds 6–8: sc around [30]
Suit (Blue)
Switch to blue yarn.
Rounds 9–23: sc around [30]
Round 24: (3 sc, dec) ×6 [24]
Round 25: (2 sc, dec) ×6 [18]
Round 26: (sc, dec) ×6 [12]
FO, stuff body firmly.
🦵 Legs (Make 2)
Shoes (Black)
Round 1: MR, 6 sc [6]
Round 2: (inc) ×6 [12]
Round 3: (sc, inc) ×6 [18]
Rounds 4–5: sc around [18]
Pants (Blue)
Switch to blue yarn.
Rounds 6–10: sc around [18]
FO first leg. Do not cut yarn after finishing the second leg.
Join Legs
Ch 3, join to first leg, and continue working around both legs and the chain [42].
Rounds 2–5: sc around [42], FO, stuff firmly.
Sew legs to the lower body evenly.
💪 Arms (Make 2)
Hands (Skin)
Round 1: MR, 6 sc [6]
Round 2: (inc) ×6 [12]
Rounds 3–4: sc around [12]
Sleeves (Blue)
Switch to blue yarn.
Rounds 5–9: sc around [12]
Round 10: (sc, dec) ×4 [8], FO.
Stuff lightly and sew to body just below the neck.
🧥 Jacket Panels (Blue)
Front Panels (Make 2)
Row 1: ch 12, sc in 2nd ch and across [11]
Rows 2–5: ch 1, turn, sc across [11]
Row 6: ch 1, turn, dec 1, sc across [10], FO.
Back Panel
Row 1: ch 18, sc in 2nd ch and across [17]
Rows 2–5: ch 1, turn, sc across [17], FO.
Sew jacket panels around the body, leaving front slightly open.
Optional: Cut small blue felt triangles for lapels and glue or stitch at the neckline.
👔 Red Tie
Row 1: ch 10, sc in 2nd ch and across [9]
Row 2: ch 1, turn, sc across [9]
Row 3: ch 1, turn, dec 1, sc across [8]
Row 4: ch 1, turn, sc across [8]
Row 5: ch 1, turn, dec 1, sc across [7]
FO, leaving a long tail.
Wrap around neck and sew flat beneath the jacket.
The tie tip should reach the top of the belly.
👞 Shoe Soles (Optional)
To add structure:
Ch 6 with black yarn.
Round 1: sc in 2nd ch, sc ×3, 3 sc in last st, continue on opposite side, sc ×3, 2 sc in last st [12].
Round 2: sc around [12], FO.
Sew beneath each foot.
🪡 Assembly
- Sew head securely to the body.
- Attach arms at shoulder level.
- Sew jacket panels around shoulders and sides.
- Stitch the tie flat over the shirt.
- Brush and style hair one final time — sweeping from left to right with a smooth curve.
- Add finishing embroidery (eyebrows, smile, etc.).
💇 Realistic Hair Styling Tutorial
Want that soft, realistic blond swoop just like the photo? Follow these steps to give your doll a perfectly styled, lifelike hairstyle 👇
🧶 Step 1: Choose the Right Yarn
Use soft acrylic DK yarn (e.g., Paintbox Simply DK, Caron Simply Soft, Stylecraft Special DK).
Pick a golden or wheat blond shade.
For depth, mix in 10–20% lighter cream strands for a highlighted effect.
💡 Avoid fuzzy or matte yarns — a soft sheen makes the hair look natural.
✂️ Step 2: Prepare the Strands
- Cut 50–60 strands, each 18–20 cm (7–8 in) long.
- Separate the plies (usually 3 or 4).
- Brush gently with a pet slicker brush or fine comb until smooth and silky.
The brushed strands will look like real fine hair — slightly wavy and soft.
🪡 Step 3: Attach the Hair
Using the latch-hook method, attach strands to the crocheted hair cap:
- Insert hook under a stitch.
- Fold strand in half.
- Pull loop through the stitch.
- Pull loose ends through loop and tighten gently.
Attach in 4–5 neat horizontal rows from the back toward the crown.
Then add 2–3 angled rows near the front, slanting toward the right side for the swoop.
💨 Step 4: Shape the Signature Swoop
- Brush strands forward and slightly to the right.
- Comb gently into a smooth side wave.
- Trim evenly, keeping the front a bit longer.
- Use hidden stitches or a touch of clear fabric glue to hold the shape.
💡 Optional: Steam lightly from a distance (never touch with iron) to set the swoop permanently.
🌟 Step 5: Add Volume (Optional)
Blend a few strands of soft, fuzzy yarn such as Red Heart Hygge or YarnArt Dolce Baby at the back of the crown for subtle lift and fullness.
✅ Step 6: Final Finish
Run your fingers through the hair to blend layers, then trim lightly to even it out.
You’ll end up with a clean, right-swept blond hairstyle that perfectly completes your Donald Trump-inspired amigurumi doll.
🎉 Finishing Touches
Congratulations — your confident little businessman is complete! 👔
With his sharp blue suit, bold red tie, and golden swept hair, this handmade doll is full of charm and personality.
Display him proudly, gift him for a laugh, or keep him as a conversation piece that shows off your crochet skill and creativity. 🧶💼✨