Add a dash of woodland charm to your everyday accessories with the Amigurumi Deer Keychain, a tiny crochet treasure that’s as sweet as it is portable! 🦌🧶 With its gentle eyes, soft antlers, and cozy little body, this baby deer is perfect for clipping onto backpacks, purses, or gifting as a pocket-sized companion. Whether you’re crafting for a nature lover or just want a quick, heartwarming project, this keychain brings a touch of forest magic to your stitches.
Perfect for crocheters who enjoy small, detailed makes, this pattern offers plenty of room for creative flair. Play with yarn colors to create your own herd, add a festive scarf or flower crown, or stitch up a matching set for friends and family. Whether used as a zipper pull, ornament, or just a cheerful charm, the Deer Keychain is a delightful way to stitch up cuteness—one tiny loop at a time! 🌲✨
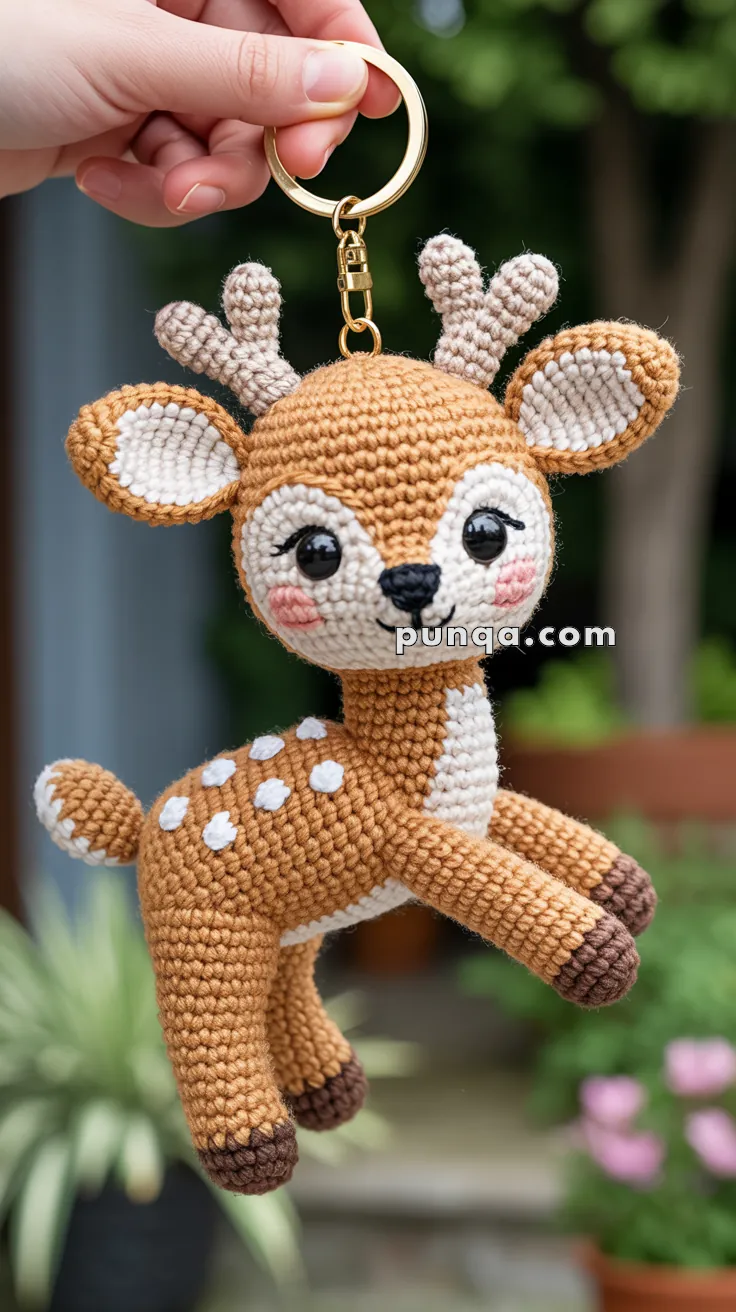
🦌 Amigurumi Deer Keychain Crochet Pattern
This sweet little deer keychain captures classic woodland charm in a tiny, lovable form. With big expressive eyes, delicate antlers, soft cream details, and carefully placed spots, this mini deer is designed to feel gentle and balanced from every angle. Its softly tapered body and two neat rows of back spots give it a polished, high-quality finish—perfect for keys, bags, or heartfelt handmade gifts.
✨ Skill Level
Intermediate – small parts, shaping, embroidery, and precise placement.
📏 Finished Size
Approx. 4–5 in (10–12 cm) tall (excluding keychain hardware), using DK yarn and a 2.5–3.0 mm hook.
🧶 Materials
Yarn (DK weight, cotton recommended):
- Light brown – head, body, ears, legs, tail (upper)
- Cream / white – face patch, belly patch, inner ears, tail underside, spots
- Dark brown – hooves
- Beige – antlers
- Pink – blush cheeks (or embroidery thread)
Notions & Tools:
- 2.5–3.0 mm crochet hook
- 12 mm safety eyes (black)
- Polyester fiberfill stuffing
- Yarn needle & embroidery needle
- Black embroidery thread or yarn (nose, mouth, lashes)
- Stitch marker, scissors
- Keyring + lobster clasp
🔤 Abbreviations (US Terms)
MR – Magic Ring
sc – single crochet
inc – increase (2 sc in one stitch)
dec – decrease (sc2tog)
sl st – slip stitch
ch – chain
FO – fasten off
🟤 Head (Light Brown)
R1: MR, 6 sc (6)
R2: inc ×6 (12)
R3: (sc, inc) ×6 (18)
R4: (2 sc, inc) ×6 (24)
R5: (3 sc, inc) ×6 (30)
R6–R14: sc around (30)
Insert safety eyes between R9–R10, spaced about 6 sts apart.
R15: (3 sc, dec) ×6 (24)
R16: (2 sc, dec) ×6 (18)
Stuff firmly.
R17: (sc, dec) ×6 (12)
R18: dec ×6 (6)
FO, close neatly.
🤍 Face Patch (Cream)
R1: MR, 6 sc (6)
R2: inc ×6 (12)
R3: (sc, inc) ×6 (18)
R4: (2 sc, inc) ×6 (24)
R5: sc around (24)
FO, leave a tail. Gently stretch into a soft oval and sew centered on the face, sitting just under the eyes.
👂 Ears (Make 2)
Outer Ear (Light Brown):
R1: MR, 6 sc (6)
R2: (sc, inc) ×3 (9)
R3–R5: sc around (9)
FO.
Inner Ear (Cream):
R1: MR, 6 sc (6)
R2: (sc, inc) ×3 (9)
FO.
Sew inner ear onto outer ear, flatten slightly, and attach ears to the sides of the head, angled gently outward.
🦌 Antlers (Make 2 – Beige)
Main Antler:
R1: MR, 6 sc (6)
R2–R5: sc around (6)
FO.
Branch (Make 2):
R1: MR, 4 sc (4)
R2–R3: sc around (4)
FO.
Sew one small branch to the side of each main antler. Attach antlers on top of the head, centered between the ears.
🟤 Body (Light Brown)
R1: MR, 6 sc (6)
R2: inc ×6 (12)
R3: (sc, inc) ×6 (18)
R4–R8: sc around (18)
R9: (2 sc, dec) ×4 (16)
R10: sc around (16)
R11: (sc, dec) ×4 (12)
Stuff firmly, keeping a rounded shape.
R12: dec ×6 (6)
FO, close and leave tail for sewing.
🤍 Belly Patch (Cream)
Ch 6
Sc 4, 3 sc in last st, rotate work
Sc 3, 2 sc in last st (12)
Next round:
inc, sc 3, inc ×3, sc 3, inc ×2 (18)
FO and sew vertically on the front of the body.
🦵 Legs (Make 4)
Start with Dark Brown (Hooves):
R1: MR, 6 sc (6)
R2: inc ×6 (12)
R3: sc around (12)
Switch to Light Brown:
R4–R8: sc around (12)
Stuff lightly. FO, leave tail.
Attach two legs as front legs angled slightly forward and two as back legs angled slightly backward.
🌀 Tail (Two-Tone)
R1: MR, 6 sc (6)
R2–R3: sc around (6)
Switch to Cream (underside):
R4: sc around (6)
FO. When sewing, position the cream stitches facing downward so the top of the tail remains light brown.
⚪ Back Spots (Cream – 7 Total)
Make 7 small circles:
MR, 5 sc (5)
FO, leave tail.
Placement:
- Upper row: 4 spots across the upper back
- Lower row: 3 spots directly beneath, centered between the top ones
Sew flat for a clean look.
😍 Facial Embroidery
- Nose: small black triangle at top of face patch
- Mouth: short curved line below nose
- Lashes: 2–3 upward stitches at outer corner of each eye
- Cheeks: pink embroidery or soft blush under eyes
🔗 Keychain Attachment
Create a sturdy yarn loop on top of the head between the antlers. Thread the keyring and lobster clasp through the loop and secure tightly.
🧷 Assembly Order
- Sew face patch to head
- Embroider face details
- Attach ears and antlers
- Sew head to body
- Attach belly patch
- Sew legs and tail
- Attach back spots
- Add keychain hardware
🌟 Final Touches
Gently shape with your fingers, check symmetry, and secure all ends tightly. This tiny deer is designed to be charming from every angle—sweet, balanced, and full of woodland personality.
Your amigurumi deer keychain is now ready to follow you on everyday adventures, bringing a little handmade magic wherever it goes 🦌✨


Gracias