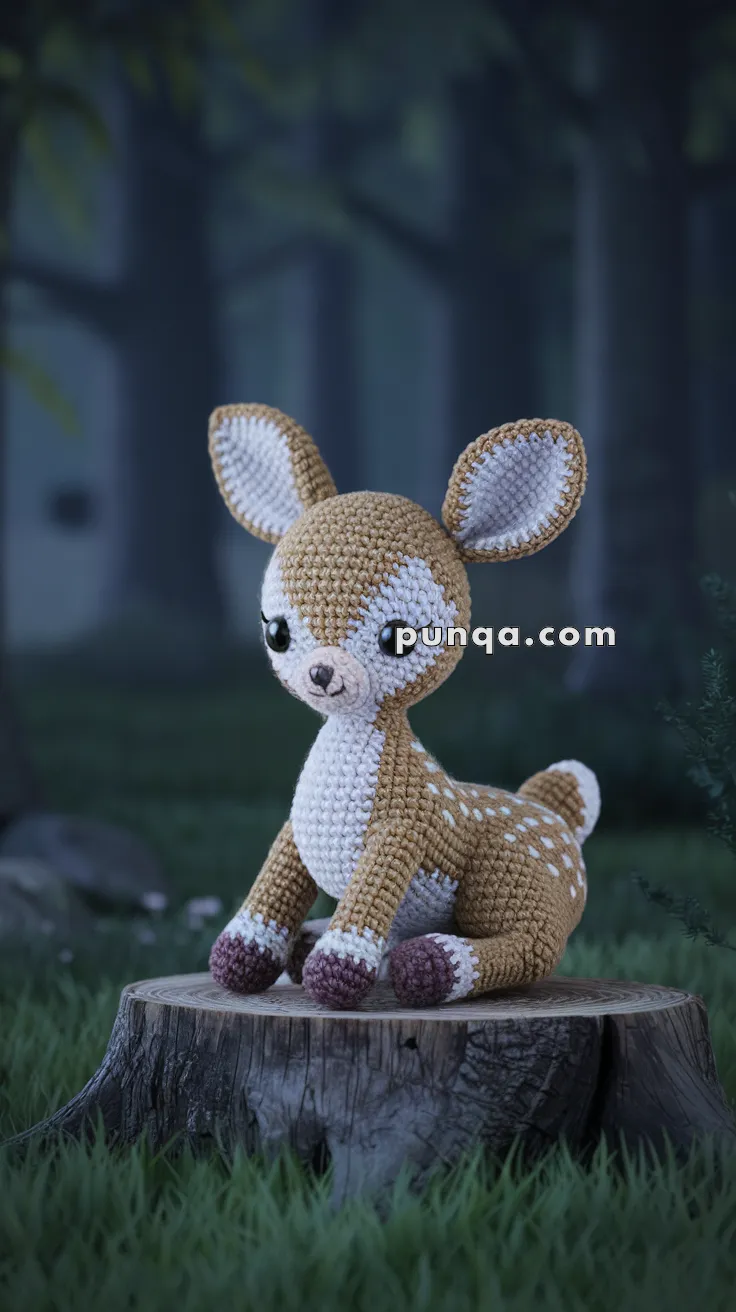
Bring a gentle touch of the forest to your crochet collection with the Amigurumi Deer Fawn, a sweet and serene project that’s full of woodland charm! 🦌🍃 With its soft expression, spotted back, and folded sitting legs, this little fawn is the perfect companion for nurseries, nature-themed gifts, or cozy seasonal décor. Whether nestled on a shelf or tucked into a handmade woodland scene, it’s sure to melt hearts wherever it goes.
Ideal for crocheters who love delicate details and peaceful vibes, this pattern invites you to explore soft shaping, earthy tones, and expressive features. Add a tiny flower crown, a scarf, or keep it classic and natural—there’s plenty of room to personalize your forest friend. The Amigurumi Deer Fawn is a lovely way to stitch up warmth, whimsy, and a sprinkle of handmade magic—one loop at a time! 🧵🌿
🦌 Amigurumi Deer Fawn Crochet Pattern
Bring the gentle magic of the forest into your home with this delicate crochet fawn. With its soft expression, spotted back, and folded sitting legs, it’s the perfect woodland friend for nurseries, gifts, or seasonal décor.
✨ Skill Level
Intermediate to Advanced – shaping, color changes, and limb positioning included.
📏 Finished Size
Approx. 9–10 inches (23–25 cm) tall when made with DK or worsted yarn and a 2.5–3.5 mm hook.
🧶 Materials
- Light Brown – body, head, legs
- White – chest, belly patch, ear inners, tail tip, back spots, eye patches
- Dark Brown / Burgundy – hooves
- Beige / Light Pink – snout base
- Black – embroidered nose, mouth, lashes
Other Supplies:
- 10–12 mm safety eyes
- Crochet hook: 2.5–3.5 mm
- Polyfill stuffing
- Tapestry needle & stitch markers
- Scissors
🧵 Abbreviations (US Terms)
- MR = Magic Ring
- sc = Single crochet
- inc = Increase
- dec = Decrease
- ch = Chain
- sl st = Slip stitch
- FO = Fasten off
- BLO = Back loop only
🧠 Head (Start White → Light Brown)
- MR, 6 sc (6)
- inc x6 → 12
- (1 sc, inc) x6 → 18
- (2 sc, inc) x6 → 24
- Switch to light brown: (3 sc, inc) x6 → 30
6–12. sc around (30)
👉 Place safety eyes between R9–10, ~8 sts apart. Add white felt/patches around eyes if desired. - (3 sc, dec) x6 → 24
- (2 sc, dec) x6 → 18
👉 Stuff firmly. - (1 sc, dec) x6 → 12
- dec x6 → 6, FO and close.
🐽 Snout (Beige/Pink)
- MR, 6 sc (6)
- inc x6 → 12
- (1 sc, inc) x6 → 18
- (2 sc, inc) x6 → 24
5–6. sc around (24) - (2 sc, dec) x6 → 18
- sc (18), FO.
👉 Lightly stuff. Sew below eyes so it protrudes outward. Embroider a small black oval nose and mouth line.
👂 Ears (Make 2 – Light Brown Outer, White Inner)
Outer (Brown):
- MR, 6 sc (6)
- (1 sc, inc) x3 → 9
3–5. sc (9), FO.
Inner (White):
Repeat as above but stop after Round 2 (smaller oval).
👉 Sew inner to outer, fold slightly, and attach to head sides.
🧍 Body (Light Brown with White Belly Patch)
- MR, 6 sc (6)
- inc x6 → 12
- (1 sc, inc) x6 → 18
- (2 sc, inc) x6 → 24
- (3 sc, inc) x6 → 30
6–10. sc around (30)
👉 On front center, add a white belly patch with surface slip stitch or embroidery. - (3 sc, dec) x6 → 24
- (2 sc, dec) x6 → 18
👉 Stuff firmly. - (1 sc, dec) x6 → 12
- dec x6 → 6, FO and close.
🦵 Front Legs (Make 2 – Slim with Hooves)
Hooves (Dark Brown):
- MR, 6 sc (6)
- inc x6 → 12
3–4. sc (12)
Switch to Light Brown:
5. (3 sc, inc) x3 → 15
6–12. sc (15)
13. (3 sc, dec) x3 → 12
14–20. sc (12), FO.
👉 Stuff lightly. Attach upright at chest for slim, elegant legs.
🦵 Back Legs (Make 2 – Folded Sitting Shape)
Hooves (Dark Brown):
- MR, 6 sc (6)
- inc x6 → 12
3–4. sc (12)
Switch to Light Brown:
5. (3 sc, inc) x3 → 15
6–10. sc (15)
11. (3 sc, dec) x3 → 12
12–16. sc (12)
17. Flatten slightly, sc across to close. FO.
👉 Sew bent backwards along body sides for curled sitting posture.
🦌 Tail (Light Brown → White Tip)
- MR, 6 sc (6)
- sc (6)
- Switch to white, sc (6)
- FO, flatten, and sew to back.
⚪ Back Spots
With white yarn, embroider or surface-stitch 8–10 small spots across the back and haunches for a realistic fawn look.
✂️ Final Assembly
- Attach head to body at a slight downward angle.
- Sew on front legs upright and slim.
- Attach back legs bent and folded under.
- Add ears, snout, and tail.
- Embroider lashes and smile line.
🌿 Optional Add-ons
- Add a crocheted flower crown or scarf.
- Use fluffy yarn for chest/tail for texture.
- Place on a crocheted grass mat or blanket.
🎀 Finished Look
Your woodland fawn is ready! With its elegant legs, soft spots, and gentle gaze, this little deer will be a timeless handmade treasure. 🦌✨