Celebrate tradition, artistry, and vibrant storytelling with this stunning Amigurumi Day of the Dead Doll Duo crochet pattern! 💀🌸 Inspired by the rich cultural heritage of Día de los Muertos, these dolls are adorned with intricate details—from floral crowns and embroidered smiles to colorful outfits that honor the beauty of remembrance. Whether you’re crafting for a seasonal display, a cultural celebration, or simply love expressive designs, these dolls bring heart and history to every stitch.
With endless opportunities for personalization, you can mix bold colors, add tiny accessories like candles or marigolds, and even create a whole family of festive figures. Their elegant skeleton-inspired features and joyful expressions make them perfect for honoring loved ones or adding a handmade touch to your altar. Whether gifted, displayed, or cherished as part of your crochet collection, these Day of the Dead Amigurumi Dolls are a meaningful and satisfying project—perfect for stitching up a little love, one loop at a time! 🧶🕯️🎉

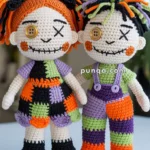
Colorful Day of the Dead Crochet Dolls 💀🌺
Celebrate Día de los Muertos with these adorable crochet sugar skull dolls! These vibrant companions feature traditional calavera face designs with embroidered details, flower crowns, and colorful outfits. Perfect for honoring loved ones or adding festive decor to your home! 🕯️✨
Skill Level: Intermediate 🧶
Finished Size: Approximately 9-10 inches tall
Materials:
🧵 Yarn: Worsted weight (4) acrylic yarn
- White: 120g
- Black: 100g
- Turquoise/Teal: 70g
- Hot Pink/Magenta: 60g
- Yellow/Gold: 60g
- Orange: 50g
- Purple/Lavender: 60g
- Blue: 40g
- Light Pink: 30g
- Green: 20g (for embroidery)
- Small amounts of brown for embroidery
🪡 Other Supplies:
- 3.5mm (E) crochet hook
- 15mm black safety eyes
- Embroidery needle and floss (pink, hot pink, teal, turquoise, orange, black, green)
- Fiberfill stuffing
- Yarn needle
- Stitch markers
- Scissors
HEAD 💀
Using White Yarn:
Round 1: 6 sc in magic ring (6)
Round 2: inc in each st around (12)
Round 3: sc, inc repeat around (18)
Round 4: 2 sc, inc repeat around (24)
Round 5: 3 sc, inc repeat around (30)
Round 6: 4 sc, inc repeat around (36)
Round 7: 5 sc, inc repeat around (42)
Round 8: 6 sc, inc repeat around (48)
Round 9: 7 sc, inc repeat around (54)
Round 10-18: sc in each st around (54) – work 9 rounds even
Round 19: 7 sc, dec repeat around (48)
Round 20: sc in each st around (48)
Round 21: 6 sc, dec repeat around (42)
Round 22: sc in each st around (42)
Round 23: 5 sc, dec repeat around (36)
Insert safety eyes between rounds 14-15, about 10 stitches apart. Begin stuffing head firmly.
Round 24: 4 sc, dec repeat around (30)
Round 25: 3 sc, dec repeat around (24)
Round 26: 2 sc, dec repeat around (18)
Round 27: sc, dec repeat around (12)
Stuff head very firmly to maintain round skull shape.
Round 28: dec around (6)
Fasten off, leaving long tail. Thread tail through remaining stitches and pull tight to close.
Embroider Face Details:
Using embroidery floss and yarn needle:
- Around left eye: Using teal/turquoise, create circular pattern with chain stitch or whip stitch in 2-3 rounds around eye
- Around right eye: Using hot pink, create circular pattern in 2-3 rounds around eye
- Between eyes at top: Add decorative details (girl doll gets pink heart, boy doll gets orange flower)
- Nose: Using black floss, embroider small inverted triangle or heart shape in center between eyes and mouth
- Mouth: Using black floss, create horizontal line across lower face with vertical lines for teeth (5-6 teeth)
- Additional swirls and decorative elements: Add green and teal curved lines and dots around face
- Flowers: Embroider small orange and yellow flowers near temples or cheeks
HAIR 💇♀️
Using Black Yarn:
For Long Pigtails/Braided Style:
Cut approximately 60 strands of black yarn, each 14-16 inches long
Starting at round 8 of head, attach strands using surface crochet or latch hook method:
Insert hook through stitch, fold yarn strand in half, pull loop through, then pull ends through loop to secure
Attach strands densely across back and sides of head from rounds 8-16
Part hair down center back
Divide hair into two equal sections
Braid each section tightly (3-strand braid)
Leave about 2 inches unbraided at ends for fullness
Secure braid ends with small piece of matching yarn tied tightly
FLOWER CROWN 🌸
Make 6-7 small flowers in various colors (purple, yellow, orange):
Small Flower (Make 3-4 in purple, 2-3 in yellow/gold, 1-2 in orange):
Using desired color:
Round 1: ch 2, 5 sc in 2nd ch from hook (5)
Round 2: ch 3, sl st in same st, sl st in next st repeat around to create 5 petals
Fasten off, leaving 8-inch tail for sewing
Weave in starting tail
Crown Base:
Using black yarn, ch 45 (adjust to fit snugly around head at rounds 6-8)
Row 1: sc in 2nd ch from hook and each ch across (44)
Row 2: ch 1, turn, sc in each st across (44)
Fasten off, leaving long tail for sewing
Sew flowers onto crown base, spacing evenly with colors alternating
Position crown on head and sew securely in place
BODY – GIRL DOLL 👗
Using Turquoise Yarn:
Round 1: 6 sc in magic ring (6)
Round 2: inc in each st around (12)
Round 3: sc, inc repeat around (18)
Round 4: 2 sc, inc repeat around (24)
Round 5: 3 sc, inc repeat around (30)
Round 6: 4 sc, inc repeat around (36)
Round 7-11: sc in each st around (36) – work 5 rounds even
Colorblock section on bodice:
Round 12: 12 sc in turquoise, join purple and work 12 sc, change back to turquoise and work 12 sc (36)
Round 13: continue color pattern from round 12 (36)
Start of skirt:
Round 14: working in back loops only, 5 sc, inc repeat around in turquoise (42)
Round 15: sc in each st around in turquoise (42)
Round 16: 6 sc, inc repeat around in turquoise (48)
Round 17: sc in each st around in turquoise (48)
Change to hot pink:
Round 18: sc in each st around (48)
Round 19: 7 sc, inc repeat around (54)
Change to yellow:
Round 20: sc in each st around (54)
Round 21: sc in each st around (54)
Change to light pink:
Round 22: sc in each st around (54)
Round 23: 7 sc, dec repeat around (48)
Fasten off, leaving long tail
Stuff body firmly
Embroider yellow heart detail on turquoise chest area using yarn and satin stitch
BODY – BOY DOLL 🎽
Using Yellow Yarn:
Round 1: 6 sc in magic ring (6)
Round 2: inc in each st around (12)
Round 3: sc, inc repeat around (18)
Round 4: 2 sc, inc repeat around (24)
Round 5: 3 sc, inc repeat around (30)
Round 6: 4 sc, inc repeat around (36)
Round 7-12: sc in each st around (36) – work 6 rounds even
Switch to Blue for overalls:
Round 13: working in back loops only, sc in each st around in blue (36)
Round 14-18: sc in each st around in blue (36) – work 5 rounds even
Round 19: 4 sc, dec repeat around (30)
Round 20: sc in each st around (30)
Fasten off, leaving long tail
Stuff body firmly
Overalls Straps (Make 2):
Using blue yarn, ch 20
Row 1: sc in 2nd ch from hook and each ch across (19)
Fasten off, leaving long tail
Sew one end of each strap to front of overalls at round 13, cross straps over shoulders, and sew other ends to back
Embroider yellow heart detail on blue overalls chest area using yarn and satin stitch
ARMS (Make 2) 💪
Using White Yarn:
Round 1: 6 sc in magic ring (6)
Round 2: inc in each st around (12)
Round 3: sc, inc repeat around (18)
Round 4: sc, dec repeat around (12)
Round 5-10: sc in each st around (12) – work 6 rounds even
Stuff hand and lower arm lightly
Change to body/clothing color (turquoise for girl, yellow for boy):
Round 11-18: sc in each st around (12) – work 8 rounds even
Stuff arm lightly, leaving top 2 rounds unstuffed for easier sewing
Flatten opening
Sc across opening to close (6 sc)
Fasten off, leaving 12-inch tail for sewing
Sew arms to sides of body at rounds 8-10, angled slightly downward
LEGS (Make 2) 🦵
Using White Yarn:
Round 1: 6 sc in magic ring (6)
Round 2: inc in each st around (12)
Round 3: sc, inc repeat around (18)
Round 4: 2 sc, inc repeat around (24)
Round 5: sc in each st around (24)
Round 6: 6 sc, 6 dec, 6 sc (18)
Round 7: 6 sc, 3 dec, 6 sc (15)
Round 8: 3 sc, dec repeat around (12)
Round 9-14: sc in each st around (12) – work 6 rounds even
Change to clothing color for girl doll (turquoise/purple/pink sections):
Round 15: sc in each st around in first color (12)
Round 16-17: sc in each st around, changing colors to match dress pattern (12)
Or for boy doll (blue):
Round 15-17: sc in each st around in blue (12)
Round 18-20: sc in each st around (12)
Stuff legs firmly
Fasten off, leaving long tail for sewing
Sew legs to bottom front of body, positioned to allow doll to sit
DECORATIVE BASE/ALTAR MAT 🎨
Using Multiple Colors in Rainbow Pattern:
Using turquoise yarn, ch 65
Row 1: sc in 2nd ch from hook and each ch across (64), change to hot pink in last st, ch 1, turn
Row 2: sc in each st across (64), change to orange in last st, ch 1, turn
Row 3: sc in each st across (64), change to yellow in last st, ch 1, turn
Row 4: sc in each st across (64), change to light pink in last st, ch 1, turn
Row 5: sc in each st across (64), change to green in last st, ch 1, turn
Row 6: sc in each st across (64), change to turquoise in last st, ch 1, turn
Row 7: sc in each st across (64), change to purple in last st, ch 1, turn
Row 8: sc in each st across (64), change to blue in last st, ch 1, turn
Row 9: sc in each st across (64), change to orange in last st, ch 1, turn
Row 10: sc in each st across (64), change to hot pink in last st, ch 1, turn
Continue pattern for 18-20 rows total, creating vibrant rainbow stripes
Fasten off and weave in ends
Decorative Edging:
Make 12-16 small flowers in various colors using same flower pattern as crown
Sew flowers evenly spaced around all edges of mat
Add small orange/yellow circle centers to some flowers for variety
ASSEMBLY 🎉
- Attach head to body: Position head on body and sew securely around entire neck area using white yarn and whip stitch
- Attach arms: Sew arms to sides of body at rounds 8-10, angled slightly downward and forward
- Attach legs: Sew legs to bottom of body, positioning them to allow doll to sit upright
- Add all embroidered facial details according to pattern instructions above
- Create and attach hair according to hairstyle instructions
- Make and attach flower crown
- Review and add any final decorative embroidery details
Display Tips:
- Arrange dolls together on decorative mat
- Surround with candles, marigolds, and papel picado 🕯️
- Perfect for ofrenda displays
- Makes a meaningful handmade gift 💝
These precious sugar skull dolls capture the joyful spirit of Día de los Muertos! Each stitch is made with love and remembrance. 💀🌺✨